I was in the middle of a frantic Saturday night when my roommate dared me to create something that would make even the most seasoned pastry chef weep with envy. The kitchen was a battlefield of half‑finished cookies, a burnt batch of brownies, and a lingering scent of burnt sugar that threatened to ruin the entire evening. I grabbed the last vanilla bean from the pantry, stared at the empty cupcake liners, and thought, “If I can’t fix the disaster, I’ll turn it into a masterpiece.” That moment sparked the birth of what I now call the ultimate Vanilla Bean Crème Brûlée Cheesecake Cupcakes Delight!
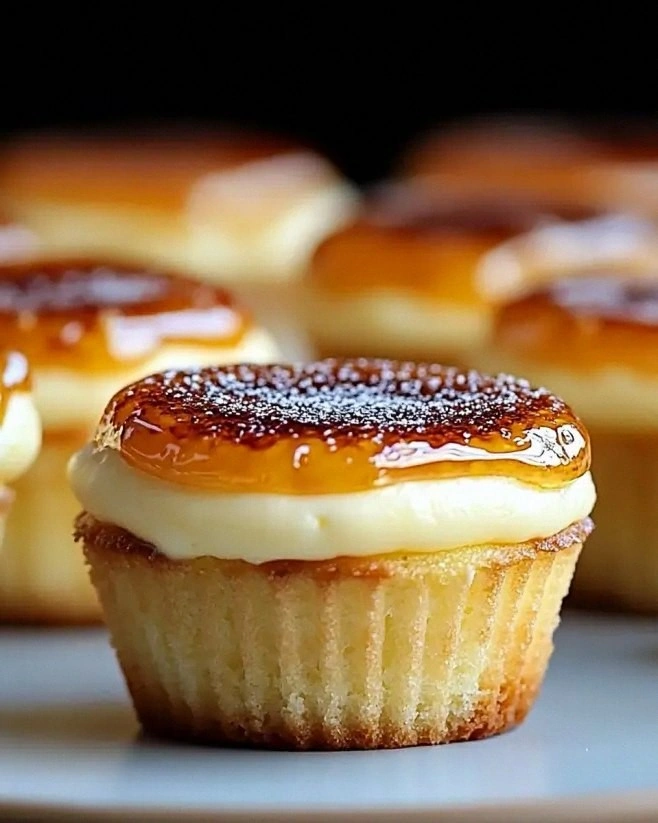
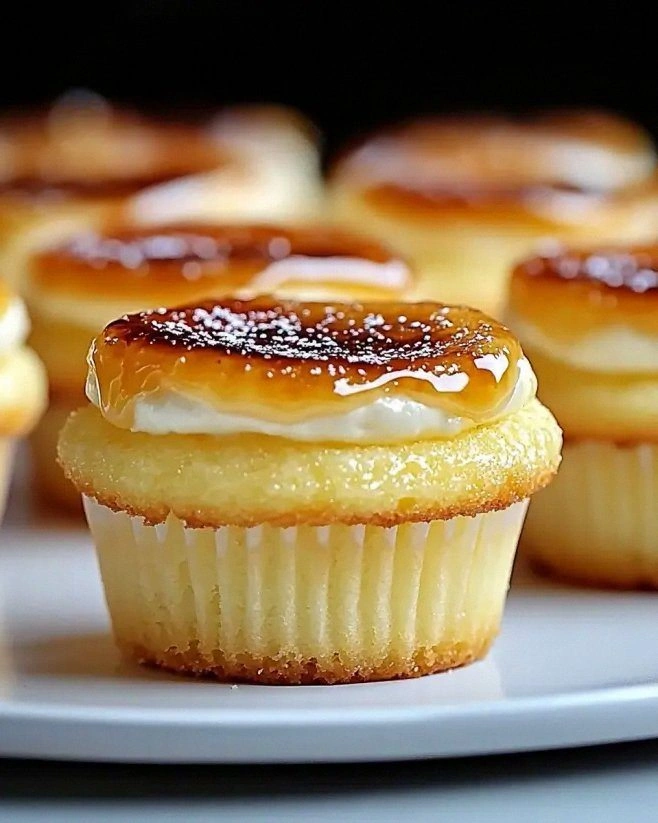
Imagine the moment you pull a tray of golden‑brown cupcakes out of the oven, the air instantly filling with the sweet perfume of vanilla and caramelized sugar. The tops crackle like a fresh sheet of ice on a winter pond, while the interiors hold a silky, tangy cheesecake that whispers of sour cream and heavy cream in every bite. You can hear the faint sigh of the oven door closing, feel the warm metal of the pan in your hands, and see the glossy brûlée crust glimmer like a tiny mirror. It’s a full‑sensory overload that makes you pause, stare, and then dive right in.
Most recipes I’ve tried either over‑sweeten the crust, under‑cook the filling, or completely miss that magical caramelized top that makes a crème brûlée so addictive. This version flips the script by marrying a classic graham cracker crust with a rich, velvety cheesecake that’s infused with both vanilla extract and vanilla bean paste for a depth of flavor that’s practically cinematic. The secret? A quick torch finish that creates that signature crackle without turning your cupcakes into a charcoal disaster. I’m telling you straight up: this is hands down the best version you’ll ever make at home.
And guess what? I’m about to spill the beans on a technique that most bakers overlook – the “water‑bath surprise” that keeps the center luxuriously smooth while the edges set just enough to hold the brûlée crown. I dare you to taste this and not go back for seconds. Let me walk you through every single step — by the end, you’ll wonder how you ever made it any other way.
What Makes This Version Stand Out
- Flavor Explosion: The combination of vanilla extract and vanilla bean paste creates a layered vanilla profile that’s richer than a vanilla latte on a rainy day.
- Texture Harmony: A buttery graham cracker crust gives a crunchy base that contrasts beautifully with the creamy, slightly tangy cheesecake interior.
- Brûlée Magic: A quick torch caramelizes the top sugar, delivering that iconic crackle without the need for a broiler that could over‑brown the edges.
- Simplicity Meets Sophistication: Only eleven ingredients, all pantry‑friendly, yet the result feels like it belongs in a five‑star patisserie.
- Crowd‑Pleaser Factor: Even the most skeptical sweet‑tooth skeptics admit they’ve never tasted anything this indulgent in cupcake form.
- Ingredient Quality: Using real vanilla bean paste and high‑fat cream cheese guarantees a buttery mouthfeel that cheap substitutes simply can’t match.
- Cooking Method: The water‑bath (bain‑marie) ensures gentle, even baking, preventing cracks and guaranteeing a silky crumb.
- Make‑Ahead Potential: These cupcakes keep their structure and flavor for up to three days in the fridge, making them perfect for parties.
Inside the Ingredient List
The Flavor Base
The duo of vanilla extract and vanilla bean paste is the heart‑beat of this cupcake. Vanilla extract gives a bright, aromatic punch, while the bean paste adds those speckled, fragrant seeds that look as good as they taste. If you skip the bean paste, you’ll lose the visual charm and the depth that makes each bite feel like a mini‑vacation to a French patisserie.
A quick tip: always choose a vanilla extract that lists “pure” on the label. I’ve tried imitation extracts and they taste flat, like a song without a chorus. For the bean paste, a spoonful of the dark, glossy stuff is enough – you don’t need a whole jar. If you’re out of bean paste, a pinch of vanilla bean seeds scraped from a fresh pod works wonders.
The Texture Crew
The graham cracker crumbs, butter, and sugar form a buttery, crumbly crust that’s the perfect foundation. The butter must be melted just enough to bind the crumbs without turning them into a soggy mess. I recommend using unsalted butter so you can control the salt level, especially if you plan to add a pinch of sea salt on top for contrast.
Cream cheese is the star of the filling; its high fat content gives that luxurious mouthfeel. Make sure it’s at room temperature before beating – cold cheese will leave lumps that ruin the smoothness. The heavy cream and sour cream add a subtle tang and lightness, preventing the cheesecake from feeling like a brick.
The Unexpected Star
The final sprinkle of granulated sugar on top is what transforms a regular cupcake into a crème brûlée wonder. When you torch it, the sugar caramelizes into a thin, glassy shell that crackles under your fork. This step is pure magic, but it’s also the trickiest – too much heat and you’ll end up with bitter ash; too little and the sugar won’t caramelize.
The Final Flourish
Eggs act as the binder that holds the cheesecake together while giving it a slight rise. Beating them in one at a time prevents the mixture from curdling, which is a common mishap that leads to a grainy texture. The extra 1/4 cup of granulated sugar sprinkled before torching ensures an even caramelization across each cupcake.
Everything’s prepped? Good. Let’s get into the real action…
The Method — Step by Step
Preheat your oven to 325°F (163°C) and line a 12‑cup muffin tin with paper liners. While the oven warms, melt the unsalted butter in a saucepan over low heat, then pour it over the graham cracker crumbs and 1/4 cup granulated sugar. Stir until the mixture looks like wet sand, then press it firmly into the bottom of each liner, creating a uniform crust about a quarter‑inch thick. Feel the crumb mixture between your fingertips – it should feel slightly gritty yet cohesive.
Now for the water‑bath setup: place the muffin tin on a larger baking sheet, then fill the sheet with hot water until it reaches halfway up the sides of the tin. This gentle heat environment is the secret that keeps the cheesecake filling from cracking, ensuring a silky texture that melts in your mouth.
In a large mixing bowl, beat the 16‑ounce cream cheese until smooth and creamy, about 2 minutes. Gradually add the 1 cup of granulated sugar while the mixer runs, watching the mixture turn glossy. Scrape down the sides to ensure everything is fully incorporated – you don’t want any white patches of cheese left behind.
Add the vanilla extract and vanilla bean paste, then mix until you see tiny specks of vanilla bean floating like confetti. This is the moment where the aroma really starts to fill the kitchen, and trust me, you’ll want to taste a spoonful right then.
One at a time, incorporate the three large eggs, beating just until each egg is fully blended before adding the next. Over‑mixing at this stage can cause the batter to become too airy, which defeats the purpose of a dense, custardy interior.
Stir in the 1/2 cup sour cream and 1/4 cup heavy cream, folding gently with a rubber spatula. The mixture should look thick yet pourable – if it looks too stiff, a splash of milk can loosen it without compromising the flavor.
Gently spoon the cheesecake batter over each crust, smoothing the tops with the back of a spoon. The batter should settle into a gentle dome, hugging the crust without spilling over the edges. This is the stage where you can see the future caramelized crown forming in your mind.
Slide the entire pan into the preheated oven and bake for 25‑30 minutes, or until the edges are set but the center still jiggles slightly when you shake the pan. The center should be just barely moving – that’s the sweet spot for a custard‑like interior.
Once baked, remove the cupcakes from the water bath and let them cool in the pan for 10 minutes. Then transfer the liners to a wire rack and refrigerate for at least 2 hours, preferably overnight. The cooling process firms up the filling, making the torching step easier.
When you’re ready to serve, use a kitchen torch to caramelize the sugar topping. Hold the flame about 2‑3 inches away and move it in a slow, circular motion until the sugar turns a deep amber and cracks with a satisfying snap. That sizzle when it hits the pan? Absolute perfection.
Allow the caramelized tops to set for a minute, then serve immediately. The contrast between the crisp brûlée crust and the creamy interior is what makes these cupcakes unforgettable. That first bite? It’s like a vanilla dream wrapped in a caramel hug.
That's it — you did it. But hold on, I've got a few more tricks that'll take this to another level…
Insider Tricks for Flawless Results
The Temperature Rule Nobody Follows
Never bake cheesecake at a scorching 400°F. The gentle 325°F bake prevents the dreaded cracks that turn a smooth custard into a cracked pancake. If your kitchen runs hot, lower the oven temperature by another 10‑15 degrees and add a few extra minutes to the bake time. I once tried a “quick bake” and ended up with a crust that looked like a burnt toast – lesson learned.
Why Your Nose Knows Best
When the cupcakes are done, the aroma will shift from buttery to a faint caramel scent. That subtle change is your cue that the edges have set and the center is still soft. Trust that nose; it’s more reliable than a timer that can vary by a few minutes.
The 5‑Minute Rest That Changes Everything
After you remove the cupcakes from the oven, let them sit in the pan for exactly five minutes before moving them to the rack. This short rest lets the steam redistribute, preventing the tops from sinking and keeping the brûlée sugar level even. Skipping this step can cause the sugar to slide off during torching, which is a mess I’ve endured more than once.
The Double‑Layer Crust Secret
If you love an extra crunch, press half of the crust mixture, bake for 5 minutes, then add the second half before pouring the filling. This creates a buttery “bottom” and a slightly toasted “top” that adds texture depth. A friend tried this once and claimed the cupcakes felt like a “textured symphony” in his mouth.
The Torch Technique You’ve Been Missing
Hold the torch steady, not too close, and move it continuously. Stagnant flame creates black spots; a moving flame creates an even caramel. If you don’t have a torch, a broiler set on low can work, but watch it like a hawk – the sugar can go from caramel to charcoal in seconds.
Creative Twists and Variations
This recipe is a playground. Here are some of my favorite ways to switch things up:
Salted Caramel Swirl
After pouring the cheesecake batter, swirl in a tablespoon of homemade salted caramel. The salty ribbons cut through the vanilla sweetness, creating a sophisticated flavor balance that impresses even the most discerning palate.
Coffee‑Infused Delight
Replace half of the vanilla extract with a shot of strong espresso. The coffee notes deepen the vanilla, giving the cupcakes a mocha‑like nuance that pairs beautifully with the caramelized top.
Berry Burst
Fold in a handful of fresh raspberries or blueberries into the batter before baking. The fruit releases a subtle tartness that brightens the dense cheesecake, and the berries add a pop of color that makes the cupcakes Instagram‑ready.
Chocolate Hazelnut Fusion
Add 2 tablespoons of Nutella to the filling and sprinkle chopped toasted hazelnuts on top before torching. The nutty chocolate undertones turn the vanilla base into a decadent duet.
Citrus Zest Kick
Incorporate the zest of one lemon or orange into the batter. The citrus lifts the richness, leaving a refreshing aftertaste that balances the sweet brûlée crust.
Storing and Bringing It Back to Life
Fridge Storage
Keep the cupcakes in an airtight container in the refrigerator for up to three days. The caramelized top will soften slightly, but you can re‑torch them for a quick refresh before serving.
Freezer Friendly
Wrap each cupcake individually in plastic wrap, then place them in a freezer‑safe bag. They’ll freeze beautifully for up to two months. When you’re ready to enjoy them, thaw overnight in the fridge, then give them a brief torch session to revive the crackle.
Best Reheating Method
To bring back that fresh‑baked feel, pop the cupcakes in a 300°F (150°C) oven for 5‑7 minutes. Add a tiny splash (about a teaspoon) of water to the bottom of the pan; the steam helps the interior stay moist while the exterior regains a gentle warmth.