I was standing in my kitchen, the timer on the oven flashing red like a traffic light, and I realized I had just burned a batch of ordinary chocolate chip cookies. The smoke curled up like a mischievous cat, and I swore I’d never bake again. Then, out of sheer desperation (and a half‑hearted dare from my roommate), I grabbed a pack of Oreos, tossed them into the batter, and hoped for a miracle. The moment those crushed cookies hit the dough, I felt a spark of excitement that made the whole kitchen feel like a chemistry lab on the verge of a breakthrough.
The first whiff that hit my nose was nothing short of intoxicating: warm butter, caramelized sugar, and a faint hint of cocoa that promised decadence. As the cookies baked, the edges began to turn a deep amber, crisping like a perfectly toasted marshmallow, while the centers stayed soft and chewy, a texture contrast that felt like biting into a cloud that had just been kissed by a chocolate storm. I could hear the faint sizzle of the cookies spreading their sweet perfume, and my mouth watered in anticipation.
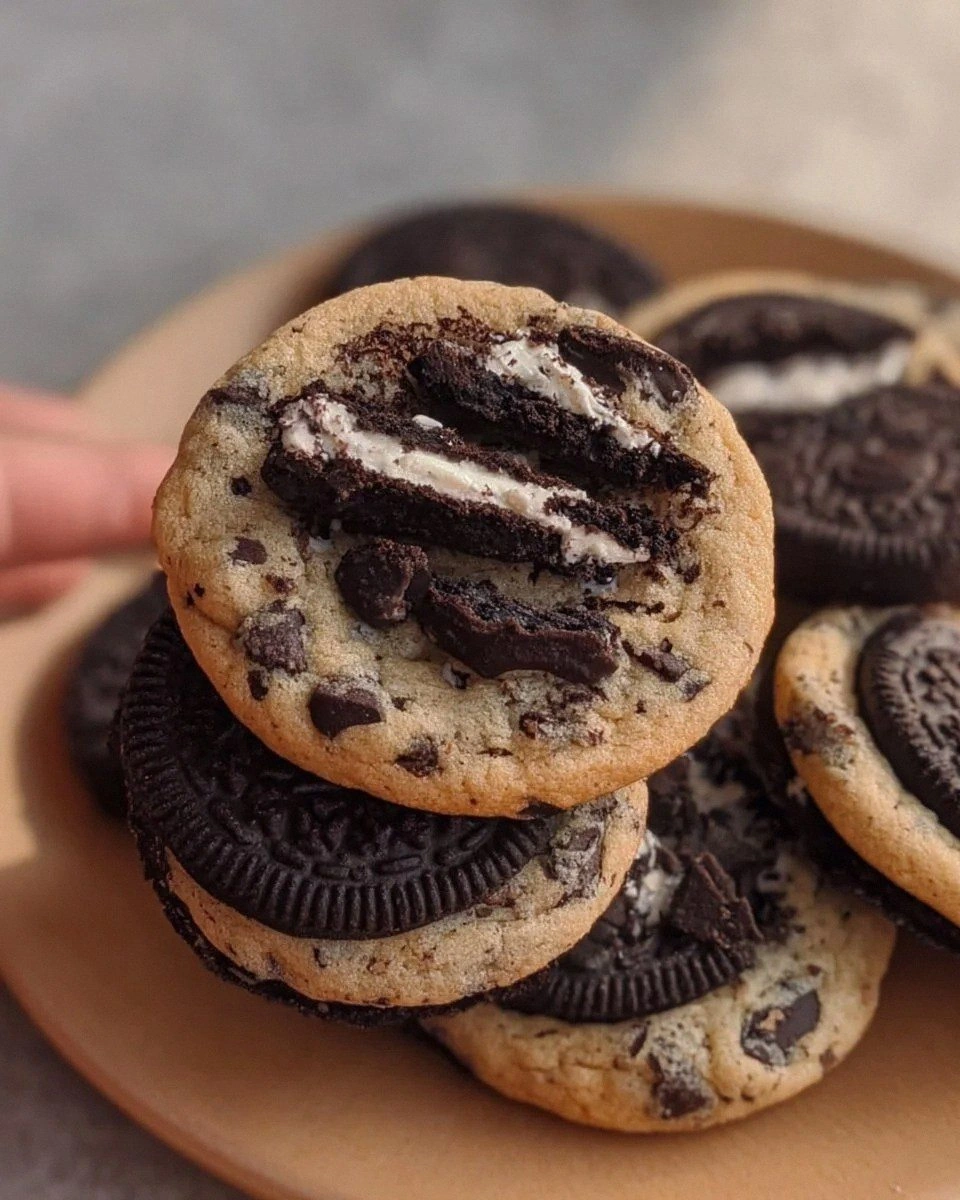
What makes this version stand out is the secret weapon hidden inside: the Oreo crumbs. They don’t just add flavor; they create little pockets of crunchy‑creamy surprise that explode with every bite. Most recipes try to be clever with nuts or pretzels, but they miss the magic of that iconic black‑and‑white cookie that most of us grew up dunking in milk. I’ll be honest — I ate half the batch before anyone else got a chance, and that’s a confession I’m willing to make because the taste is that good.
I’m about to walk you through every single step — from the moment you crush those Oreos to the final pull‑out‑of‑the‑oven triumph. By the end, you’ll wonder how you ever settled for plain chocolate chip cookies when this masterpiece is just a few minutes away. Let me walk you through every single step — by the end, you’ll wonder how you ever made it any other way.
What Makes This Version Stand Out
- Flavor Explosion: The combination of semi‑sweet chocolate chips with the creamy, slightly bitter Oreo crumbs creates a layered taste that dances on the palate.
- Texture Harmony: Crispy edges meet a chewy, almost cake‑like center, while the Oreo bits add a satisfying crunch that shatters like thin ice.
- Simplicity: Only ten ingredients, all pantry staples, so you won’t need a trip to the specialty store.
- Unique Twist: Most chocolate chip recipes never think to incorporate a cookie‑in‑a‑cookie; this one does, and it works like a charm.
- Crowd‑Pleaser: I dare you to taste this and not go back for seconds; even the pickiest eaters will beg for more.
- Ingredient Quality: Using real unsalted butter and high‑quality chocolate chips lets the flavors shine without any unwanted aftertaste.
- Cooking Method: Baking at a moderate temperature ensures the cookies spread evenly, giving you that perfect golden‑brown edge.
- Make‑Ahead Potential: The dough can be refrigerated for up to 24 hours, allowing the flavors to meld and intensify.
Inside the Ingredient List
The Flavor Base
The unsalted butter is the backbone of any great cookie, providing richness and a tender crumb. By softening it at room temperature, you allow it to cream easily with the sugars, creating an emulsion that traps air and yields a light texture. If you substitute melted butter, you’ll get a flatter, crisper cookie that lacks that buttery melt‑in‑your‑mouth feel. For the best result, use a stick of high‑fat European‑style butter for extra depth.
Granulated sugar and brown sugar work together to balance sweetness and moisture. The granulated sugar caramelizes during baking, giving you those golden edges, while the brown sugar’s molasses content keeps the interior soft and adds a subtle caramel note. Skipping the brown sugar would make the cookies dry, and using only brown sugar would result in a darker, almost fudgy cookie.
Fun Fact: The original Oreo was introduced in 1912, and its name was inspired by the word “creme” spelled backward, a playful nod to the sandwich nature of the cookie.
The Texture Crew
Semi‑sweet chocolate chips are the classic choice because they provide just enough bitterness to balance the sweet dough. If you love extra melty pockets, you can swap half of them for chocolate chunks, but be careful – larger pieces can cause uneven baking and may sink to the bottom.
The 10 Oreo cookies, crushed, are the secret weapon. Their cream filling melts into the dough, creating pockets of gooey, milky caramel, while the chocolate wafer adds crunch. If you don’t have Oreos on hand, try crushed chocolate wafer cookies or even a mix of crushed pretzels for a salty‑sweet contrast.
The Leavening & Structure
Baking soda is the leavening agent that gives the cookies a slight rise and a tender crumb. It reacts with the acidity of the brown sugar and the vanilla, creating carbon dioxide bubbles that expand during baking. Too much soda will make the cookies spread too thin; too little and they’ll be dense.
Salt is the unsung hero that amplifies the flavors, cutting through the sweetness and enhancing the chocolate. A half‑teaspoon is enough; any more will make the cookies taste salty, any less will leave them flat.
The Final Flourish
All‑purpose flour provides structure, but the amount is crucial. 2 ¼ cups strike the perfect balance between chewiness and sturdiness. If you prefer a cake‑like texture, add an extra ¼ cup of flour; for a denser, fudgier cookie, reduce by ¼ cup.
Vanilla extract adds aromatic depth, rounding out the flavor profile. Using pure vanilla instead of imitation makes a noticeable difference, especially when paired with the distinctive Oreo taste.
Everything's prepped? Good. Let's get into the real action...
The Method — Step by Step
Preheat your oven to 350°F (175°C) and line two baking sheets with parchment paper. The heat should be steady; an uneven oven can cause some cookies to over‑brown while others stay pale. While the oven warms, take a moment to admire the clean sheets – they’ll prevent sticking and make cleanup a breeze.
Kitchen Hack: Use a silicone baking mat instead of parchment for an even browning and easy release.In a large mixing bowl, cream together the softened butter, granulated sugar, and brown sugar until the mixture is light and fluffy, about 3‑4 minutes on medium speed. You’ll notice the color lightening and the texture becoming airy – that’s the sugar crystals aerating the butter, a crucial step for a tender crumb.
Add the vanilla extract and eggs one at a time, beating well after each addition. The batter should look glossy and slightly thickened. If the mixture looks curdled, keep beating; the emulsion will come together as the eggs incorporate fully.
In a separate bowl, whisk together the all‑purpose flour, baking soda, and salt. This ensures the leavening is evenly distributed, preventing pockets of soda that could cause uneven rise.
Gradually add the dry ingredients to the wet mixture, mixing on low speed until just combined. Over‑mixing will develop gluten, leading to tough cookies. Stop as soon as you no longer see flour streaks.
Fold in the chocolate chips and the crushed Oreo cookies, reserving a handful of Oreo crumbs for topping. The dough should be studded with dark chocolate specks and white‑black Oreo fragments. This is the moment of truth – you’ll see the texture start to look like a decadent, speckled batter.
Using a cookie scoop (or a tablespoon), drop rounded balls onto the prepared sheets, spacing them about 2 inches apart. Gently press the tops with the back of a spoon to flatten slightly; this helps the cookies spread evenly without losing their height.
Watch Out: If your dough feels too sticky, chill it for 10 minutes; overly soft dough can spread too much and become thin.Bake for 10‑12 minutes, or until the edges turn a golden‑brown while the centers still look slightly soft. The cookies will continue to set as they cool on the sheet, so pulling them out at the perfect moment is key. You’ll hear a faint crackle as the edges start to pull away from the parchment – that’s your cue.
Allow the cookies to cool on the sheet for 5 minutes before transferring them to a wire rack. This rest lets steam escape, preserving the crisp edge and chewy center. While they cool, the reserved Oreo crumbs can be sprinkled on top for an extra crunch and visual appeal.
That's it — you did it. But hold on, I've got a few more tricks that'll take this to another level...
Insider Tricks for Flawless Results
The Temperature Rule Nobody Follows
Most home bakers bake cookies at 375°F, assuming higher heat equals faster results. In reality, a moderate 350°F gives you that perfect balance of crispy edges and chewy centers. I once tried 400°F and ended up with burnt bottoms and raw middles – a disaster that taught me the value of patience.
Why Your Nose Knows Best
When the cookies are about 8 minutes in, start sniffing. A sweet, buttery aroma signals they’re nearly done. If you can smell the caramel notes without any burnt scent, pull them out. Trusting your senses beats relying solely on the timer.
The 5‑Minute Rest That Changes Everything
After baking, let the dough rest on the sheet for exactly five minutes before moving to a rack. This short pause lets the residual heat finish the cooking process, ensuring the center stays soft while the edges firm up. Skipping this step often leads to cookies that crumble too easily.
Chill the Dough, Not Just the Butter
Refrigerating the dough for at least 30 minutes (or overnight) concentrates the flavors and solidifies the butter, which reduces spread. I once left the dough out for an hour and got thin, crispy discs – not the chewy masterpiece we’re aiming for.
Uniform Size, Uniform Bake
Using a cookie scoop guarantees each cookie is the same size, which means they all bake evenly. If you eyeball the scoops, you’ll end up with a mix of over‑cooked and under‑cooked cookies, which is a culinary nightmare.
Creative Twists and Variations
This recipe is a playground. Here are some of my favorite ways to switch things up:
Double‑Stuffed Oreo
Replace half of the chocolate chips with white chocolate chips and add an extra 5 crushed Oreo cookies. The white chocolate adds a buttery sweetness that pairs beautifully with the dark chocolate, while the extra Oreo bits amplify the cookie‑in‑a‑cookie experience.
Peanut Butter Swirl
Stir in ¼ cup of creamy peanut butter into the dough before adding the chips. The nutty richness creates a subtle swirl that complements the chocolate and Oreo flavors, perfect for fans of Reese’s.
Minty Fresh
Add ½ teaspoon of peppermint extract and swap half the chocolate chips for mint chocolate chips. This gives the cookies a refreshing after‑taste that’s reminiscent of an after‑dinner mint.
Salted Caramel Drizzle
Once the cookies have cooled, drizzle them with homemade salted caramel sauce and sprinkle a pinch of flaky sea salt. The salty‑sweet combo elevates the dessert to a gourmet level.
Gluten‑Free Adaptation
Replace the all‑purpose flour with a 1:1 gluten‑free flour blend and add a tablespoon of xanthan gum. The texture remains chewy, and the flavor stays true to the original.
Storing and Bringing It Back to Life
Fridge Storage
Place cookies in an airtight container with a slice of fresh bread; the bread releases moisture that keeps the cookies soft for up to a week. If you prefer a crispier texture, store them without the bread and enjoy within three days.
Freezer Friendly
Lay the cookies on a parchment‑lined tray, freeze until solid, then transfer to a zip‑top freezer bag. They’ll stay fresh for up to three months. When you’re ready to eat, let them thaw at room temperature for 15 minutes.
Best Reheating Method
To revive that just‑baked softness, pop a cookie in the microwave for 10‑12 seconds with a tiny splash of water on a paper towel beside it. The steam works like a mini‑oven, bringing back the melt‑in‑your‑mouth texture without making it soggy.