I still remember the first time I made this cake — it was supposed to be a casual Tuesday night experiment, nothing more than a way to use up half a jar of peanut butter and the tail end of my cocoa powder. Fast-forward thirty-eight minutes and I was standing barefoot in my kitchen, holding a fork like it was Excalibur, scraping the last molten corner from the baking dish while the oven fan hummed a congratulatory anthem. Somewhere between the second and third “test bite” I realized I had crossed into dangerous territory; this wasn’t just dessert, it was a full-on chocolate-peanut butter vortex that refused to release its grip on any mortal who dared take a taste.
The scent alone should come with a warning label: waves of roasted cocoa and salty-sweet peanut wafting through the house like a cartoon rope, luring roommates, neighbors, even the aloof cat from next door. You’ll hear the crackle of the sugar crust before you see it, a delicate snap that gives way to a river of fudgy sauce so glossy it practically winks at you. One spoonful and your eyes close involuntarily, the way they do when you step into a hot shower after shoveling snow — instant, primal relief. The outer edge bakes into a brownie-like chew, while the center stays gloriously under-baked, pooling on your plate like liquid velvet. I dare you to taste this and not go back for seconds; I double-dog dare you to walk away from the pan without lifting a corner with your finger once “everyone’s served.”
What makes this version different from every other “ooze cake” on the internet? Most recipes get this completely wrong: they treat peanut butter as an afterthought, swirled on top like polite ribbons. Here, we blast it straight into the batter, fold it into the sauce, and let it seep into the very foundation so every bite tastes like a Reese’s cup that took a masterclass in decadence. The cocoa isn’t just any cocoa — it’s bloomed in hot melted butter until it smells like a European chocolatier’s daydream, intensifying the flavor so you can dial back the sugar without losing that kid-in-a-candy-shop joy. Picture yourself pulling this out of the oven, the whole kitchen smelling incredible, your phone already buzzing with friends who somehow sensed dessert alchemy in progress. Stay with me here — this is worth every sticky spoon, every stolen warm bite, every promise you’ll “bring it to the potluck tomorrow” even though half of it is gone before midnight.
Let me walk you through every single step — by the end, you’ll wonder how you ever made it any other way.
What Makes This Version Stand Out
- Peanut Butter in Triplicate: We whip natural peanut butter into the batter, swirl more into the gooey layer, and finish with a salty peanut drizzle so the nutty flavor arcs across every mouthful instead of wimping out after the first taste.
- Cocoa Bloom First: Instead of dry cocoa clumps that never fully hydrate, we melt butter, bloom the cocoa until it smells like brownie batter heaven, then let it cool before marrying it with sugar — think of it as espresso versus instant coffee.
- One-Bowl Brilliance: No stand mixer, no fussy egg-white peaks, no “fold in thirds” ballet. A single bowl, a whisk, and a rubber spatula are your entire cleanup crew.
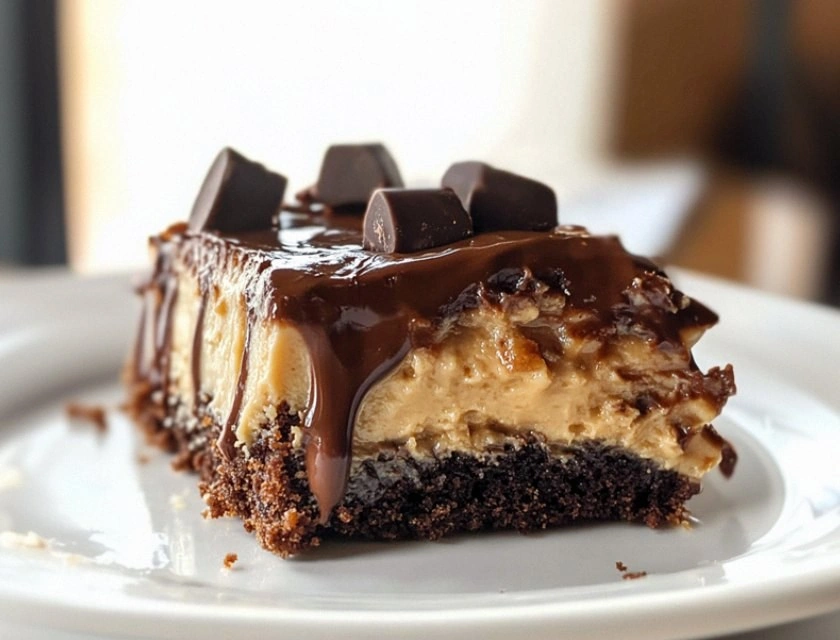
- Texture Spectrum: The edges bake into a chewy, almost brownie-crust; the center stays saucy like molten lava cake; the top forms a tissue-thin sugar lid that shatters like thin ice under your spoon.
- Make-Ahead Magic: Mix the dry layer and the wet layer separately in the afternoon, stash them in the fridge, then assemble and bake after dinner so you can serve dessert still bubbling without any last-minute scramble.
- Instant Crowd Cred: Bring this to game night and watch grown adults lose their minds; I’ll be honest — I ate half the batch before anyone else got to try it at my last potluck and still got four requests for the recipe.
Alright, let’s break down exactly what goes into this masterpiece.
Inside the Ingredient List
The Flavor Base
We’re building flavor the way a jazz trio builds rhythm — starting with a deep chocolate groove. Dutch-process cocoa gives a smoother, darker chocolate note than natural cocoa, but if all you have is the regular stuff, don’t panic; just add a pinch of baking soda to balance the acidity. Unsalted butter gets melted until it smells nutty and foams slightly; this little extra toast carries through the whole cake and whispers “browned butter” without the extra babysitting. Light brown sugar brings molasses undertones that hug the peanut butter like old friends reuniting at a high-school football game. Granulated sugar is still invited — we need it for that glossy, crackly lid — but brown sugar does the heavy lifting inside.
The Texture Crew
All-purpose flour is the scaffolding, yet we keep it shockingly low so the cake never turns into a dry sponge. A single teaspoon of baking powder lifts just enough to keep the saucy center from feeling like pudding skin. Eggs do double duty: yolks emulsify everything into velvet, whites set the outer ring into chew. A modest pour of whole milk loosens the batter so it self-levels in the pan and bakes evenly. Cornstarch might seem like an interloper, but it tenderizes the crumb; think of it as the cake equivalent of adding a pinch of cornstarch to shortbread.
The Unexpected Star
Creamy commercial peanut butter (yes, the supermarket staple you pretended to outgrow) melts seamlessly into hot sauce without seizing. Natural peanut butter separates into oil globs that can leave greasy craters; we want silk, not swamp. A teaspoon of soy sauce sounds wild, but it deepens the nuttiness the same way salt intensifies caramel; you won’t taste soy, only “why is this so addictive?” If you’re peanut-allergic, almond butter works, though it will ride in with a marzipan vibe that’s equally seductive.
The Final Flourish
Pure vanilla extract is non-negotiable; imitation vanilla tastes like a candle shop clearance sale. A fistful of mini chocolate chips scattered on top before baking creates puddles of molten ganache that glue the peanut butter swirl to the cake. Flaky sea salt finish is the mic-drop moment; those tiny crystals sparkle like disco lights and make the sweet notes sing louder. If you’ve ever struggled with desserts that taste flat, you’re not alone — and I’ve got the fix right here.
Everything’s prepped? Good. Let’s get into the real action.
The Method — Step by Step
- Melt and Bloom: Preheat your oven to 350°F (175°C). In a medium saucepan over medium heat, melt 10 tablespoons of butter until it foams and the milk solids turn golden-brown — about 4 minutes. Whisk in ½ cup Dutch-process cocoa until glossy and smooth; the mixture should look like black satin and smell like a chocolate croissant just out of the oven. Remove from heat and let it cool for 5 minutes so it won’t scramble the eggs later.
- Build the Dry Team: In a large bowl whisk together 1 cup all-purpose flour, ¾ cup light brown sugar, ¼ cup granulated sugar, 1 teaspoon baking powder, ½ teaspoon kosher salt, and 1 tablespoon cornstarch. Break up any brown-sugar boulders with your fingers; think of it as aerating the mixture so the cake rises like a happy balloon.
- Wet Wonderland: To the cooled cocoa-butter slurry, whisk in ¾ cup creamy peanut butter until no streaks remain. Add 2 large eggs, one at a time, beating until the batter looks like thick chocolate frosting. Pour in ½ cup whole milk and 2 teaspoons vanilla; the mixture will loosen and gleam like melted ice cream.
- Bring It Together: Pour the wet mixture into the dry ingredients. Switch to a rubber spatula and fold just until the flour ghosts disappear; over-mixing is the enemy of goo. The batter will be thick and slightly tacky — that’s perfect. If you taste it now (and you will), it’ll feel like brownie batter that went on vacation to Peanut Town.
- Peanut Butter Swirl Sauce: In a small bowl whisk ½ cup peanut butter, ⅓ cup sweetened condensed milk, 2 tablespoons melted butter, 1 tablespoon corn syrup, and a pinch of salt until satin-smooth. This is your molten core; set it nearby but do not eat it yet — I’m watching.
- Pan Prep with Attitude: Grease an 8-inch square metal pan with butter, then line it with a parchment sling. Metal conducts heat quickly, giving you those crispy edges that shatter like thin ice; glass pans will leave you with pale, soggy corners. Spray the parchment too — we are not in the business of leaving cake behind.
- Layer and Marble: Scrape half the chocolate batter into the pan and nudge it into the corners. Spoon half the peanut butter sauce in fat dollops over the surface. Add remaining chocolate batter, smoothing gently so you don’t deflate the air pockets. Crown with the rest of the peanut sauce and drag a skewer through in figure-eights; you’re creating rivers of goo that will sink and rise unpredictably — pure magic.
- The Bake: Slide the pan onto the center rack and bake for 28–32 minutes. The edges should look matte and slightly puffed, the center should jiggle like a friendly belly laugh when you shimmy the pan. If you insert a toothpick 1 inch from the edge, it should come out with a few moist crumbs; the center will still look under-baked — that’s your cue to snatch it out before it crosses into cakey dryness.
- Cool Down & Crack: Let the cake cool in the pan on a wire rack for 15 minutes. During this time the residual heat finishes setting the goo without baking it through. Use the parchment sling to lift it out; the underside will reveal a glossy layer of fudge that makes you want to applaud yourself. Dust with flaky sea salt while it’s still warm so the crystals stick like tiny spotlights.
That’s it — you did it. But hold on, I’ve got a few more tricks that’ll take this to another level.
Insider Tricks for Flawless Results
The Temperature Rule Nobody Follows
Room-temperature eggs and milk aren’t just pastry-chef pretense; cold dairy shocks the butter into seizing, creating little pellets of fat that melt later and leave greasy pockets. Pull your ingredients 30 minutes before mixing, or cheat: submerge eggs in warm tap water for 5 minutes and microwave milk 10 seconds. Your batter will emulsify into glossy luxury, and the cake rises evenly instead of doming like a baseball cap.
Why Your Nose Knows Best
Trust your olfactory factory: when the cocoa-butter mixture smells like fresh-baked Oreos, it’s properly bloomed. If it still smells dusty or sharp, keep stirring another 30 seconds over low heat. That toasty aroma signals the Maillard reaction is cranking out hundreds of flavor compounds that will echo through every bite. A friend tried skipping this step once — let’s just say it tasted like flat chocolate pudding and she blamed the full moon instead of her impatience.
The 5-Minute Rest That Changes Everything
After baking, the cake’s center is molten sugar lava. Resting allows carry-over heat to finish setting the starches so you get a thick sauce rather than a runny puddle. Cut too early and you’ll have chocolate soup racing off the plate; wait five minutes and you’ll slice clean squares that still ooze slowly like a lava lamp. Set a timer, wipe the drool, and practice restraint — your Instagram photos will thank you.
Creative Twists and Variations
This recipe is a playground. Here are some of my favorite ways to switch things up:
Rocky Road Remix
Fold ½ cup mini marshmallows and ¼ cup chopped toasted almonds into the batter. The marshmallows melt into stretchy pockets that contrast the fudgy cake, while almonds add a carnival-style crunch. Top with extra marshmallows in the last 2 minutes of baking so they get campfire-toasty but not burnt.
Spicy Mayan Edition
Whisk ½ teaspoon cayenne and 1 teaspoon cinnamon into the cocoa-butter slurry. The gentle heat sneaks in after the chocolate blooms on your tongue, making guests ask, “Why does this taste like a cozy hug with a mischievous secret?” Serve with cinnamon-dusted whipped cream to amplify the theme.
Banana Breakfast Loaf
Swap the milk for an equal amount of mashed overripe banana. Reduce sugar by 2 tablespoons; bananas bring their own candy sweetness. The result tastes like Elvis’s favorite sandwich in cake form — perfect for brunch with strong coffee and a side of rock-and-roll.
Salted Caramel Swirl
Replace the peanut butter swirl with ½ cup thick bottled caramel plus 1 teaspoon miso paste (trust me). The miso adds umami depth that makes the caramel taste like it was patiently cooked for hours. Sprinkle coarse salt on top so every other bite pops with sweet-salty lightning.
Gluten-Free Glutton
Sub the all-purpose flour with ¾ cup almond flour plus ¼ cup oat flour. The cake will be slightly denser, but the almond flour lends buttery richness and the oat flour keeps it from crumbling like sand. Check doneness 3 minutes early; gluten-free battas can dry out faster.
Mini Skillet Party
Divide the batter among four 6-inch cast-iron skillets; bake 18 minutes. Everyone gets their own personal volcano cake, and you can customize toppings per person: one with Reese’s pieces, one with crushed pretzels, one with espresso powder, one plain for the purist.
Storing and Bringing It Back to Life
Fridge Storage
Once completely cool, cover tightly with plastic wrap or transfer to an airtight container. Refrigerate up to 4 days; the flavors actually meld and intensify overnight, so day-two cake is arguably better. Bring to room temp before serving or warm a slice in the microwave 15 seconds so the goo regains its flow.
Freezer Friendly
Cut into squares, wrap each in plastic wrap, then foil, and freeze up to 2 months. Thaw overnight in the fridge, then warm 20 seconds in the microwave. Add a tiny splash of water on top before reheating — it steams back to perfection and keeps edges from turning rubbery.
Best Reheating Method
For maximum revival, place a square on a sheet of foil in a 300°F oven for 8 minutes. The gentle heat reactivates the goo without over-baking the already-delicate center. If you’re in a rush, microwave on 50% power for 12 seconds, cover with an inverted mug to trap steam, then another 8 seconds. You want it just warm enough to make a scoop of vanilla ice cream weep with happiness.