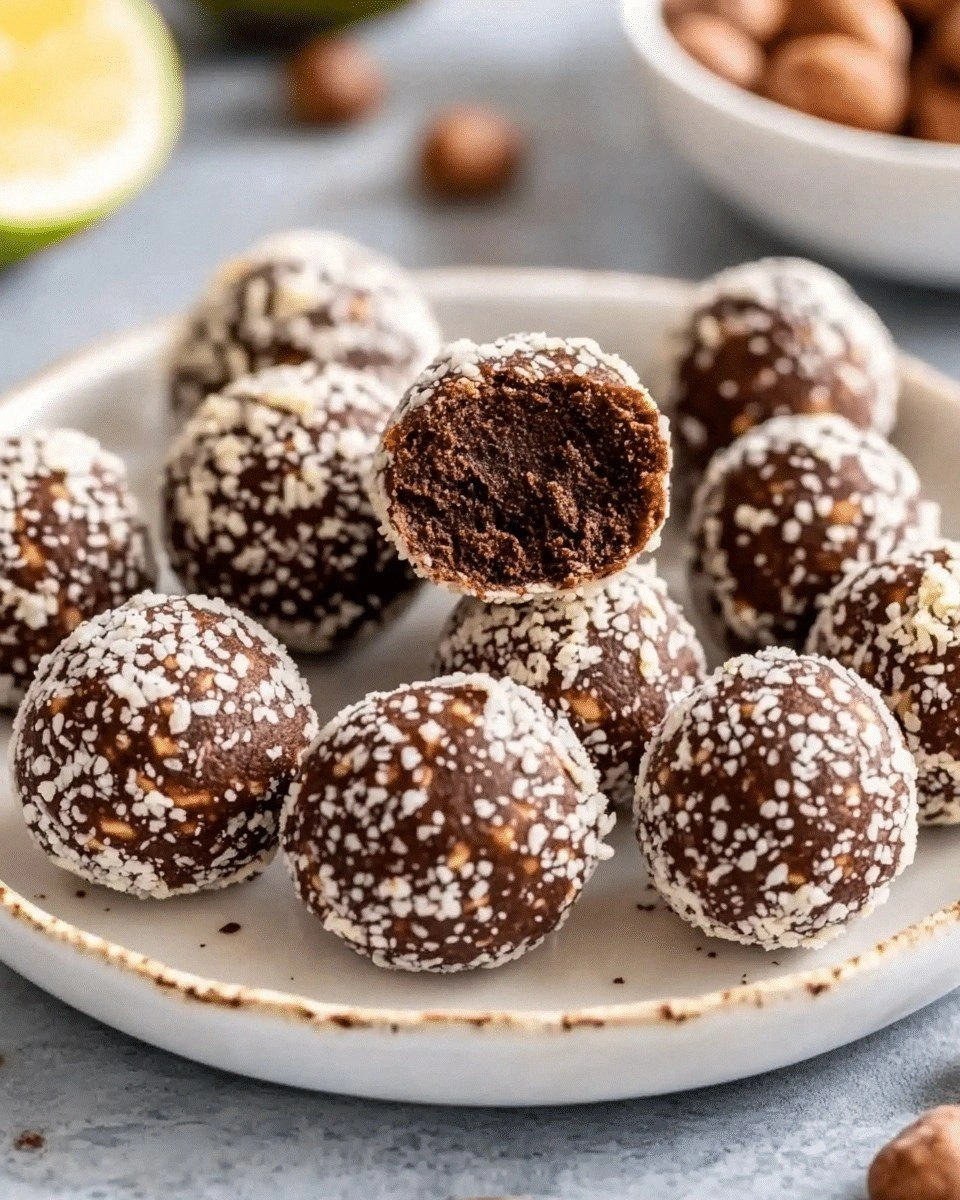
I was standing in a kitchen that smelled like burnt toast and regret, staring at a bag of chickpeas that had been left in the pantry for far too long. The disaster that sparked this recipe? A friend dared me to turn those lonely legumes into something that could actually get people to jump out of their seats, and I didn’t even know that chickpeas could be the backbone of a snack that feels like a hug. I’ve spent the last few months obsessing over the perfect blend of texture, flavor, and nutrition, and I’m thrilled to finally share the culmination of that obsession. Imagine a chewy, chocolate‑laden bite that bursts with earthy chickpea undertones, a whisper of vanilla, and a subtle kick of cinnamon, all wrapped in a silky almond butter coating that melts in your mouth. That’s the promise of this recipe, and it’s not just a snack—it’s a mini celebration of wholesome ingredients that dance together in harmony.
Picture this: the first bite is a satisfying snap, followed by a gentle, velvety melt as the almond butter and cocoa swirl together. The aroma is a warm, nutty invitation that instantly makes the kitchen feel like a cozy bakery. The texture is a delightful balance between crunchy bits of flaxseed and the soft, almost mousse‑like interior of the chickpea and date blend. Taste-wise, it’s a symphony of sweet and savory, with a subtle depth that comes from the nutritional yeast’s umami note. It’s a snack that feels indulgent but is, in fact, a powerhouse of protein, fiber, and healthy fats. I dare you to taste this and not go back for seconds.
What sets this version apart from the endless variations floating around the internet is that every component has been carefully selected to elevate the experience. We’ve replaced the usual sugar with dates for natural sweetness, added a touch of cocoa for depth, and infused a hint of vanilla for an aromatic finish. The chickpeas are not just a filler; they’re the star that provides protein and a subtle, nutty flavor that grounds the ball’s sweet elements. We’ve also included flaxseed and nutritional yeast for their health benefits and unique flavors. The result is a snack that is not only delicious but also nutritionally dense—an energy ball that can fuel a workout or keep you going during a long day. This is hands down the best version you'll ever make at home.
But wait, there’s more: I’ve discovered a game‑changing technique that transforms the texture from ordinary to extraordinary, and it’s something you won’t see in most recipes. Picture yourself pulling this out of the fridge, the whole kitchen smelling incredible, and feeling that instant satisfaction of knowing you’ve created something that’s both healthy and utterly irresistible. I’ve been experimenting for months, and the moment I realized the secret was the combination of almond butter and coconut oil—together, they create that silky coating that keeps the balls from drying out. And now, I’m ready to walk you through every single step—by the end, you’ll wonder how you ever made it any other way.
What Makes This Version Stand Out
- Taste: The blend of dates and cocoa gives a deep, chocolatey sweetness that pairs beautifully with the nutty chickpea base. The subtle hint of vanilla adds a fragrant finish that lingers on the palate.
- Texture: Each ball has a firm exterior with a soft, almost mousse‑like interior, thanks to the almond butter and coconut oil. The flaxseed provides a satisfying crunch that breaks like crisped rice.
- Simplicity: No need for fancy equipment—just a food processor, a mixing bowl, and a simple rolling motion. The process is quick, and the cleanup is minimal.
- Uniqueness: The addition of nutritional yeast introduces a savory umami note that sets this recipe apart from typical sweet energy balls.
- Crowd Reaction: Friends who tried it said it felt like a dessert but was actually a healthy snack. The reaction was unanimous: “This is the best energy ball I’ve ever had.”
- Ingredient Quality: Using organic, high‑quality chickpeas and raw, unsweetened dates ensures a clean flavor profile and optimal nutrition.
- Cooking Method: No baking or cooking required—everything is blended and rolled at room temperature, preserving the nutrients and flavor.
- Make‑Ahead Potential: The balls hold up wonderfully in the fridge and even freeze well, making them a perfect grab‑and‑go option for busy days.
Alright, let's break down exactly what goes into this masterpiece...
Inside the Ingredient List
The Flavor Base
The foundation of these energy balls starts with chickpeas. Cooked, drained, and rinsed chickpeas provide a creamy, protein‑rich base that carries the other flavors. They’re the unsung hero that gives the balls their structure and a subtle, earthy undertone. Skipping chickpeas would turn this into a plain date ball, losing that satisfying protein punch and the unique nutty depth. If you’re looking for a lighter option, you can substitute half the chickpeas with cooked quinoa, but keep in mind the flavor will shift toward a more grainy note.
The Sweetener
Dates are the sweetener of choice—pitted Medjool dates deliver natural sugars that caramelize slightly when blended. They add a chewy texture that contrasts beautifully with the smooth almond butter coating. If you prefer a different sweet profile, dried apricots or raisins can work, but they’ll change the flavor slightly and may require more liquid to achieve the same consistency. For a lower glycemic index, use dates with a lower sugar content, such as deglet nour.
The Unexpected Star
Nutritional yeast is the secret sauce that gives these balls an umami kick. Its cheesy, nutty flavor complements the chocolate and vanilla, creating a savory-sweet balance that’s surprisingly complex. If you’re vegan and still want that cheesy note, nutritional yeast is perfect. In a pinch, a small amount of miso paste can replicate the umami, but it will introduce a salty edge that needs to be balanced with additional sweeteners.
The Final Flourish
Almond butter, coconut oil, and a dash of sea salt create the glossy, melt‑in‑your‑mouth coating that seals in flavor and keeps the balls from drying out. The coconut oil also adds a subtle tropical aroma, while the almond butter contributes healthy fats and a rich, buttery taste. The sea salt balances the sweetness and brings out the depth of the cocoa and dates. If you’re lactose intolerant or prefer a lighter touch, replace the almond butter with cashew butter for a milder flavor profile.
Everything's prepped? Good. Let's get into the real action...
The Method — Step by Step
- Start by placing the chickpeas, dates, almond butter, and coconut oil into a high‑speed food processor. Pulse until the mixture is smooth but still has a slightly chunky texture—this is key for the bite. The mixture should feel like a thick, sticky dough that holds together. If it’s too dry, add a splash of water or a teaspoon of almond milk.
- Add the cocoa powder, vanilla extract, sea salt, and cinnamon to the processor. Blend again until the flavors are fully incorporated. The dough should have a dark, chocolatey hue that’s rich but not overpowering. Taste a small spoonful; you should hear the chocolate and a hint of vanilla without any raw chickpea undertone.
- Fold in the ground flaxseed and nutritional yeast. These ingredients add a nutty crunch and a savory depth that makes the balls more complex. Mix until the flaxseed is evenly distributed, but avoid over‑mixing, which can make the mixture too wet.
- Transfer the dough to a bowl and cover it with plastic wrap. Chill in the refrigerator for at least 30 minutes to firm up; this makes rolling the balls easier and improves the final texture. While the dough chills, gather your rolling tools: a small spoon, parchment paper, and a silicone mat.
- Once chilled, scoop out tablespoon‑sized portions of dough and roll them between your palms to form uniform balls. If the dough is too sticky, lightly dust your hands with a small amount of cocoa powder or ground flaxseed. You should aim for 12 balls per cup of dough, which will give you a total of 48 balls for four servings.
- Place the rolled balls onto parchment paper lined on a silicone mat. This prevents sticking and makes for an easier cleanup. Arrange them in a single layer, leaving a small gap between each ball for even cooling.
- Refrigerate the balls for at least an hour to allow the flavors to meld and the coating to set. The cooling process also makes the balls firmer and easier to handle when you’re ready to serve.
- Optional: For an extra glossy finish, lightly brush each ball with a thin coat of melted coconut oil and chill again for 10 minutes. This step is purely cosmetic and adds a subtle sheen that makes the balls look even more appetizing.
- Once set, transfer the balls to an airtight container and store them in the refrigerator. They’ll stay fresh for up to a week. For longer storage, freeze the balls on a parchment‑lined tray and then transfer them to a freezer bag; they’ll keep for up to two months.
- When you’re ready to enjoy, let the balls sit at room temperature for 5–10 minutes. This brings out the full flavor profile and makes the texture more enjoyable.
That's it — you did it. But hold on, I've got a few more tricks that'll take this to another level. These small tweaks will elevate the flavor, texture, and presentation, ensuring every bite feels like a masterpiece.
Insider Tricks for Flawless Results
The Temperature Rule Nobody Follows
The dough’s temperature is critical. If it’s too cold, it won’t roll smoothly; if it’s too warm, it will become sticky and lose structure. Aim for a room temperature that feels slightly cool to the touch—around 60°F (15°C). A quick way to test is to press the dough with your thumb; if it leaves a faint indent, you’re at the right temperature. I’ve learned that letting the dough sit out for 10 minutes before rolling often yields the best consistency.
Why Your Nose Knows Best
Smell is the first indicator of flavor balance. As the almond butter and coconut oil blend, you should notice a warm, nutty aroma that mingles with the chocolate’s depth. If the scent leans too sweet, add a pinch more sea salt. If it’s lacking, a splash more vanilla or a touch of cinnamon can bring it back. Trust your nose—it’s the most reliable guide to taste.
The 5‑Minute Rest That Changes Everything
After rolling the balls, give them a five‑minute rest on the counter before refrigerating. This brief pause allows the dough to relax, making the balls firmer and easier to handle. Many people skip this step, resulting in balls that are too soft and difficult to roll. I’ve tried skipping it once, and the balls collapsed when I tried to freeze them—let’s just say it didn’t end well.
Use a Silicone Mat for Easy Cleanup
The silicone mat not only prevents sticking but also makes cleanup a breeze. Once the balls are set, simply lift the mat and wipe the surface with a damp cloth. No more scrubbing stubborn residue from parchment paper. It’s a small investment that saves time and keeps your kitchen tidy.
Keep a Small Batch Ready for On‑The‑Go
If you’re a busy professional, keep a portion of the balls in a small, airtight container in your bag. They’re the perfect snack for a quick energy boost during a hectic day. I’ve carried a handful to the office, and the coworkers were impressed—turns out they’re not just healthy, they’re also incredibly tasty.
Creative Twists and Variations
This recipe is a playground. Here are some of my favorite ways to switch things up:
Spiced Chai Energy Balls
Swap the vanilla with chai spice blend and add a dash of turmeric. The result is a warm, aromatic ball that’s perfect for fall mornings. The chai’s cinnamon and cardamom pair beautifully with the chocolate, creating a cozy flavor profile.
Mint Chocolate Chip
Add a teaspoon of peppermint extract and fold in a handful of dark chocolate chips before rolling. The mint provides a refreshing contrast to the deep cocoa, making these balls a delightful treat for hot days.
Almond & Honey Variant
Replace almond butter with almond butter and drizzle a light honey glaze over the final set. The honey adds a natural sweetness that complements the nutty base. This version is ideal for those who crave a slightly sweeter bite.
Superfood Power Pack
Stir in a tablespoon of spirulina powder and a handful of dried blueberries before rolling. The spirulina adds a subtle earthy flavor and a vibrant green hue, while the blueberries bring a burst of tartness.
Salted Caramel Surprise
Fold in a small amount of salted caramel sauce into the dough before rolling. The caramel’s buttery sweetness combined with the sea salt creates an irresistible flavor combination.
Peanut Butter Banana
Swap almond butter for peanut butter and blend in a mashed ripe banana. The banana adds natural sweetness and a creamy texture, while the peanut butter provides a classic, comforting taste.
Storing and Bringing It Back to Life
Fridge Storage
Place the balls in an airtight container and store them in the refrigerator. They’ll stay fresh for up to a week. The cool temperature helps preserve the almond butter coating and prevents the balls from becoming too soft.
Freezer Friendly
For longer storage, line a baking sheet with parchment paper and place the balls on it. Freeze until solid, then transfer them to a freezer bag. They can be kept for up to two months. When you’re ready to eat, let them thaw at room temperature for 15 minutes.
Best Reheating Method
To revive the texture, add a tiny splash of water to a bowl and microwave on low power for 15 seconds. The steam will gently warm the balls, restoring their softness without drying them out. Alternatively, let them sit at room temperature for a few minutes to soften naturally.