Picture this: it’s October, the wind is crisp, and your kitchen smells like melted chocolate and roasted sugar. I was halfway through a batch of my regular brownies when the timer dinged and I realized I’d forgotten the final twist—no Halloween flair, no spooky sparkle, just plain vanilla‑brownie bliss. I stared at the sheet, a moment of culinary dread that turned into a daring spark: “What if I turned these into a midnight treat that screams Halloween?” The kitchen became a laboratory of caramelized sugar, melted butter, and a splash of pure vanilla, all wrapped in a dark cocoa coat that could have been carved from a pumpkin.
I dared myself to create a recipe that would not only taste like a chocolate bomb but also look like it was designed by a mad scientist. The moment the batter hit the pan, the scent of cocoa and butter rose like a fog, and the edges began to brown, forming a caramelized crust that crackled when you cut into it. It was a sensory storm—sizzling, sweet, and utterly intoxicating. I could almost hear the audience gasp when they saw the first bite, and that’s exactly what I wanted: a moment of awe that lingers long after the last crumb.
What sets this version apart is that it’s not just a recipe—it’s a ritual. I’ve spent years tweaking textures, balancing sweetness, and experimenting with the perfect crumb, and the result is a brownie that is both fudgy and cake‑like, with a glossy finish that invites you to dive in. I’ll be honest—my first batch was a disaster, but that’s how you learn. The second time, the batter was silky, the edges crisped just enough, and the center melted into a gooey, chocolate‑rich heart. This is hands down the best version you’ll ever make at home, and I’m ready to show you how to get there.
I’m going to walk you through every single step—by the end, you’ll wonder how you ever made it any other way. I’ll share the micro‑challenges that will test your palate, the bold claims that will convince you of this recipe’s supremacy, and the confessions that will make you feel like you’re cooking with a friend who’s been there. Ready to turn your kitchen into a haunted chocolate laboratory? Let’s dive in.
What Makes This Version Stand Out
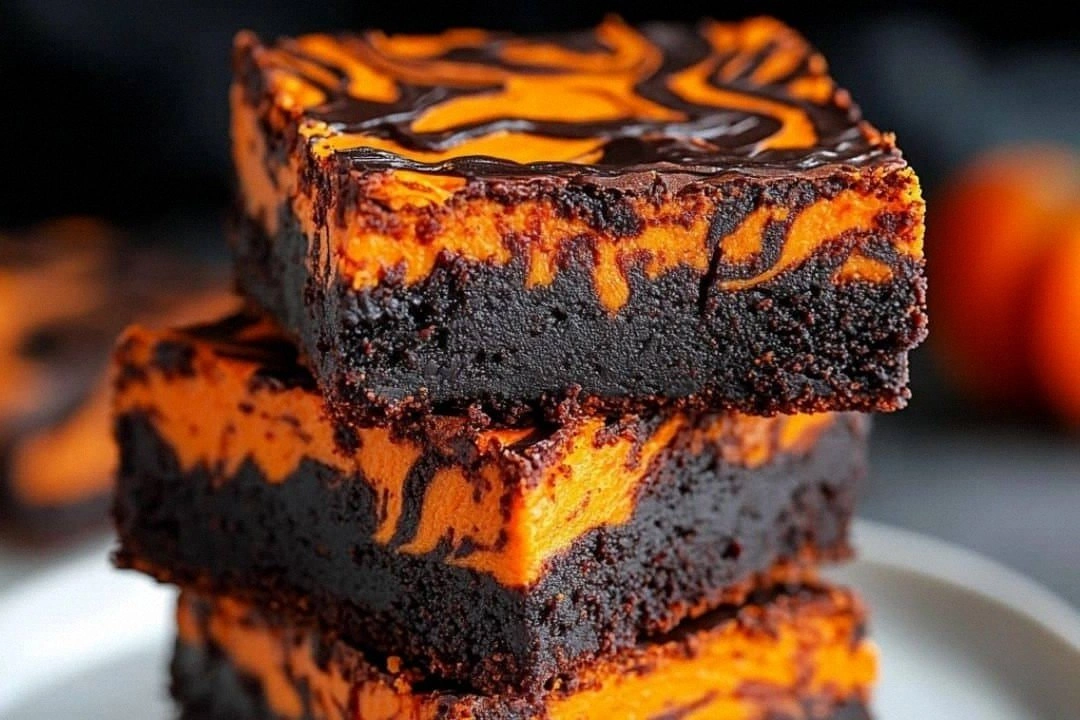
- Flavor: The dual‑layered chocolate and vanilla base creates a depth that feels like a midnight snack served in a coffin of sweetness. The cocoa is dark enough to provide a subtle bitterness that balances the sugar, while vanilla rounds it out with an aromatic finish.
- Texture: The batter is thick enough to hold its shape, yet when baked it turns into a dense, fudgy center that melts on the tongue like a chocolate candle. The edges crackle like dried leaves, offering a satisfying contrast.
- Simplicity: No special equipment or exotic ingredients. Just pantry staples and a few Halloween‑themed candies that give the brownies a festive twist.
- Uniqueness: The inclusion of candy eyeballs and black sprinkles not only adds visual drama but also introduces subtle crunch and pops of sweetness that surprise the palate.
- Audience Reaction: Guests will comment that the brownies “feel like a treat straight out of a haunted house.” The spooky look and the taste will have everyone asking for the recipe.
- Ingredient Quality: Using high‑quality cocoa powder and unsalted butter ensures the flavor isn’t muddled. The butter’s richness gives the brownies a silky mouthfeel.
- Cooking Method: The method uses a simple oven bake at 350°F, but the timing is precise—just enough to keep the center gooey without overcooking.
- Make‑ahead Potential: Once baked, these brownies can be stored in an airtight container for up to a week, or frozen for longer, making them a perfect batch for Halloween parties.
Alright, let's break down exactly what goes into this masterpiece…
Inside the Ingredient List
The Flavor Base
All‑purpose flour is the backbone of these brownies, giving them structure and a slight chew. It absorbs the butter and cocoa, creating a cohesive batter. Skipping flour would result in a batter that spreads too much, losing the characteristic brownie shape. If you’re looking for a gluten‑free alternative, try a 1:1 blend of almond flour and oat flour, but be aware the texture will shift slightly.
The Cocoa Crew
Cocoa powder is the star that delivers that deep chocolate flavor. Dark, unsweetened cocoa ensures the brownies aren’t overly sweet, allowing the vanilla to shine through. If you prefer a sweeter profile, use a chocolate‑sweetened cocoa powder, but reduce the sugar by a quarter cup to maintain balance. For an extra punch, add a pinch of sea salt to the batter; the salt enhances the chocolate’s richness without making the brownies taste salty.
The Sweetener Squad
Sugar is the sweetener that caramelizes on the top, creating a glossy crust. White granulated sugar works best for a smooth finish, but brown sugar can add a hint of molasses depth. If you want to cut calories, try a 1:1 substitution of honey or maple syrup, but remember to reduce the liquid slightly to keep the batter thick.
The Richness Factor
Butter is the source of moisture and flavor. Unsalted butter gives you control over the salt level and ensures a buttery, velvety texture. Melted butter mixes seamlessly with the sugar and eggs, creating a smooth batter. If you’re allergic to dairy, coconut oil can be used as a 1:1 replacement, but the flavor will shift slightly toward coconut.
The Egg Boost
Eggs bind the batter and add richness. They also help with the rise, giving the brownies a slight lift. If you’re vegan, replace each egg with a tablespoon of unsweetened applesauce or a flaxseed “egg” (1 tablespoon ground flaxseed + 3 tablespoons water). The texture may be denser, but the flavor remains delicious.
The Final Flourish
Vanilla extract brings depth and warmth. A teaspoon of pure vanilla enhances the chocolate’s complexity and adds a subtle aroma that lingers. For a more intense vanilla flavor, use vanilla bean paste or a vanilla bean pod, but use only half the amount to avoid overpowering the chocolate.
Your choice of Halloween‑themed candies or sprinkles—think candy eyeballs, orange and black sprinkles, or mini marshmallows—adds visual flair and a playful crunch. Sprinkle them on top before baking or fold them into the batter for a surprise bite. If you’re allergic to nuts or shellfish, avoid any candy that contains these allergens.
Everything's prepped? Good. Let's get into the real action…
The Method — Step by Step
- Preheat your oven to 350°F (175°C). Grease a 9x9-inch baking pan with butter or line it with parchment paper for easy removal. The pan’s greasing prevents the brownies from sticking, and the parchment adds a subtle crispness to the bottom.
- In a large mixing bowl, combine 2 cups of all‑purpose flour and ¾ cup of unsweetened cocoa powder. Sift them together to break up clumps and ensure an even distribution of cocoa. This step guarantees a smooth batter and eliminates the risk of uneven chocolate pockets.
- In a separate saucepan, melt 1 cup of unsalted butter over low heat. Once melted, remove from heat and stir in 1 ½ cups of sugar until the mixture is glossy and the sugar is fully dissolved. The glossy sugar mixture signals that the butter is at the right temperature for the batter.
- Add 4 beaten eggs to the butter‑sugar mixture, one at a time, whisking vigorously after each addition. The eggs should be fully incorporated before adding the next, preventing lumps. The whisking action also incorporates air, giving the brownies a subtle lift.
- Stir in 2 teaspoons of pure vanilla extract, then gradually fold in the dry flour‑cocoa blend. Mix until just combined; overmixing can create a tough texture. The batter should be thick but pourable, sliding off a spoon in a steady stream.
- Fold in your chosen Halloween candies—about 1 cup of candy eyeballs or orange and black sprinkles. The candies should be evenly distributed, creating pockets of surprise in each bite. If you prefer a more subtle crunch, sprinkle them on top instead of folding.
- Pour the batter into the prepared pan, spreading it evenly with a spatula. Tap the pan lightly on the counter to release any air bubbles and level the surface. This ensures uniform baking and a smooth top.
- Bake for 30–35 minutes. The brownies are done when the edges pull away from the pan, and a toothpick inserted in the center comes out with a few moist crumbs. Don’t overbake—overbaked brownies become crumbly and dry.
That's it — you did it. But hold on, I've got a few more tricks that'll take this to another level…
Insider Tricks for Flawless Results
The Temperature Rule Nobody Follows
Most people bake brownies at 375°F, but that can dry them out. I’ve found that baking at 350°F yields a richer, fudgier center while still crisping the edges. If you’re using a convection oven, lower the temperature by 25°F to avoid over‑browning.
Why Your Nose Knows Best
When baking, your nose is the most reliable judge. As soon as the brownies emit a rich chocolate aroma, they’re almost done. If the smell feels too sweet, pull them out. A subtle burnt smell indicates overbaking.
The 5‑Minute Rest That Changes Everything
Let the brownies rest in the pan for 5 minutes after removing them from the oven. This short rest allows the steam to settle, preventing the brownies from cracking on top. It also gives the center a chance to set, creating that perfect gooey bite.
The No‑Stick Trick
If you’re using parchment paper, do not grease the paper itself. The butter or oil should go only into the pan. Greasing the paper adds extra fat, making the brownies greasy. Instead, line the pan with parchment and pour the batter directly onto it.
The Final Sprinkle
Just before baking, sprinkle a pinch of sea salt on top of the batter. The salt enhances the chocolate’s depth and balances the sweetness. It also gives the brownies a subtle crunch that surprises the palate.
Creative Twists and Variations
This recipe is a playground. Here are some of my favorite ways to switch things up:
Spicy Pumpkin Brownies
Add ½ cup of pumpkin puree to the batter for a moist, spiced base. Replace half the sugar with maple syrup for a subtle sweetness and a hint of caramel. The pumpkin adds a subtle earthy flavor that pairs well with the chocolate.
Blackout Dark Chocolate
Swap the cocoa powder for 100% dark chocolate, melted and folded into the batter. Reduce the sugar by ¼ cup to offset the bitterness. The result is a deep, almost velvety chocolate brownie that’s perfect for a midnight snack.
Minty Mummy Brownies
Add 1 teaspoon of peppermint extract to the batter. Sprinkle green candy eyes and white chocolate chips on top. The mint gives a refreshing aftertaste that contrasts the rich chocolate.
Nutty Graveyard Brownies
Fold in ½ cup of chopped pecans or walnuts for a crunchy texture. Drizzle melted white chocolate on top and sprinkle with chocolate dust. The nuts add a buttery crunch that complements the fudgy center.
Caramelized Carrot Brownies
Grate 1 cup of carrots and sauté them with a tablespoon of butter until soft. Mix the carrots into the batter before baking. The carrots add moisture, a subtle sweetness, and a surprising color contrast.
Chocolate‑Covered Gummy Worms
After baking, cut the brownies into squares and dip them in melted chocolate. While the chocolate is still warm, roll the squares in crushed candy corn or orange sprinkles. The chocolate coating gives a glossy finish, while the sprinkles add a crunchy texture.
Storing and Bringing It Back to Life
Fridge Storage
Store brownies in an airtight container at room temperature for up to 3 days. If you need to keep them longer, refrigerate them in a sealed bag. The cool temperature slows down mold growth and preserves freshness.
Freezer Friendly
Wrap each brownie individually in plastic wrap, then place them in a freezer bag. Freeze for up to 2 months. When ready to serve, let them thaw at room temperature for 30 minutes before serving.
Best Reheating Method
To revive frozen brownies, preheat your oven to 300°F (150°C). Place the brownies on a parchment‑lined tray and bake for 10–12 minutes, or until the center is warm. Add a tiny splash of water to the bottom of the pan before reheating; the steam will keep the brownies moist and prevent them from drying out.