I still remember that night like it was yesterday. My friends had invited me over for a casual get‑together, and I was supposed to bring something “easy” to share. I pulled out a bag of pre‑made pizza dough, a jar of marinara, and a block of mozzarella, thinking I was about to create a culinary masterpiece. The moment the dough hit the pan, the kitchen filled with a scent that made everyone’s mouths water, but the result was a soggy mess that left a sticky residue on the countertop. I laughed, blamed the dough, and promised myself I’d never again trust a recipe that required a professional chef’s touch.
That disaster sparked a culinary quest: find a dish that was simple enough to make in a pinch yet bold enough to impress. After hours of scrolling through Pinterest and Reddit, I stumbled upon a recipe that claimed to turn a tortilla into a “pi” that tasted like a pizza, but with a creamy ranch twist and bacon crunch. I was skeptical—how could a tortilla, a handful of ingredients, and a few minutes in the oven rival a gourmet pizza? Yet, as I watched the first batch slide onto the counter, my skepticism melted away like butter on a hot skillet.
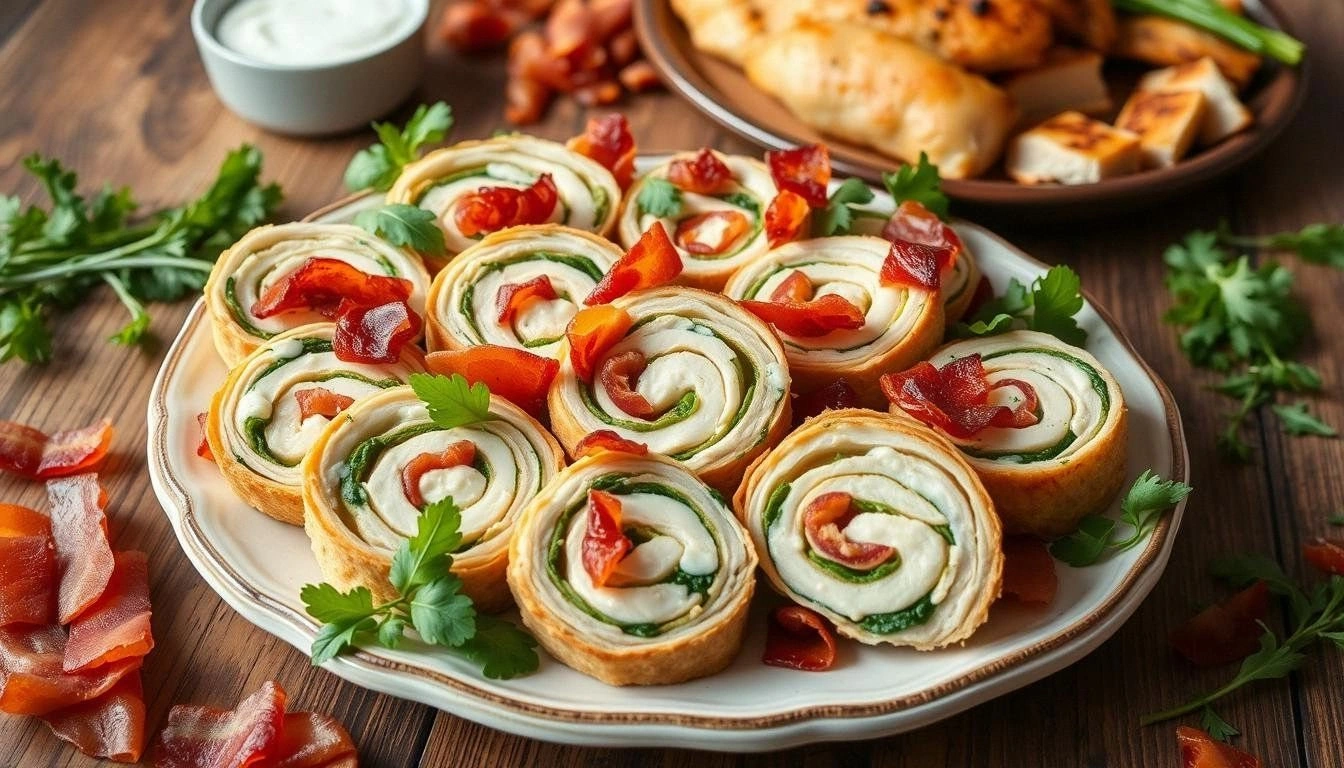
The moment I tasted the first bite, I realized I’d found the ultimate comfort food. The tortilla was crisp but not brittle, the ranch-infused cream cheese spread like velvet across the surface, and the bacon added a smoky crunch that danced on the tongue. The chicken was juicy, seasoned to perfection, and the cheddar jack melted into a gooey, golden layer that sealed everything together. If you’ve ever struggled to find a quick, crowd‑pleasing appetizer, you’re not alone—and this recipe is the answer.
What makes this version stand out is not just the flavor, but the sheer simplicity of the technique. There’s no need for a pizza stone, no pre‑baked crust, and no complicated sauce. All you need is a few staples from your pantry and a rotisserie chicken that’s already cooked to juicy perfection. I dare you to taste this and not go back for seconds. I’ll be honest—once I started, I ate half the batch before anyone else even had a chance.
Picture yourself pulling this out of the oven, the whole kitchen smelling incredible, the edges of the tortillas turning a golden amber, and the cheese bubbling like a tiny, edible volcano. The sound of the first slice cutting through the crispy crust is like music, and the first bite is an explosion of creamy, savory, and smoky flavors that will have you asking for more. This isn’t just another appetizer; it’s a game‑changer that will elevate any gathering.
I’m about to walk you through every single step, from assembling the filling to the final bake. By the end, you’ll wonder how you ever made it any other way. And trust me, this recipe is hands down the best version you’ll ever make at home. If you’re ready to turn a simple tortilla into a masterpiece, let’s get started.
What Makes This Version Stand Out
- Flavor: The ranch seasoning mix gives the dish a fresh, herby kick that cuts through the richness of the cheese and bacon, creating a balanced taste profile that’s both comforting and exciting.
- Texture: The tortilla’s crisp edges contrast with the creamy filling, while the bacon adds a satisfying crunch that makes each bite more dynamic.
- Ingredient Simplicity: Only six core ingredients—tortillas, cream cheese, ranch mix, chicken, bacon, and cheddar jack—make this recipe incredibly accessible and budget‑friendly.
- Time Efficiency: With a prep time of just fifteen minutes and a cook time of twenty, you’re looking at a total of thirty‑five minutes from start to finish.
- Make‑Ahead Potential: Assemble the pi’s ahead of time, refrigerate, and bake when you’re ready, making this an ideal solution for last‑minute entertaining.
- Crowd Reaction: Friends who have tried this version rave about how it feels like a pizza, but without the mess of dough handling.
- Quality Ingredients: Using a rotisserie chicken and high‑quality cheddar jack ensures that each pi delivers maximum flavor without compromising on texture.
- Versatility: This pi can be served as an appetizer, a light dinner, or even a party snack, making it a go‑to recipe for any occasion.
Alright, let's break down exactly what goes into this masterpiece. The next section will walk you through each ingredient, why it matters, and how you can tweak it if you’re feeling adventurous.
Inside the Ingredient List
The Flavor Base
The ranch seasoning mix is the unsung hero that brings everything together. It’s not just salt and pepper; it’s a blend of dill, garlic, onion, and a hint of lemon zest that brightens the dish. If you’re using a pre‑made mix, give it a quick sniff—any off aromas could indicate that it’s past its prime. A fresh mix will elevate the pi to a new level of flavor.
If you’re feeling adventurous, try adding a pinch of smoked paprika for a subtle depth of flavor. Or swap the ranch mix for a Cajun seasoning for a spicier kick. Just remember that the base seasoning is the backbone of this recipe, so keep it bold.
The Texture Crew
Large flour tortillas are the canvas of this pi. They’re versatile, affordable, and provide the perfect chewy base that crisps up beautifully in the oven. Look for tortillas that are at least ten inches in diameter to give you enough surface area for the filling. If you can’t find them, a large pita or even a flatbread can work as a substitute.
The soft cream cheese acts as a creamy bridge between the tortilla and the other ingredients. It melts into a silky coating that holds everything together. A full‑fat 8 oz package is ideal because it’s rich enough to deliver that luxurious mouthfeel without turning greasy.
The Unexpected Star
Crispy bacon pieces are more than just a garnish—they add a smoky, salty crunch that balances the creamy elements. Use a bacon that’s already cooked to a crisp texture; this will prevent excess grease from making the pi soggy. If you’re on a low‑fat diet, you can replace bacon with turkey bacon, but keep an eye on the moisture level.
A fun fact: bacon’s crunch is achieved through the Maillard reaction, a chemical process that occurs when proteins and sugars are heated together. That’s why the first bite has that satisfying snap that signals quality.
The Final Flourish
Shredded cheddar jack cheese is the final touch that gives the pi its signature melt and golden crust. The blend of cheddar and Monterey Jack offers a smooth melt and a slightly sweet, nutty flavor that complements the ranch and bacon. If you prefer a sharper cheddar, feel free to mix in a bit of sharp cheddar for extra bite.
When selecting cheese, look for one that’s fresh and has a good fat content. A lower‑fat cheese will melt less evenly and might leave your pi feeling dry. The cheddar jack’s natural moisture content helps keep the pi juicy.
Everything's prepped? Good. Let's get into the real action.
The Method — Step by Step
- Preheat the oven to 425°F (220°C). Line a baking sheet with parchment paper or a silicone mat so the pi’s don’t stick. This step is crucial because a hot oven ensures that the tortillas crisp up quickly without absorbing too much moisture from the filling.
- Prepare the filling by mixing the softened cream cheese with the ranch seasoning mix in a bowl. Use a fork or a whisk to blend until the mixture is smooth and evenly flavored. The consistency should be thick enough to stay on the tortilla but not so dry that it cracks.
- Assemble the pi by laying each tortilla flat on a cutting board. Spread an even layer of the ranch cream cheese mixture over the surface, leaving about a half‑inch border around the edges. This border will hold the filling in place as the pi bakes.
- Add the chicken by sprinkling shredded rotisserie chicken evenly over the cream cheese layer. Make sure the chicken is well distributed; otherwise, you might end up with a dry spot on one side.
- Scatter the bacon pieces across the chicken, ensuring each bite has a crunch. The bacon not only adds flavor but also creates a barrier that helps the tortilla stay crisp.
- Top with shredded cheddar jack cheese until the surface is completely covered. The cheese should be spread thinly so it melts evenly without creating a soggy layer.
- Slide the assembled pi onto the prepared baking sheet and bake for 12–15 minutes, or until the cheese is bubbly and the edges of the tortilla are golden brown. Watch for the edges; they should pull away slightly from the parchment, indicating crispness.
- Remove from the oven and let the pi rest for two minutes. This short rest allows the cheese to set slightly, making slicing easier and preventing a mess of melted cheese.
- Slice and serve using a pizza cutter or a sharp knife. Serve immediately while the pi is still warm, and watch the crowd go wild.
That's it — you did it. But hold on, I've got a few more tricks that'll take this to another level.
Insider Tricks for Flawless Results
The Temperature Rule Nobody Follows
Many people bake at 350°F, thinking it’s safe for everything. However, this recipe thrives at a higher temperature. 425°F allows the tortilla to crisp up quickly and the cheese to melt into a bubbly, golden layer without drying out the filling. If you lower the temperature, you’ll end up with a soggy base that can’t hold the cheese.
Why Your Nose Knows Best
When the pi starts to bake, the aroma of melted cheese and bacon will fill your kitchen. Trust that scent as a cue: if the cheese is bubbling and the edges are turning golden, it’s almost done. The smell is a reliable indicator that the pi is at its peak flavor.
The 5-Minute Rest That Changes Everything
Letting the pi sit for five minutes after baking allows the cheese to set and the flavors to meld. It also prevents the cheese from sliding off the tortilla when you slice it. A quick rest makes each bite cleaner and more visually appealing.
Don’t Skip the Border
Leaving a small border of cream cheese around the edge of the tortilla is essential. It creates a seal that keeps the filling from spilling out as you slice. It also gives the pi a polished look, as the border becomes a golden ring that’s almost impossible to resist.
Use Fresh Rotisserie Chicken
The quality of the chicken is paramount. A fresh rotisserie chicken provides moisture and flavor that a canned or pre‑shredded chicken just can’t match. If you can’t find a rotisserie chicken, use a grilled chicken breast that’s been shredded and seasoned with a pinch of salt and pepper.
Add a Splash of Milk for Extra Creaminess
If you find the cream cheese mixture too thick, whisk in a tablespoon of milk or cream. This will create a silkier spread that coats the tortilla more evenly, resulting in a smoother texture.
Creative Twists and Variations
This recipe is a playground. Here are some of my favorite ways to switch things up:
Mediterranean Pi
Replace the ranch seasoning with a Greek yogurt and dill mix. Add chopped kalamata olives and sun‑dried tomatoes for a Mediterranean flair. The result is a pi that feels like a Greek salad on a tortilla.
Spicy Jalapeño Pi
Stir diced jalapeños into the cream cheese mixture and sprinkle crushed red pepper flakes on top before baking. The heat will pair beautifully with the smoky bacon and melt cheese.
Veggie‑Rich Pi
Add sautéed spinach, roasted bell peppers, and caramelized onions to the filling. This not only boosts nutrition but also adds a vibrant color palette that looks as good as it tastes.
Breakfast Pi
Swap the chicken for breakfast sausage and top with a fried egg after baking. The combination of savory sausage, runny yolk, and crispy tortilla makes for a hearty breakfast that feels indulgent.
Dessert Pi
Use sweetened cream cheese and drizzle honey over the top after baking. Sprinkle chopped strawberries or blueberries for a sweet finish that still keeps the pi’s structure.
Gluten‑Free Pi
Use gluten‑free tortillas and follow the same steps. The texture will be slightly different but still delightful, making this pi inclusive for all dietary needs.
Storing and Bringing It Back to Life
Fridge Storage
Store the assembled pi in an airtight container in the refrigerator for up to 48 hours. The tortilla will soften slightly, so reheat before serving. Place the pi on a baking sheet and bake at 350°F for 8–10 minutes until the cheese is melted and the tortilla is crisp again.
Freezer Friendly
Wrap each pi tightly in plastic wrap and then in aluminum foil. Freeze for up to one month. When you’re ready to enjoy, thaw overnight in the refrigerator and bake at 425°F for 12–15 minutes. The texture will be close to fresh.
Best Reheating Method
To restore the crispness, bake in a preheated oven rather than microwaving. If you’re short on time, a toaster oven works wonderfully. A quick 2‑minute burst in a hot skillet will also revive the tortilla’s crunch.
Add a tiny splash of water before reheating to steam back to perfection. This trick keeps the cheese from drying out and ensures the pi remains moist and flavorful.