You ever had a kitchen moment that turned into a culinary revelation? I was scrambling to salvage a batch of over‑baked chocolate cookies that had turned into a crunchy, bitter mess. I tossed them into a blender, added a splash of milk, a dollop of chocolate frosting, and a handful of Peeps marshmallow chicks. The result was a surprisingly lush, chocolatey “dirt” that felt like a sweet, edible playground. If you think you’ve tried every Easter dessert, think again. This version of the classic dirt cake will have you wondering why you ever settled for anything less.
Picture the scene: a bright kitchen, the scent of chocolate and vanilla drifting through the air, the gentle clink of a spoon against a bowl. The texture is a paradox—crunchy cookie crumbs balanced by silky, melt‑in‑your‑mouth chocolate frosting, topped with fluffy marshmallow chicks that look like they’ve just hopped out of a spring garden. When you bite into the first spoonful, the chocolate sings, the marshmallow gives a light, airy pop, and the cookie crumbs provide a satisfying crunch. The overall sensation is like a secret garden under a sky of chocolate, with the Peeps adding a whimsical touch that feels both nostalgic and fresh.
What makes this particular dirt cake stand out is the meticulous layering of flavors and textures that I discovered after a few trial runs. The cookie crumbs are toasted just enough to bring out a nutty undertone that pairs beautifully with the rich chocolate frosting. The Peeps aren’t just decorative; they melt slightly, creating pockets of sweet, airy fluff that contrast the dense chocolate base. I’ve found that using a high‑quality chocolate frosting—preferably one with a lower sugar content—adds depth without overwhelming the marshmallow’s delicate sweetness. The result is a dessert that’s both indulgent and surprisingly balanced.
I dare you to taste this and not go back for seconds. This isn’t a fleeting treat; it’s a full‑blown experience that will have you reaching for the spoon even after you’ve finished. The best part? It’s a no‑bake recipe, which means you can whip it up in minutes, leaving you more time to enjoy the festivities. And if you’re looking for a showstopper, the final presentation—complete with a chocolate “dirt” surface, marshmallow “bunnies,” and a drizzle of chocolate sauce—will look as good as it tastes. Let me walk you through every single step — by the end, you’ll wonder how you ever made it any other way.
What Makes This Version Stand Out
- Flavor: The toasted cookie crumbs add a subtle nutty sweetness that elevates the chocolate base, creating a complex flavor profile that satisfies both sweet and savory palates.
- Texture: A harmonious blend of crunchy, chewy, and silky textures keeps each bite exciting—no single element dominates.
- Ease: No baking required. All the work happens in the fridge, making this an ideal last‑minute dessert for busy families.
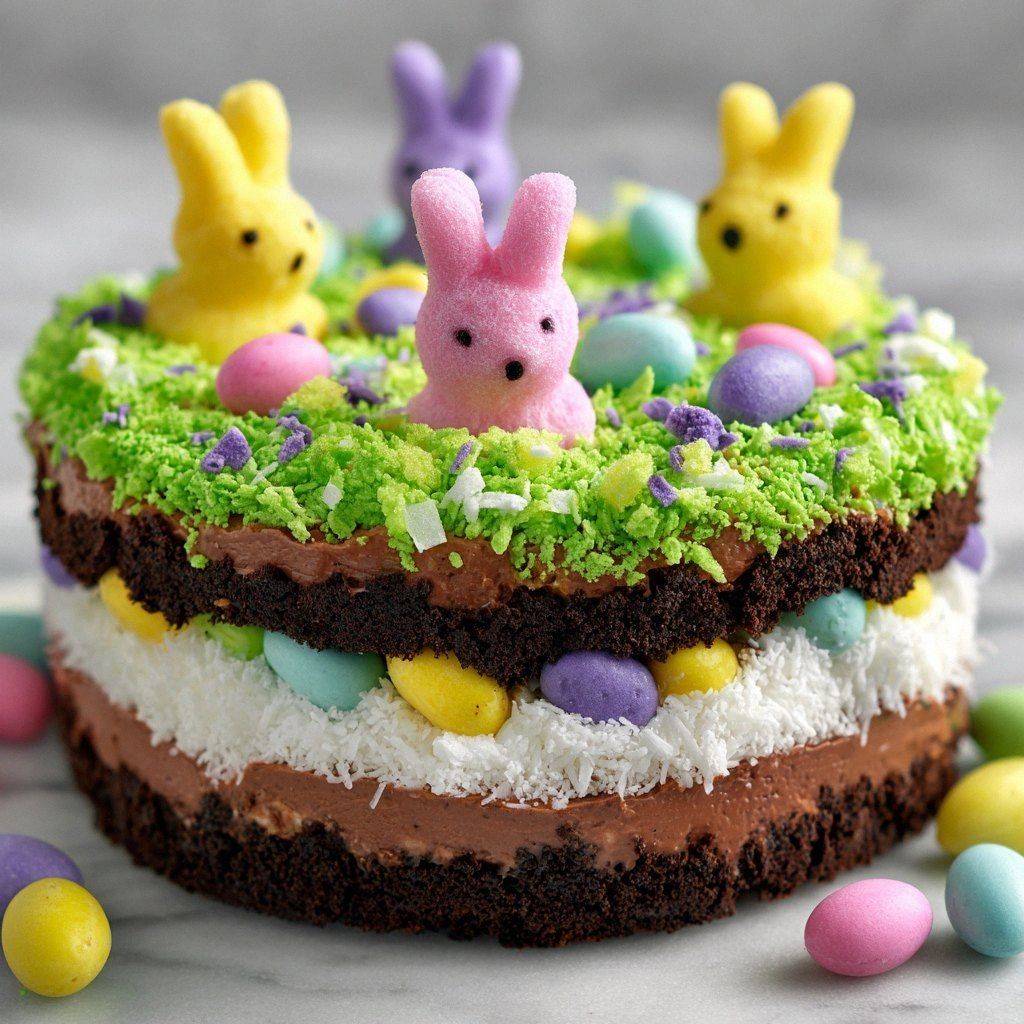
- Visual Appeal: The “dirt” surface, complete with chocolate “rocks” and Peeps “bunnies,” turns the dish into a conversation starter at any gathering.
- Make‑ahead Friendly: Assemble the layers the night before; the flavors meld beautifully, and the dessert stays fresh for up to three days.
- Ingredient Quality: Using a high‑quality chocolate frosting and fresh Peeps ensures the dessert doesn’t feel like a generic copycat.
- Kid‑Friendly: The marshmallow chicks and chocolate drizzle make it a hit with children, while the chocolate base satisfies adult cravings.
- Versatility: Add a splash of espresso or a pinch of sea salt to tweak the flavor for different occasions.
Alright, let's break down exactly what goes into this masterpiece…
Inside the Ingredient List
The Flavor Base
At the heart of this dirt cake is the chocolate frosting—rich, velvety, and slightly sweet. It forms the creamy ground that supports the cookie crumbs and marshmallow chicks. The frosting’s cocoa content is critical; a higher cocoa percentage yields a deeper chocolate taste without the sugar overload. If you’re watching your sugar intake, you can swap in a dark chocolate frosting or even a homemade ganache for a more sophisticated profile.
The Texture Crew
The cookie crumbs provide the crunch, while the Peeps marshmallow chicks deliver a light, airy contrast. The crumbs are made from crushed chocolate sandwich cookies, which give a buttery undertone that pairs perfectly with the chocolate frosting. If you prefer a different crunch, try using crushed pretzels or shortbread cookies. The Peeps are the star garnish, adding a whimsical touch that children adore. They also melt slightly when pressed, creating pockets of sweet, fluffy texture.
The Unexpected Star
A splash of vanilla extract and a dash of sea salt subtly enhance the overall flavor. The vanilla adds warmth, while the sea salt sharpens the sweetness, creating a balanced taste that feels indulgent yet refined. If you’re feeling adventurous, a pinch of espresso powder can deepen the chocolate notes and add an aromatic lift.
The Final Flourish
A drizzle of melted chocolate or a dusting of cocoa powder crowns the dessert, giving it that authentic “earthy” look. The chocolate drizzle also adds a glossy finish that makes the dish Instagram‑ready. If you’re a fan of a more rustic look, sprinkle crushed chocolate chips on top for a speckled effect.
Everything's prepped? Good. Let's get into the real action…
The Method — Step by Step
- Toast the Cookie Crumbs: Heat a non‑stick skillet over medium heat. Add the crushed chocolate sandwich cookies and toast for 2–3 minutes, stirring frequently. You’ll notice a subtle nutty aroma that signals the crumbs are ready. Remove from heat and let them cool; this step unlocks their full flavor potential.
- Prepare the Chocolate Base: In a mixing bowl, combine the chocolate frosting, butter, powdered sugar, vanilla extract, and milk. Whisk until the mixture is smooth and glossy. The butter softens the frosting, giving it a silky consistency that’s easy to spread. This base will hold the crumbs and marshmallows together.
- Layer the Crumbs: Spoon a generous layer of toasted cookie crumbs onto the bottom of a 9‑inch square baking dish. Press them down firmly with the back of a spoon to create an even surface. This crumb layer acts as the “earth” in your dirt cake.
- Add the Chocolate Base: Pour the chocolate frosting mixture over the crumbs, spreading it evenly with a spatula. The chocolate should just cover the crumbs, creating a smooth, even layer. The mixture should look like a chocolate mud, ready to receive the marshmallow “bunnies.”
- Insert the Marshmallows: Gently press the Peeps marshmallow chicks into the chocolate layer, spacing them evenly across the surface. They should sit flush with the chocolate, giving the appearance of a field of Easter bunnies. The marshmallows will slightly soften when pressed, creating a delightful contrast.
- Refrigerate: Cover the dish with plastic wrap and refrigerate for at least 30 minutes, or until the chocolate base has set firmly. This chilling step ensures the layers stay together when you cut or serve. If you’re in a hurry, a 15‑minute chill will suffice for a slightly softer texture.
- Finish with Drizzle: Melt a handful of chocolate chips or a bar of chocolate in a double boiler. Drizzle the melted chocolate over the top of the set dirt cake in a zig‑zag pattern, allowing it to pool in the crevices. The glossy drizzle adds visual drama and a burst of flavor.
- Serve: Slice the cake into squares using a sharp knife. Serve immediately, or let it rest at room temperature for a few minutes so the chocolate softens slightly. The final bite should feel like a crunchy, chocolatey adventure topped with fluffy marshmallow fluff.
That's it — you did it. But hold on, I've got a few more tricks that'll take this to another level…
Insider Tricks for Flawless Results
The Temperature Rule Nobody Follows
The key to a smooth chocolate base is ensuring the frosting isn’t too cold or too hot. If the frosting is too cold, it will harden quickly and become crumbly; if too warm, it won’t set properly. Aim for a room‑temperature frosting, then chill it for 10 minutes before pouring. This subtle temperature control guarantees a silky, spreadable consistency that holds the crumbs and marshmallows together.
Why Your Nose Knows Best
Before you add the final drizzle, give the dessert a quick sniff. A faint chocolate aroma indicates the base is set and the marshmallows are ready. If you detect a strong vanilla or buttery scent, the base may still be soft. Trusting your nose saves you from a soggy, disappointing dessert.
The 5‑Minute Rest That Changes Everything
After chilling, let the cake rest at room temperature for 5 minutes before slicing. This short pause allows the chocolate to relax, preventing the crust from cracking when you cut it. The result is clean, even slices that showcase the layers beautifully.
The Secret to a Crisp Edge
If you love a bit of crunch, sprinkle a thin layer of crushed chocolate chips along the edge of the chocolate base before chilling. The chips will caramelize slightly during refrigeration, giving you a crisp, chocolatey border that’s a treat for the palate.
The Sweet‑and‑Savory Twist
A pinch of sea salt on the chocolate base amplifies the sweetness and balances the richness. Add the salt at the same time as the vanilla for a subtle, savory undertone that elevates the overall flavor profile.
Creative Twists and Variations
This recipe is a playground. Here are some of my favorite ways to switch things up:
Chocolate‑Mint Surprise
Add a few drops of peppermint extract to the chocolate base for a refreshing twist. The mint pairs wonderfully with the chocolate, creating a layered flavor that feels both festive and sophisticated.
Nutty Crunch
Incorporate chopped toasted almonds or hazelnuts into the cookie crumb layer. The nuts add a delightful crunch and a nutty aroma that complements the chocolate foundation.
Caramel Swirl
Drizzle a thin stream of caramel sauce over the set dirt cake before serving. The caramel’s buttery sweetness cuts through the chocolate richness, adding depth and complexity.
Espresso‑Infused Delight
Stir a teaspoon of instant espresso powder into the chocolate frosting. The espresso accentuates the chocolate’s depth, giving the dessert a bold, adult‑friendly flavor.
Sea‑Salted Pretzel Crunch
Replace some cookie crumbs with crushed pretzels and sprinkle a pinch of sea salt on top. The salty crunch provides a savory contrast to the sweet marshmallow chicks, creating a balanced bite.
Vegan Version
Swap the butter for coconut oil, use a dairy‑free chocolate frosting, and choose vegan Peeps marshmallows. The result is a plant‑based dessert that still delivers on flavor and texture.
Storing and Bringing It Back to Life
Fridge Storage
Store the assembled dirt cake in an airtight container in the refrigerator for up to three days. The chocolate base will remain firm, while the marshmallows stay fresh and pliable. When ready to serve, let the cake sit at room temperature for 10 minutes to soften slightly.
Freezer Friendly
Wrap the dish tightly in plastic wrap and place it in a freezer bag. The cake can be frozen for up to two weeks. Thaw in the refrigerator overnight, then allow to come to room temperature for 15 minutes before serving.
Best Reheating Method
To revive a chilled or frozen cake, gently warm it in a microwave on low power for 10–15 seconds. If you prefer a warmer texture, place the cake in a preheated oven at 300°F (150°C) for 5 minutes. Add a tiny splash of water before reheating to create steam, which helps the chocolate soften without becoming runny.