Picture this: it’s 2 a.m., the house is quiet, and a sudden craving for something rich, chocolatey, and oh‑so‑creamy hits you like a freight train. I was half‑asleep, half‑determined, and absolutely unwilling to settle for a store‑bought brownie that had been sitting on the counter for a week. The pantry offered me a lonely box of chocolate cookies, a block of cream cheese that was practically begging to be whisked, and a handful of semi‑sweet chocolate chips that glimmered like tiny promises. I thought, “What if I could turn these leftovers into bite‑size clouds of decadence?” That night, I embarked on a culinary experiment that would end with me devouring half the batch before anyone else even knew they existed.
The kitchen quickly transformed into a symphony of sounds: the gentle crackle of butter melting in a saucepan, the soft sigh of cream cheese yielding to a whisk, and the faint, almost seductive pop of chocolate chips as they melted into a glossy river of darkness. The air filled with an aroma that was part espresso, part cocoa, and part vanilla—an intoxicating perfume that made my nose tingle and my heart race. I could feel the buttery crust forming beneath my fingertips, firm yet tender, while the silky filling swirled in the bowl like a velvet curtain being drawn across a stage. When the first bite finally hit my tongue, it was an explosion of textures: a crisp, chocolatey base giving way to a creamy, tangy center that melted like a dream.
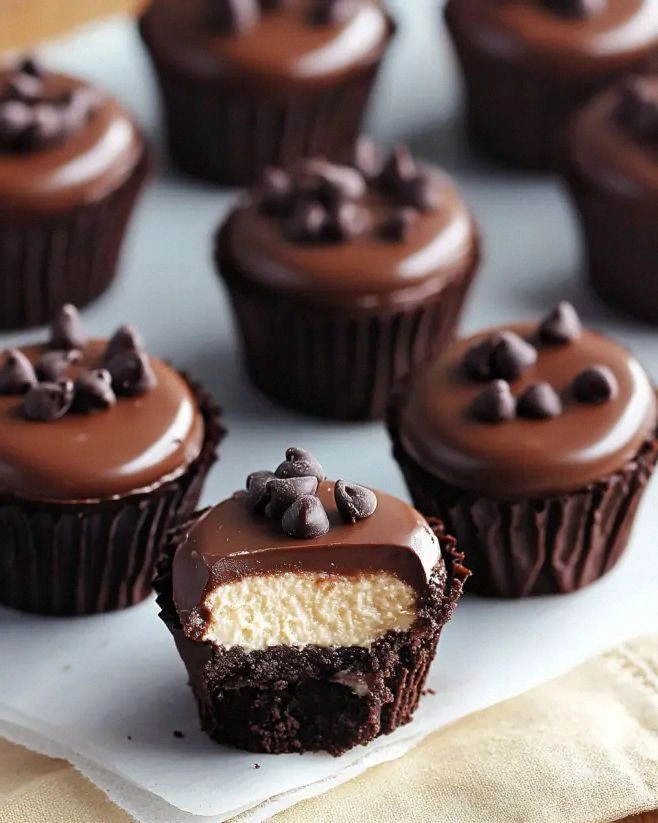
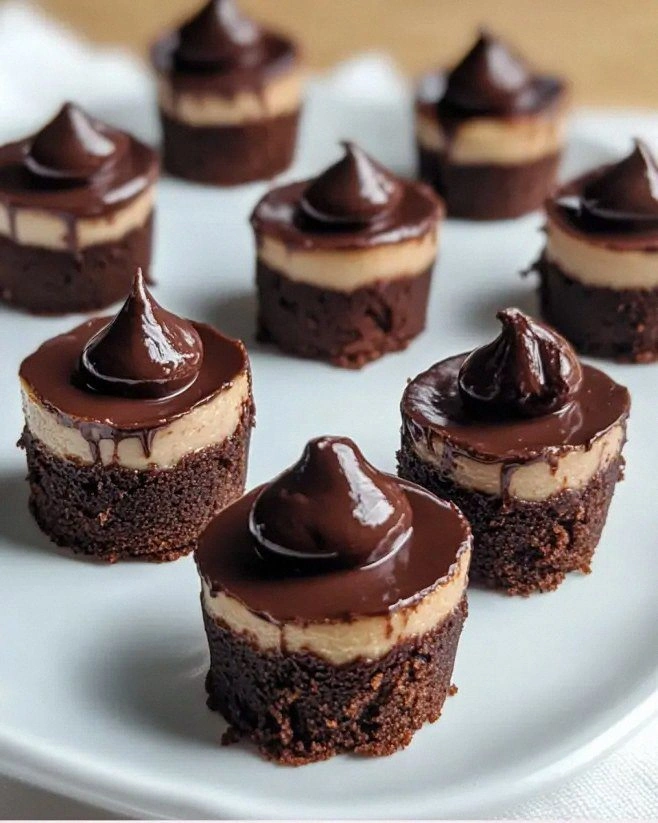
Most mini cheesecake recipes get the texture wrong—either they’re too dense, or the crust is soggy, or the chocolate flavor is an afterthought. I’ve tried a dozen “quick” versions that left me disappointed, but this one hits every note perfectly. The secret? A balanced marriage of crunchy cookie crumbs, a buttery binder, and a luscious filling that incorporates sour cream for that subtle tang that cuts through the sweetness. Plus, the final topping of whipped cream and chocolate shavings adds a luxurious finish that makes each bite feel like a celebration.
And here’s the kicker: I’m about to reveal the one technique that most recipes completely overlook—the “double‑set” method, where the crust sets first, then the filling gets a brief chill before the final bake. This ensures the crust stays crisp while the interior stays silky. Let me walk you through every single step — by the end, you’ll wonder how you ever made it any other way.
What Makes This Version Stand Out
- Texture: A crunchy chocolate cookie crust that holds its shape, paired with a melt‑in‑your‑mouth filling that’s airy yet dense enough to satisfy.
- Flavor Depth: Semi‑sweet chocolate chips melt into the batter, delivering a deep cocoa note that’s balanced by the tang of sour cream.
- Simplicity: Only ten ingredients, all pantry staples, and no fancy equipment—just a muffin tin and a whisk.
- Speed: From start to finish it takes under an hour, making it perfect for last‑minute gatherings.
- Visual Appeal: The glossy chocolate top, crowned with whipped cream and shavings, looks like a miniature work of art.
- Make‑Ahead Power: These bites keep their texture for up to three days in the fridge, so you can prep ahead for parties.
- Crowd Reaction: I dare you to taste this and not go back for seconds—people literally line up for a second round.
- Ingredient Quality: Using real butter and high‑quality chocolate makes the difference between “good” and “mind‑blowing.”
Inside the Ingredient List
The Flavor Base
1 cup chocolate cookie crumbs: These crumbs are the foundation, delivering that unmistakable chocolate crunch. If you skip them, you lose the textural contrast that makes each bite interesting. You can substitute with Oreo crumbs for a slightly different flavor, but you’ll miss the pure cocoa note.
2 tablespoons granulated sugar: The sugar sweetens the crust just enough to complement the bitterness of the chocolate. Too much sugar would make the base overly sweet and mask the cheese’s tang.
The Texture Crew
4 tablespoons unsalted butter: Butter binds the crumbs together, creating a firm yet tender base. Using salted butter can throw off the flavor balance, so always go unsalted and add a pinch of salt if you like.
8 ounces cream cheese: The star of the filling, providing richness and a slight tang. Choose full‑fat cream cheese for the creamiest texture; low‑fat versions become grainy.
1/2 cup powdered sugar: It sweetens the filling without adding grittiness. Sifting it ensures a smooth, glossy batter.
1 teaspoon vanilla extract: A whisper of vanilla lifts the entire flavor profile, making the chocolate taste deeper.
The Unexpected Star
1/2 cup sour cream: This adds a subtle acidity that cuts through the richness, preventing the cheesecake from feeling heavy. If you don’t have sour cream, Greek yogurt works as a 1‑to‑1 swap.
1/2 cup semi‑sweet chocolate chips: They melt into the batter, creating a silky chocolate river that runs through each bite. For a richer taste, use dark chocolate chips with 70% cacao.
The Final Flourish
Whipped cream: A dollop on top adds lightness and visual contrast. It’s optional, but the creamy crown makes the bite feel luxurious.
Chocolate shavings: These garnish the top, adding a slight bitterness that balances the sweet filling. Use a vegetable peeler on a chocolate bar for the best ribbons.
Everything's prepped? Good. Let’s get into the real action…
The Method — Step by Step
Preheat your oven to 325°F (160°C) and line a standard 12‑cup muffin tin with paper liners. The heat is gentle enough to set the crust without over‑browning, and the liners make removal a breeze. While the oven warms, gather all your crust ingredients in a medium bowl.
Combine the chocolate cookie crumbs, granulated sugar, and frozen butter cubes. Using a pastry cutter or your fingertips, mash the mixture until it resembles wet sand. This is the moment where the crust starts to form its identity—listen for that faint “crunch” as the butter coats each crumb.
Press the crumb mixture firmly into the bottom of each muffin cup, about 1/3 of the cup height. Use the back of a spoon or a small glass to flatten it evenly. Power transition: Okay, ready for the game‑changer? This is where the “double‑set” method begins.
Kitchen Hack: Chill the crust for 10 minutes in the freezer before adding the filling; it firms up instantly, preventing cracks later.While the crust chills, beat the cream cheese in a large bowl until smooth—no lumps allowed. This should take about 2 minutes on medium speed. The mixture will become creamy and glossy, a sign that the proteins have fully emulsified.
Add powdered sugar and vanilla extract to the cream cheese, beating until fully incorporated. The batter should turn a pale ivory color, and you’ll notice a faint sweet perfume rising—your nose knows when it’s ready.
Fold in the sour cream, then gently stir in the semi‑sweet chocolate chips. The chips should stay whole, creating little pockets of molten chocolate that will surprise the palate later.
Pour the filling over the chilled crusts, filling each cup to about three‑quarters full. Smooth the tops with a spatula; a tidy surface makes for an even bake. Watch Out: If the filling is too hot, it can melt the crust, causing it to become soggy.
Watch Out: Over‑filling the cups will cause the cheesecake to spill over during baking, creating a mess and uneven textures.Slide the tin into the oven and bake for 20‑25 minutes. You’ll know they’re done when the edges start to pull away from the sides of the cups and the center is just set with a slight wobble. Resist the urge to open the oven door early; the heat needs to stay consistent.
Turn off the oven, crack the door open a few inches, and let the cheesecakes sit for 10 minutes. This gentle cooling prevents cracks. Then, remove the tin and let the bites cool completely on a wire rack.
Once cooled, refrigerate the mini cheesecakes for at least 2 hours. This is the final “set” that locks in the creamy texture. Before serving, top each bite with a swirl of whipped cream and a sprinkling of chocolate shavings.
That’s it — you did it. But hold on, I’ve got a few more tricks that’ll take this to another level…
Insider Tricks for Flawless Results
The Temperature Rule Nobody Follows
Never bake cheesecake batter straight from the fridge. Let it sit at room temperature for 15 minutes before it hits the oven. This prevents a sudden temperature shock that can cause cracks. I once tried skipping this step, and the result was a cheesecake that looked like a cracked desert—unpleasant to the eye and the palate.
Why Your Nose Knows Best
When the cheesecake is nearly done, trust the aroma more than the timer. The moment you smell a faint caramelized butter scent, you’re at the perfect doneness point. Over‑baking turns the creamy interior into a rubbery texture—something no one wants.
The 5‑Minute Rest That Changes Everything
After baking, let the cheesecakes rest in the turned‑off oven with the door ajar for 5 minutes. This gradual cooling reduces the risk of cracking and gives the filling time to firm up uniformly. It’s a tiny step that yields massive results.
Whipped Cream Consistency Secret
For the fluffiest topping, chill your mixing bowl and whisk attachments for at least 10 minutes before whipping. Cold metal helps incorporate air faster, resulting in peaks that hold their shape longer. If you skip this, the whipped cream will deflate quickly, and your presentation suffers.
Chocolate Shaving Perfection
Use a high‑quality chocolate bar with at least 60% cacao for shavings. The higher cocoa content means less sugar, which prevents the shavings from melting too quickly on the warm cheesecake. A quick tip: run the peeler over a cold chocolate bar for longer, finer ribbons.
Creative Twists and Variations
This recipe is a playground. Here are some of my favorite ways to switch things up:
Mint‑Chocolate Fusion
Swap half the semi‑sweet chocolate chips for mint chocolate chips and add a drop of peppermint extract to the filling. The cool mint cuts through the richness, making it perfect for summer gatherings.
Espresso‑Infused Delight
Dissolve 1 teaspoon of instant espresso powder in the vanilla extract before adding it to the batter. The coffee notes deepen the chocolate flavor, turning each bite into a mini tiramisu.
Nutty Crunch Variation
Stir in ¼ cup toasted chopped hazelnuts or almonds into the crust mixture. The nuts add an extra layer of crunch that contrasts beautifully with the silky filling.
White Chocolate Raspberry
Replace the semi‑sweet chocolate chips with white chocolate chips and fold in ¼ cup fresh raspberry puree into the batter. The tangy berries brighten the flavor profile and give a gorgeous pink hue.
Spiced Autumn Edition
Add a pinch of cinnamon, nutmeg, and a dash of pumpkin spice to the filling for a cozy, fall‑ready version. Top with a drizzle of caramel sauce for extra indulgence.
Storing and Bringing It Back to Life
Fridge Storage
Place the cooled mini cheesecakes in an airtight container and store them in the refrigerator for up to three days. The chilled environment keeps the texture firm while preserving the flavor.
Freezer Friendly
If you need to keep them longer, wrap each bite individually in plastic wrap, then place them in a freezer‑safe zip‑top bag. They’ll freeze beautifully for up to two months. When you’re ready to enjoy, thaw overnight in the fridge.
Best Reheating Method
To revive the cheesecake’s silky interior, let it sit at room temperature for 10 minutes, then microwave for 10‑15 seconds. Add a tiny splash of water (about a teaspoon) before microwaving; the steam restores the creamy texture without drying out the crust.