I was standing in my kitchen at 2 a.m., half‑asleep, staring at a half‑finished bowl of instant noodles, when my roommate dared me to recreate the iconic Yoshinoya beef bowl that we both love from the Japanese fast‑food chain. I laughed, grabbed the cheapest ribeye I could find, and set off on a culinary adventure that turned my tiny apartment into a miniature Tokyo street stall. The air filled with the sweet‑savory perfume of soy, mirin, and sizzling onions, and I could almost hear the bustling sounds of a Tokyo train station in the background. By the time the first spoonful hit my tongue, I knew I had stumbled onto something magical.
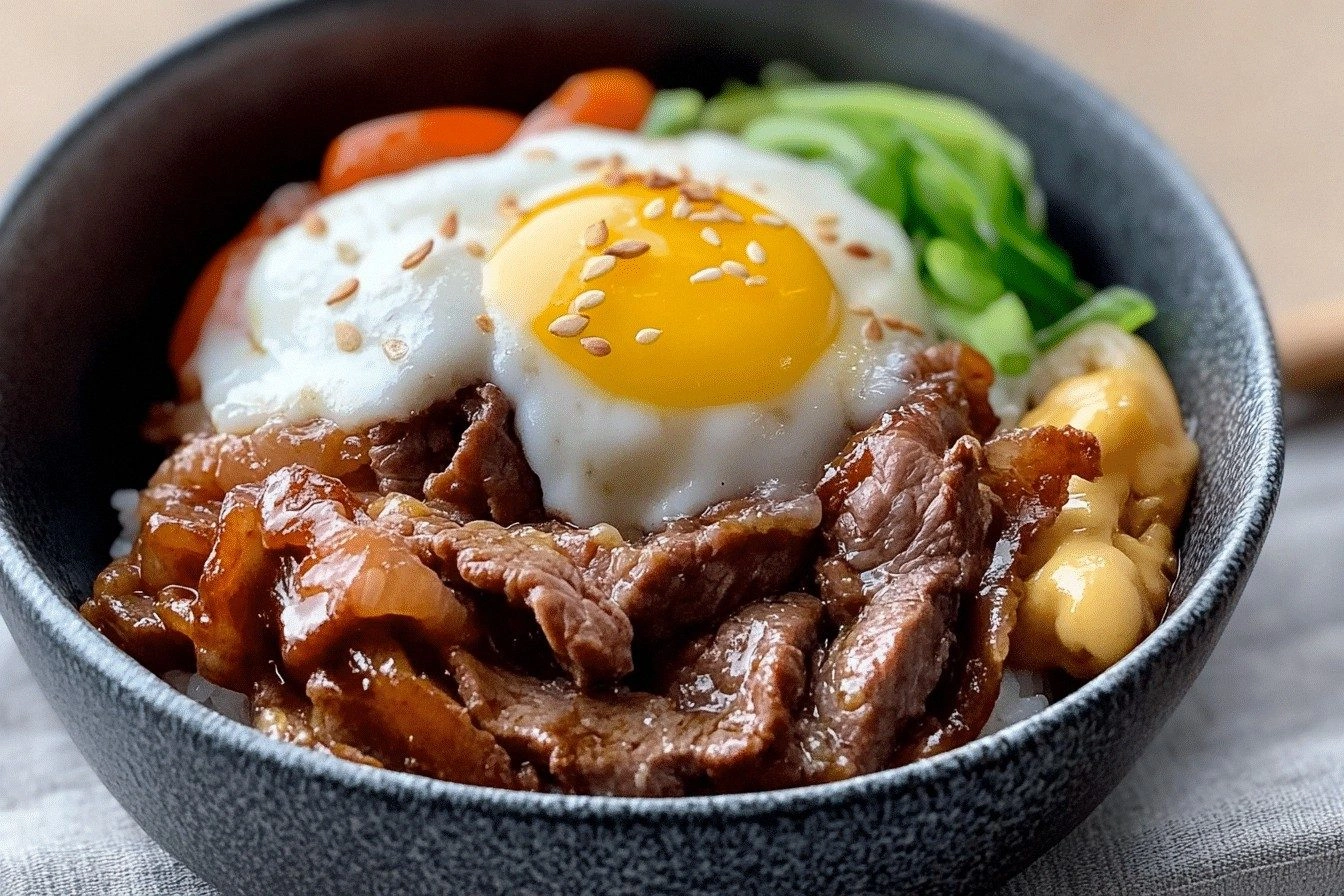
Picture this: a steaming mound of fluffy white rice, the kind that glistens like freshly fallen snow, topped with thin ribbons of beef that have been coaxed into a glossy, umami‑rich glaze. The beef is tender enough to melt in your mouth, while the onions have caramelized just enough to add a buttery sweetness that balances the salty sauce. When you break the optional raw egg yolk over the top, the yolk runs like liquid gold, turning every bite into a velvety, buttery explosion. That moment, that taste, that aroma—that’s what I was chasing, and I finally nailed it.
Most copycat recipes out there either over‑complicate the sauce or skimp on the beef, leaving you with a watery bowl that feels more like a sad lunchbox than a comfort food masterpiece. This version, however, respects the original’s simplicity while sneaking in a few chef‑level tricks that make the flavor pop louder than a karaoke night in Shibuya. I’m talking about a precise balance of sweet, salty, and umami, plus a cooking method that locks in moisture without turning the meat into a rubbery chew. The result? Hands down the best version you’ll ever make at home, and I dare you to taste this and not go back for seconds.
Let me walk you through every single step — by the end, you’ll wonder how you ever made it any other way. Okay, ready for the game‑changer? This next part? Pure magic. Stay with me here — this is worth it.
What Makes This Version Stand Out
- Umami Depth: By using a combination of dashi stock and beef broth, the sauce gains layers of flavor that mimic the secret broth Yoshinoya keeps under lock and key.
- Silky Texture: A quick deglaze with mirin and sake creates a glossy coating that clings to each slice of beef like a satin dress.
- Speed: The whole process takes under 45 minutes, perfect for a weeknight dinner that feels like a treat.
- Ingredient Quality: Using ribeye or sirloin guarantees a buttery bite, while a good quality soy sauce adds that authentic Japanese saltiness.
- Versatility: Optional toppings let you customize the bowl for spice lovers, vegans (skip the egg), or anyone who wants a pop of freshness.
- Make‑Ahead Friendly: The sauce can be prepared in advance and stored, meaning you can assemble bowls in minutes on busy days.
- Crowd Reaction: Guests often claim they’ve never tasted anything like it outside of Japan, and the bowl disappears faster than you can say “itadakimasu.”
- Cost‑Effective: Despite sounding fancy, the total cost stays under $15 for a family of four, making it a budget‑friendly indulgence.
Inside the Ingredient List
The Flavor Base
Soy sauce is the backbone of any Japanese savory dish, delivering that unmistakable salty‑umami punch. I recommend a naturally brewed soy sauce; it has a richer mouthfeel compared to the chemically enhanced versions. If you skip the soy sauce, you’ll lose the depth that makes the sauce feel like it’s been simmering for hours. Mirin adds a gentle sweetness that balances the salt, while also helping the sauce achieve that glossy sheen. A splash of sake introduces a subtle acidity that brightens the overall flavor profile, preventing the bowl from feeling heavy.
Dashi stock or beef broth is the secret weapon here. Dashi, made from kombu and bonito flakes, brings an oceanic umami that pairs beautifully with the beef. If you can’t find dashi, a good quality low‑sodium beef broth works just as well, giving the sauce a robust, meaty backbone. Sugar isn’t just for sweetness; it helps to caramelize the onions and creates that signature glossy finish you see at Yoshinoya. Together, these ingredients form a sauce that coats the beef like velvet.
The Texture Crew
Thinly sliced beef is the star of the show. Opt for ribeye or sirloin because the marbling in these cuts ensures a juicy bite that stays tender even after a quick stir‑fry. If you use a lean cut like flank steak, the meat can become tough, especially if overcooked. The key is to slice the beef against the grain, which shortens the muscle fibers and makes each bite melt in your mouth. Yellow onion adds natural sweetness and a soft texture once caramelized; it also acts as a flavor carrier for the sauce.
Cooked white rice provides the perfect canvas. Use short‑grain Japanese rice for that sticky, slightly chewy texture that soaks up the sauce without turning mushy. If you’re short on time, a day‑old batch of rice works even better because it’s drier and absorbs the sauce more evenly. Optional toppings like pickled ginger add a zingy contrast, while green onions contribute a fresh, oniony bite that cuts through the richness.
The Unexpected Star
A raw egg yolk might sound daring, but it’s a classic addition that turns the entire bowl into a silky, luxurious experience. When you break the yolk over the hot rice, the heat gently cooks the outer edge while the center stays runny, creating a sauce that’s richer than any store‑bought version. If you’re uneasy about raw egg, you can gently temper it by whisking it with a tablespoon of the hot broth before adding it back to the bowl.
The Final Flourish
Pickled ginger, green onions, and a raw egg yolk aren’t just garnish—they’re flavor amplifiers. Pickled ginger cuts through the richness with its bright acidity, while green onions add a subtle crunch and fresh aroma. The egg yolk, as mentioned, creates a luxurious coating that binds the rice, beef, and sauce together. Skipping any of these toppings will still give you a solid bowl, but you’ll miss out on the full sensory symphony that makes this copycat version sing.
Everything’s prepped? Good. Let’s get into the real action…
The Method — Step by Step
Start by gathering all your ingredients and measuring them out. This is the moment where organization pays off; you’ll thank yourself when the sauce starts bubbling and you’re not scrambling for a missing spice. Heat a large skillet or wok over medium‑high heat and add a splash of neutral oil (vegetable or canola works best). When the oil shimmers, it’s ready for the next move.
Add the sliced onions first. Stir them constantly for about 3‑4 minutes until they turn translucent and start to caramelize at the edges. You’ll hear a gentle sizzle that signals the sugars are breaking down, creating that sweet, buttery aroma that makes your kitchen feel like a Japanese izakaya. Once the onions are golden, push them to the side of the pan.
Now, it’s beef time. Add the thinly sliced ribeye in a single layer, letting it sear without moving for 30 seconds. That quick sear locks in juices and creates a beautiful brown crust. After the initial sear, toss the beef with the onions, letting it cook for another 1‑2 minutes until just pink. That sizzle when it hits the pan? Absolute perfection.
Pour in the soy sauce, mirin, sake, and sugar all at once. Stir quickly to combine, and let the mixture come to a gentle boil. As it bubbles, the sugar will dissolve and the sauce will start to thicken, coating the beef and onions in a glossy sheen. Watch Out: If the heat is too high, the sauce can scorch, turning bitter. Keep the temperature moderate and stir continuously.
When the sauce has reduced to a syrupy consistency, stir in the dashi stock or beef broth. This will loosen the glaze just enough to coat the rice later without making it soupy. Let the mixture simmer for another 2‑3 minutes, allowing the flavors to meld. You’ll notice a fragrant steam rising, hinting at the umami depth you’re about to experience.
While the sauce finishes, cook your white rice according to package instructions. For the best texture, rinse the rice until the water runs clear, then let it soak for 15 minutes before cooking. This step ensures each grain stays separate and absorbs the sauce beautifully.
To assemble, place a generous mound of hot rice in each bowl. Spoon the beef‑onion mixture over the rice, making sure every grain gets a coating of the glossy sauce. If you’re feeling adventurous, crack a raw egg yolk over the top and let it sit for a minute so the heat gently cooks the outer edge.
Finish with your optional toppings: a drizzle of pickled ginger, a scattering of sliced green onions, and a final drizzle of soy sauce if you like extra saltiness. Serve immediately, and watch as your guests dive in, eyes widening at the aroma. That moment when they take the first bite? Pure bliss.
That’s it — you did it. But hold on, I’ve got a few more tricks that’ll take this to another level…
Insider Tricks for Flawless Results
The Temperature Rule Nobody Follows
Never cook the beef over low heat; you’ll end up with a rubbery texture that no one wants. High heat creates a rapid Maillard reaction, giving the meat a caramelized exterior while keeping the interior buttery. If your stove runs hot, reduce the heat just after the initial sear to avoid burning. I once tried cooking on medium‑low and the beef turned into a chewy mess—let’s just say the kitchen was quiet after that.
Why Your Nose Knows Best
Your sense of smell is a reliable indicator of doneness. When the onions start to smell sweet and the sauce emits a slightly caramelized aroma, you’re at the perfect point to add the dashi. If the scent is still raw or metallic, give it another minute. Trusting your nose prevents over‑cooking and saves you from a bland bowl.
The 5‑Minute Rest That Changes Everything
After the sauce has reduced, remove the pan from heat and let it sit for five minutes. This short rest allows the flavors to harmonize, much like letting a good wine breathe. The sauce will thicken slightly, making it easier to coat the rice without sliding off. Skipping this step can result in a runny bowl that looks sad on the plate.
Egg Yolk Tempering 101
If raw egg worries you, whisk the yolk with a tablespoon of the hot sauce, then gently fold it back into the bowl. This technique, called tempering, raises the yolk’s temperature just enough to eliminate any food‑safety concerns while preserving its silky texture. A friend tried skipping this step once—let’s just say the yolk turned into a scrambled mess.
Rice Prep Like a Pro
For the ultimate rice texture, use a rice cooker with a “sushi” setting, or if you’re using a pot, keep the lid on and turn off the heat as soon as the water is absorbed. Let the rice sit, covered, for 10 minutes before fluffing. This resting period allows each grain to firm up, preventing sogginess when the sauce is added.
Creative Twists and Variations
This recipe is a playground. Here are some of my favorite ways to switch things up:
Spicy Gochujang Kick
Add a tablespoon of Korean gochujang paste to the sauce for a sweet‑heat twist. The fermented chili adds depth without overwhelming the umami, perfect for those who love a little fire.
Miso‑Infused Version
Stir in a teaspoon of white miso after the sauce has reduced. The miso adds an earthy richness that makes the bowl feel even more comforting on a rainy day.
Vegetarian Swap
Replace the beef with thinly sliced shiitake mushrooms or king oyster “steak” strips. Marinate them in the same sauce; they’ll absorb the flavors and provide a meaty bite without any animal products.
Coconut‑Milk Curry Fusion
Swap half of the dashi stock for coconut milk and add a pinch of curry powder. The result is a creamy, aromatic bowl that bridges Japanese and Thai flavors beautifully.
Crispy Onion Topping
Fry thinly sliced onions until they’re golden and crisp, then sprinkle them on top for a textural contrast that adds a satisfying crunch.
Storing and Bringing It Back to Life
Fridge Storage
Cool the cooked beef and sauce to room temperature, then transfer to an airtight container. Store in the refrigerator for up to 3 days. Keep the rice separate to prevent it from becoming mushy. When reheating, add a splash of water or extra dashi to revive the sauce’s sheen.
Freezer Friendly
Portion the beef‑onion mixture into freezer‑safe bags, removing as much air as possible. Freeze for up to 2 months. The rice can also be frozen, but it’s best to reheat the rice separately and then combine with the thawed sauce for optimal texture.
Best Reheating Method
Use a skillet over medium heat, adding a tablespoon of water or broth to the frozen or refrigerated mixture. Stir until the sauce bubbles and the rice is heated through. The added moisture steams the rice back to fluffiness and prevents the sauce from drying out.