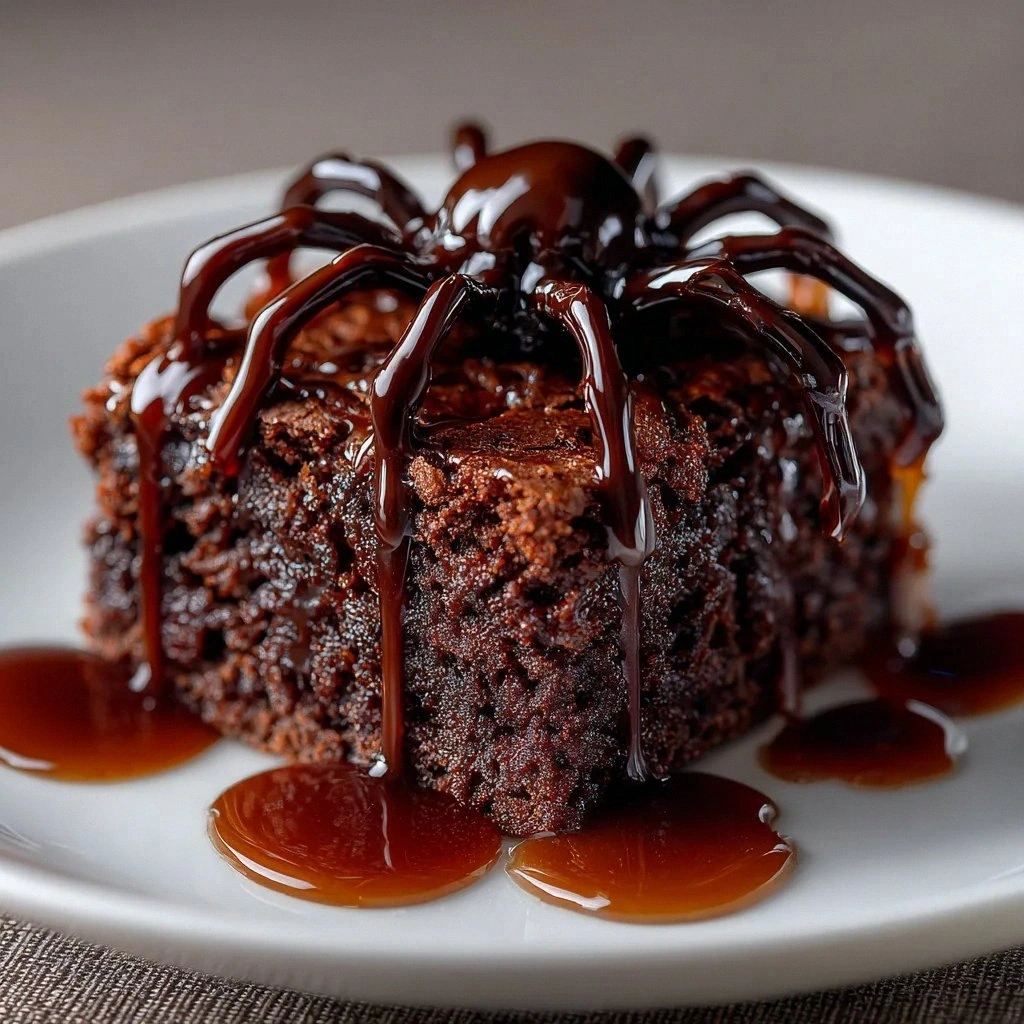
Picture this: I’m halfway through baking a batch of brownies for a Halloween party, the timer’s set, the scent of chocolate is thick in the air, and the kitchen turns into a battlefield when the batter starts to bubble like a cauldron. I was about to serve a classic fudgy treat when a mischievous friend dared me to add a “spooky twist” that would scare the crowd into a frenzy. The moment the batter hit the pan, I realized the challenge was not just flavor, but creating a visual spectacle that would leave guests in awe. I grabbed a handful of chocolate candies and edible eyes, and the idea of spider‑shaped brownies took shape in my mind. If you’ve ever felt the thrill of turning a simple dessert into a Halloween masterpiece, you’re about to see how I made it happen.
The kitchen was a sensory carnival: the buttery aroma mingled with the sharp tang of cocoa, the clink of spoons against the stainless steel counter, and the rhythmic hiss of the oven as it heated to the perfect temperature. I could almost taste the anticipation, a mix of sweet chocolate and the crisp, slightly salty bite of pretzel candy. My fingers felt the smoothness of the batter, a silky mixture that promised a melt‑in‑your‑mouth experience. The sound of the timer ticking away was a metronome for the impending transformation. Every element was in sync, from the way the batter slid into the pan to the way the chocolate candy would cling to the edges, forming eight little legs that would come to life on a plate.
What sets this recipe apart is that it’s not just about taste; it’s about creating a narrative on your plate. I’ve refined the texture to be fudgy yet firm enough to hold the spider legs, and the flavor profile is a balance of deep chocolate, subtle vanilla, and a hint of salt that elevates every bite. The method uses a precise ratio of cocoa to flour that ensures the brownies are dense but not dry, a technique I learned from a pastry chef who once told me, “You want a brownie that’s a hug, not a hug that’s a hug.” The result is a brownie that feels like a warm blanket in your mouth, with a crackling edge that snaps like thin ice when you bite into it. I dare you to taste this and not go back for seconds, because it’s that addictive.
I’ll be honest—my first batch was a disaster: the batter was too thin, the spiders fell apart, and the house smelled like burnt chocolate. After a few trial runs, I discovered the secret: a small pinch of baking powder to lift the batter just enough, and the chocolate candy’s coating that gives the spiders a realistic texture. The next time I baked, the brownies came out perfect, and the spiders were as creepy as they were delicious. I’m telling you this because I know how frustrating it can be to get the spider effect right. Let me walk you through every single step—by the end, you’ll wonder how you ever made it any other way.
What Makes This Version Stand Out
- Flavor: The deep cocoa flavor is amplified by a splash of vanilla, creating a complex chocolate profile that lingers on the palate.
- Texture: The batter’s unique ratio of flour to cocoa gives a fudgy interior with a slightly crisp edge that snaps like thin ice.
- Visual Appeal: The chocolate candy legs and edible eyes transform ordinary brownies into a living, breathing creature.
- Ease: The recipe requires no special equipment—just a standard oven, a mixing bowl, and a few kitchen staples.
- Make‑Ahead: Once baked, the brownies keep their texture for up to five days when stored properly.
- Kid‑Friendly: The ingredients are simple and safe for children, making it a great family activity.
- Party‑Ready: The spiders are a guaranteed conversation starter at any Halloween gathering.
- Budget: All ingredients are inexpensive, so you can make a large batch without breaking the bank.
Alright, let’s break down exactly what goes into this masterpiece…
Inside the Ingredient List
The Flavor Base
Unsalted butter: The butter is the heart of the brownie, adding richness, moisture, and a buttery finish that makes each bite melt in your mouth. If you skip the butter, the brownies will feel dry and flat. A good rule of thumb is to use a full stick for every cup of flour to keep the ratio balanced. For a dairy‑free version, coconut butter works wonders, but keep in mind it will add a subtle coconut flavor.
Granulated sugar: Sugar does more than sweeten; it helps create the fudgy texture by dissolving into the batter and contributing to the Maillard reaction. If you reduce the sugar, the brownies will be less sweet but still delicious. A touch of brown sugar can add depth, but it will change the color slightly.
The Texture Crew
Large eggs: Eggs bind the batter and add structure, ensuring the brownies hold their shape. One egg per cup of flour is a good starting point. If you’re looking for a lighter texture, you can separate the eggs and whisk the whites until stiff before folding them in.
All‑purpose flour: Flour provides the structure that keeps the brownies from falling apart. I use a slightly lower amount of flour than typical brownie recipes to keep the batter moist. If you prefer a gluten‑free version, almond flour is a great substitute, but you’ll need to reduce the amount by about 25% to avoid a dry result.
The Unexpected Star
Cocoa powder: This is the star of the show, giving the brownies their deep chocolate flavor. Dark chocolate cocoa powder adds a slightly bitter edge that balances the sweetness. If you use a sweetened cocoa powder, reduce the sugar by a quarter to keep the flavor balanced.
Salt: Just a pinch of salt is enough to bring out the chocolate’s full potential. Too much salt can overpower the sweetness, so keep it minimal. If you’re using a salted butter, you can reduce the salt to ½ teaspoon.
The Final Flourish
Baking powder: A small amount of baking powder helps the brownies rise slightly, giving them a lighter bite. Too much baking powder will make them cakey, so keep it to 1 teaspoon per cup of flour. If you’re avoiding baking powder, a pinch of baking soda can work, but you’ll need to add an acid like vinegar to activate it.
Chocolate candy: These candies become the spider’s legs. Choose chocolate-covered pretzels or round chocolate candies that have a firm coating. If you want a more dramatic effect, use chocolate chips that will melt slightly when the brownies bake.
Edible eyes: The eyes give the spiders personality. They’re small, so you’ll need about 12 for a dozen brownies. If you can’t find edible eyes, a small dollop of white chocolate or a few drops of food coloring on a cookie can substitute.
Everything’s prepped? Good. Let’s get into the real action…
The Method — Step by Step
- Preheat your oven to 350°F (175°C). Line a 9x13 inch baking pan with parchment paper, leaving an overhang on the sides for easy removal. The parchment ensures the brownies don’t stick and makes cleanup a breeze. While the oven warms, you’ll start the batter that will become the foundation of our spooky creation.
- Melt the butter and cocoa together. Place the butter in a medium saucepan over low heat; let it melt slowly to avoid scorching. Stir in the cocoa powder until the mixture is smooth and glossy. This step releases the chocolate’s full aroma and ensures a uniform distribution of cocoa throughout the batter.
- Whisk in the sugar. Add the granulated sugar to the melted butter and cocoa mixture, stirring until the sugar is fully dissolved. The batter should feel silky and slightly thick. This is the moment when the batter starts to look like a chocolate pudding.
- Incorporate the eggs. Beat the eggs in a separate bowl until the whites are slightly frothy. Fold the eggs into the chocolate mixture in two additions, ensuring each addition is fully incorporated before adding the next. This gentle folding technique keeps the batter airy and prevents overmixing, which can make the brownies tough.
- Add vanilla, salt, and baking powder. Stir in the vanilla extract, salt, and baking powder until just combined. The baking powder will give the brownies a slight lift, while the salt balances the sweetness. Overmixing at this stage can cause the brownies to rise too much and become cakey.
- Fold in the flour and cocoa. Sift the flour and cocoa powder together to avoid lumps. Gently fold the dry ingredients into the wet batter, using a spatula and a light touch. The batter should be thick and glossy, like a dark, rich pudding.
- Pour the batter into the prepared pan. Spread it evenly with a spatula, smoothing the top. The batter should be about ½ inch thick. This thickness ensures the brownies are dense enough to hold the spider legs without cracking.
- Bake for 30 minutes. The brownies should look set around the edges and have a slight crust. When you insert a toothpick into the center, it should come out with a few moist crumbs attached, not wet batter. This is the moment of truth: the brownies are almost there.
- Cool and decorate. Let the brownies cool in the pan on a wire rack for 15 minutes. Once cooled, carefully lift them out using the parchment overhang. Place a chocolate candy on each brownie and press gently to attach it. Add an edible eye on top of each candy for the spider’s face.
- Serve or store. Cut into squares or squares with a small bite taken out to reveal the spider legs. If you’re serving immediately, enjoy the gooey, chocolatey goodness. If you’re storing, wrap each brownie tightly in plastic wrap and refrigerate for up to five days.
That’s it — you did it. But hold on, I’ve got a few more tricks that will take this to another level…
Insider Tricks for Flawless Results
The Temperature Rule Nobody Follows
Maintain a steady oven temperature. Many ovens have hot spots, so I preheat for at least 15 minutes before placing the pan. If your oven runs hot, set it a few degrees lower; if it’s undercooked, set it a few degrees higher. This small adjustment can mean the difference between a soggy center and a perfectly fudgy bite.
Why Your Nose Knows Best
Trust the aroma. When the brownies are done, the scent will be rich and chocolatey, with a hint of vanilla. If the smell is more sweet than chocolate, the batter may be overmixed. If it’s flat, you might need more cocoa or a pinch of salt to lift the flavor.
The 5-Minute Rest That Changes Everything
Let the brownies rest. After removing them from the oven, let the brownies sit in the pan for 5 minutes before cutting. This allows the structure to set, preventing the brownies from falling apart. It also gives the spider legs time to adhere to the surface.
The Quick Chill Trick
Chill the batter before baking. Placing the batter in the fridge for 30 minutes before baking can help the brownies set faster and improve the texture. It’s especially useful on hot days when the batter can become too runny.
The “No‑Touch” Baking Method
Set a timer and walk away. Once the brownies are in the oven, set a timer and step away. The temptation to check on them can lead to overbaking. Trust the timer and the oven’s consistency.
Creative Twists and Variations
This recipe is a playground. Here are some of my favorite ways to switch things up:
Nutty Spider
Swap the chocolate candy legs for chopped walnuts or pecans. The nuts add crunch and a buttery flavor that complements the chocolate. They also give the spiders a more natural look.
Minty Web
Add a teaspoon of peppermint extract to the batter. The mint pairs beautifully with chocolate, creating a refreshing twist that’s perfect for winter parties.
Spicy Spider
Stir in a pinch of cayenne pepper or a few drops of hot sauce. The heat will surprise your guests and add a layer of complexity to the sweet base.
Caramelized Spider
Drizzle caramel sauce over the cooled brownies before adding the candy legs. The caramel will seep into the brownie, creating a sweet, sticky center that’s irresistible.
Vegan Version
Use plant‑based butter, a flaxseed egg, and coconut milk to keep the recipe vegan. The texture will be slightly different, but the flavor remains rich and chocolatey.
Gluten‑Free Spider
Replace all‑purpose flour with almond flour or a gluten‑free blend. Use a gluten‑free baking powder and keep the ratio of wet to dry ingredients the same to maintain structure.
Storing and Bringing It Back to Life
Fridge Storage
Wrap each brownie tightly in plastic wrap and place them in an airtight container. They’ll stay fresh for up to five days. For the best flavor, let them sit at room temperature for 15 minutes before serving.
Freezer Friendly
For longer storage, wrap the brownies individually in foil and place them in a freezer bag. They’ll keep for up to three months. Thaw at room temperature for 30 minutes before serving.
Best Reheating Method
To revive a cold brownie, warm it in a microwave for 15-20 seconds or in a preheated oven at 300°F for 5 minutes. Add a tiny splash of water to the center of the brownie before reheating; the steam will restore moisture and give it a fresh, fudgy texture.