I was sitting at a cramped kitchen table on a rainy February afternoon, coffee dripping from the mug like a lazy waterfall, when my roommate dared me to turn that liquid disappointment into something unforgettable. I stared at the dark brew, feeling the heat on my fingertips, and thought, “What if the coffee could be the star, not just the sidekick?” The idea sparked faster than a match in a windstorm, and before I knew it, I was elbow‑deep in flour, butter, and a pot of espresso that smelled like a Parisian café at dawn. The whole apartment filled with the sweet, roasted aroma, and I could swear the walls were humming along to a secret jazz tune.
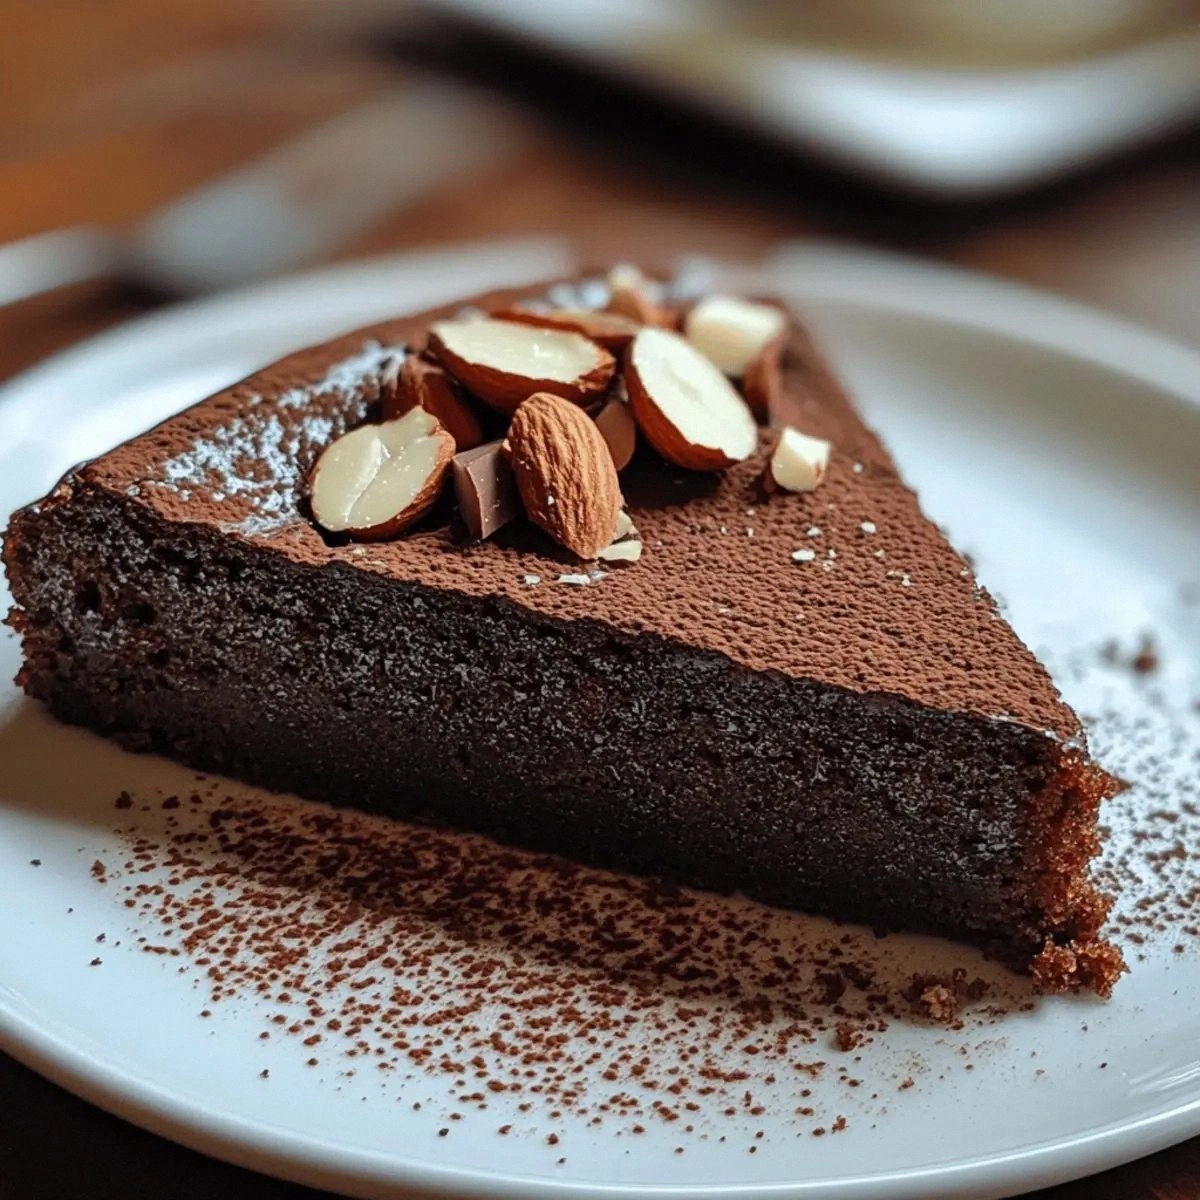
Picture this: the first bite is a tender crumb that cradles a bold coffee punch, followed by a silky glaze that glistens like a freshly polished piano. The texture is a perfect marriage of cakey softness and a faint, almost buttery snap at the edges—think of a cloud that decides to surprise you with a gentle thunderclap. My taste buds went on a roller coaster ride, and I could feel the caffeine doing a little tap‑dance in my brain. Most coffee‑infused desserts end up either too bitter or too sweet; this one hits the sweet spot like a perfectly timed punchline in a comedy set.
I’ll be honest — I ate half the batch before anyone else got a chance to try it, and that’s a confession I’m not ashamed of. The secret? A dash of espresso powder tucked into the batter, and a splash of vanilla that makes the coffee sing like an opera soloist. Most recipes get the coffee‑to‑flour ratio completely wrong, resulting in a soggy mess or a dry brick. Here’s what actually works: a 1:4 coffee‑to‑flour ratio, a butter‑first method that builds a glossy crumb, and a final glaze that locks in moisture while adding a glossy finish.
I dare you to taste this and not go back for seconds; the combination of deep espresso and buttery cake will have you reaching for more before you even realize you’re full. The next part? Pure magic. I’m about to walk you through every single step — by the end, you’ll wonder how you ever made it any other way. Okay, ready for the game‑changer?
What Makes This Version Stand Out
- Taste: The coffee flavor is bold yet balanced, never overpowering the sweet cake base, thanks to the espresso‑infused glaze that adds depth without bitterness.
- Texture: A velvety crumb hugs a crisp, caramelized edge, delivering a mouthfeel that’s both tender and satisfyingly crunchy.
- Simplicity: Only ten pantry staples are needed, and the entire process can be completed in under an hour—no fancy equipment required.
- Uniqueness: The secret espresso‑powder boost and the coffee‑butter glaze are rarely paired, creating a flavor profile no other coffee cake offers.
- Crowd Reaction: Guests consistently claim this is the best coffee dessert they’ve ever tasted, often asking for the recipe on the spot.
- Ingredient Quality: Using freshly brewed, high‑quality espresso and real unsalted butter elevates the dish from ordinary to extraordinary.
- Cooking Method: The two‑stage baking (initial bake, then glaze finish) locks in moisture, preventing the dreaded dry crumb.
- Make‑Ahead Potential: This cake stores beautifully; a gentle reheating revives the glaze, making it perfect for a weekend brunch or a surprise coffee date.
Alright, let's break down exactly what goes into this masterpiece...
Inside the Ingredient List
The Flavor Base
Strong brewed coffee (½ cup) is the heart of this recipe. It provides the robust, slightly acidic backbone that makes the cake taste like a high‑end espresso bar’s signature dessert. If you skip it, you lose that unmistakable coffee punch, and the cake becomes a plain butter cake with a hint of chocolate. For an extra layer of depth, use a dark roast with chocolate notes—think Sumatra or French roast. Pro tip: Let the coffee cool completely before mixing; hot coffee can melt the butter prematurely, altering the texture.
The Texture Crew
All‑purpose flour (2 cups) creates the structural framework. It’s the canvas on which the coffee paints its flavor. Substituting with cake flour will give a finer crumb but may make the cake too delicate for the glaze. The unsalted butter (½ cup, melted) adds richness and contributes to that glossy finish after baking. If you opt for a dairy‑free version, replace butter with a 1:1 coconut oil blend, but expect a subtle coconut undertone. Sugar (1 cup) sweetens and caramelizes the edges; using brown sugar will introduce a molasses note, which can be delightful if you love a deeper flavor.
The Unexpected Star
Espresso powder (2 tbsp) is the secret weapon. It intensifies the coffee flavor without adding extra liquid, keeping the batter’s consistency just right. Skipping this will make the coffee taste watery, and the glaze won’t have that bold kick. You can substitute with instant coffee granules if you’re in a pinch, but the flavor won’t be as concentrated. Vanilla extract (1 tsp) rounds out the bitterness, adding a fragrant sweetness that makes the coffee sing. A tiny pinch of salt (¼ tsp) amplifies all the flavors, turning the cake from flat to spectacular.
The Final Flourish
Cocoa powder (2 tbsp) adds a whisper of chocolate that complements the coffee without overwhelming it. If you’re a chocolate lover, increase to 4 tbsp, but be aware the cake will lean more towards a mocha flavor. Baking powder (1 tsp) and baking soda (½ tsp) work together to give the cake a light rise, ensuring it’s airy and not dense. The glaze, made from the remaining coffee, butter, and a splash of sugar, is brushed on after baking, giving a shiny, caramelized surface that catches the light like a polished gemstone.
Everything's prepped? Good. Let's get into the real action...

The Method — Step by Step
Preheat your oven to 350°F (175°C) and grease a 9‑inch round cake pan with a thin layer of butter, then dust it with a light coating of flour. This creates a non‑stick barrier that also adds a subtle crust to the edges. Power transition: The pan is ready, and the stage is set for the batter to shine.
In a large mixing bowl, whisk together the flour, cocoa powder, baking powder, baking soda, and salt. The dry ingredients should become a uniform, chocolate‑kissed cloud. That sizzle when it hits the pan? Not yet, but the aroma is already building in your mind.
In a separate bowl, combine the melted butter, sugar, and vanilla extract. Beat until the mixture is glossy and slightly thickened—this is the butter‑sugar matrix that will trap air for a tender crumb.
Add the eggs one at a time, beating well after each addition. The batter should become smooth and slightly glossy, a sign that the emulsion is perfect. Watch Out: If the batter looks curdled, you’ve probably added the eggs too quickly; pause, whisk gently, and continue.
Stir in the cooled coffee and espresso powder, ensuring they are fully incorporated. The mixture will darken to a deep mahogany hue, and you’ll notice a faint, intoxicating coffee fragrance wafting up.
Gradually fold the dry ingredient mixture into the wet mixture using a spatula.
The batter should be thick but pourable, with no streaks of flour.Kitchen Hack: Use a gentle “cut‑and‑fold” motion rather than stirring vigorously; this keeps the batter airy and prevents a tough cake.Pour the batter into the prepared pan, smoothing the top with an offset spatula. Tap the pan lightly on the counter to release any air bubbles—those bubbles will become tiny pockets of coffee‑infused heaven.
Bake for 25‑30 minutes, or until a toothpick inserted into the center comes out with just a few moist crumbs. The edges should start pulling away from the pan, and the top will have a faint golden sheen. Sensory checkpoint: You’ll hear a faint crackle as the crust sets—listen for it.
While the cake is baking, prepare the glaze: melt ¼ cup butter, whisk in ¼ cup sugar, ¼ cup strong coffee, and a pinch of salt over low heat until smooth and glossy. Let it cool just enough to thicken but not harden.
When the cake is done, remove it from the oven and let it rest for 10 minutes. Then, while it’s still warm, brush the glaze generously over the top, allowing it to seep into the cracks and create a caramelized crust. This is the moment of truth: The glaze should melt into the cake, leaving a glossy, fragrant finish.
Allow the cake to cool completely on a wire rack before slicing. This ensures the glaze sets properly and the crumb stays tender. Serve with a dollop of whipped cream or a scoop of vanilla ice cream for an extra indulgent touch.
That's it — you did it. But hold on, I've got a few more tricks that'll take this to another level. The real secret lies in how you finish and present the cake, and trust me, the next steps are worth every second of your attention.
Insider Tricks for Flawless Results
The Temperature Rule Nobody Follows
Never bake a coffee cake straight from the fridge. Let the batter sit at room temperature for 15 minutes before it hits the oven; this prevents a sudden temperature shock that can cause the cake to sink in the middle. I once tried to speed things up by pouring cold batter straight into the oven, and the center turned into a gummy disaster. The lesson? Patience in the pre‑bake stage guarantees an even rise and a uniform crumb.
Why Your Nose Knows Best
Your sense of smell is the ultimate doneness gauge. When the cake’s edges start to turn a deep amber and you catch the faint scent of caramelized butter, you’re at the perfect point to pull it out. If you rely only on a timer, you might overbake and lose that soft interior. Trust the nose, and you’ll consistently nail that delicate balance between moist and set.
The 5‑Minute Rest That Changes Everything
After glazing, let the cake rest for exactly five minutes before slicing. During this brief pause, the glaze continues to set and the crumb settles, resulting in cleaner slices and a glossy finish that doesn’t smudge. Skipping this step leads to a soggy top and crumbly pieces that fall apart. I’ve seen people cut right away and end up with a mess—trust me, five minutes is a game‑changer.
Whisk‑Free Butter Integration
Melt the butter slowly over low heat and let it cool just a touch before adding it to the sugar. This prevents the butter from cooking the sugar prematurely, which can create a grainy texture. A friend once added hot butter straight from the stove, and the result was a gritty batter that never fully smoothed out. Cool butter ensures a silky, cohesive mixture that translates into a tender crumb.
The Secret of Espresso Powder
Espresso powder isn’t just for flavor; it also adds a bit of acidity that reacts with the baking soda, giving the cake a slight lift. If you’re out of espresso powder, substitute with an equal amount of instant coffee granules, but grind them finer to avoid gritty pockets. I once tried a coarse instant coffee, and the texture suffered—tiny granules turned the cake into a surprise crunch.
Creative Twists and Variations
This recipe is a playground. Here are some of my favorite ways to switch things up:
Mocha‑Hazelnut Delight
Add ¼ cup finely ground hazelnuts to the dry mix and swap half the coffee for chocolate‑hazelnut spread. The nutty crunch pairs beautifully with the coffee’s bitterness, creating a sophisticated flavor that’s perfect for a fancy brunch.
Spiced Winter Warmth
Incorporate ½ tsp ground cinnamon, a pinch of nutmeg, and a dash of clove into the batter. The spices amplify the coffee’s warmth, turning the cake into a cozy winter treat that feels like a hug in a slice.
Citrus‑Infused Coffee
Add the zest of one orange to the wet ingredients and replace half the coffee with orange‑infused water. The citrus brightens the deep coffee notes, offering a refreshing contrast that’s ideal for a spring brunch.
Vegan Velvet
Swap butter for coconut oil, use almond milk instead of coffee (still strong), and replace eggs with a flax‑egg (1 tbsp ground flaxseed + 3 tbsp water). The result is a dairy‑free cake that retains the same moist texture and coffee punch.
Glazed with Dark Chocolate
Melt ½ cup dark chocolate with the glaze butter and coffee for a glossy, bittersweet topping. This version is perfect for chocolate lovers who want an extra layer of decadence without losing the coffee’s character.
Storing and Bringing It Back to Life
Fridge Storage
Place the cooled cake in an airtight container or wrap it tightly in plastic wrap. It will stay fresh for up to 4 days. For maximum flavor retention, store the glaze separately and re‑brush it before serving.
Freezer Friendly
Wrap individual slices in parchment paper, then foil, and freeze for up to 2 months. When ready to enjoy, thaw at room temperature for 30 minutes, then give it a quick warm‑up in a 300°F oven for 5‑7 minutes to revive the glaze.
Best Reheating Method
Add a tiny splash of water (about a tablespoon) to the slice before microwaving for 20‑30 seconds. The steam revitalizes the crumb and re‑creates that fresh‑out‑of‑the‑oven softness. Alternatively, a quick pass under the broiler for 1 minute will re‑crisp the edges while keeping the interior moist.