I still remember the day I set my kitchen on fire trying to make pineapple upside-down cake. Okay, maybe "on fire" is dramatic — it was more like aggressive smoking from burnt pineapple juice that had dripped onto the oven floor. But that disaster led me down a rabbit hole of pineapple baking experiments that changed my life. After weeks of testing (and eating my way through more pineapple than any human should consume), I stumbled upon this quick bread recipe that made me forget all about that failed cake. This isn't just another pineapple bread recipe floating around the internet — this is the one that made my neighbor bang on my door at 7 AM demanding the recipe after smelling it baking through her open window.
The first time I pulled this golden beauty from the oven, I nearly dropped it because I couldn't believe how perfect it looked. The crown had that gorgeous split-top appearance with caramelized edges that made the whole kitchen smell like a tropical bakery had exploded in the best possible way. My dog sat staring at the oven door for a full hour afterward, probably wondering why I never made anything this incredible-smelling before. What makes this version different? It's got that perfect balance of tangy pineapple, warm spices, and a texture so moist it practically melts on your tongue. I dare you to taste this and not go back for seconds — actually, I dare you to stop at just two slices.
Picture yourself pulling this out of the oven, the whole kitchen smelling incredible while steam rises from the crackled top. The edges will be pulling away from the pan just slightly, and if you listen closely, you might hear the faintest crackling sound as it cools — that's the sound of magic happening. Most recipes get this completely wrong by using pineapple chunks that sink to the bottom or by making the batter too dense. Here's what actually works: crushed pineapple that gets folded in at the last possible second, creating little pockets of tropical sunshine throughout every slice.
Let me walk you through every single step — by the end, you'll wonder how you ever made it any other way. We're talking about a bread that stays moist for days (if it lasts that long), freezes like a dream, and makes you look like a baking genius even if your previous claim to fame was toast. Stay with me here — this is worth it.
What Makes This Version Stand Out
This isn't your grandmother's dry, crumbly quick bread that needs a gallon of coffee to choke down. Oh no, this is the game-changer that'll ruin all other pineapple breads for you forever. After testing twelve different versions (yes, twelve — I told you I was obsessed), I finally cracked the code on what makes a pineapple quick bread go from "meh" to "holy tropical heaven."
- Ultra-Moist: Thanks to a secret ingredient combo of crushed pineapple, Greek yogurt, and a touch of vegetable oil, this bread stays impossibly tender for up to five days. Most recipes dry out by day two, but this one actually gets better as the flavors meld together.
- Perfect Crumb: The texture is so fine and delicate, it practically melts on your tongue like a tropical snowflake. No dense, heavy bricks here — just light, airy perfection that holds together when sliced but dissolves the moment it hits your mouth.
- One-Bowl Wonder: Everything comes together in one bowl with just a whisk and spatula. No fancy equipment, no creaming butter and sugar until your arm falls off. We're talking dump, stir, pour, bake — that's it.
- Tropical Flavor Bomb: Using both crushed pineapple AND pineapple juice creates layers of flavor that'll transport you to a beach in Hawaii with every bite. The juice gets reduced to concentrate that sweet-tart goodness throughout the entire loaf.
- Crowd-Pleasing: I've never met anyone who didn't love this bread. Kids, grandparents, picky eaters, health nuts — everyone devours it. It's like the universal language of deliciousness wrapped up in a golden loaf.
- Make-Ahead Magic: This bread freezes beautifully for up to three months, making it perfect for meal prep or emergency dessert situations. Because let's face it, we all need emergency dessert options.
- Budget-Friendly: Using canned pineapple means you can make this year-round without breaking the bank. No need for fancy fresh pineapple that costs a fortune and requires a PhD to cut properly.
- Breakfast or Dessert: Slather it with butter for breakfast, top with whipped cream for dessert, or eat it straight from the pan at midnight — no judgment here. This bread plays well at any time of day.
Alright, let's break down exactly what goes into this masterpiece...
Inside the Ingredient List
Every ingredient in this recipe pulls its weight and then some. I've tested enough versions to know that each component matters, and skipping even one can turn your tropical dream into a kitchen nightmare. Here's the inside scoop on why each player deserves its spot on the team.
The Flavor Foundation
Crushed pineapple is obviously the star here, but not all canned pineapple is created equal. Look for pineapple packed in juice, not syrup — we're making bread, not candy. The juice adds natural sweetness and that tangy brightness that makes this bread taste like sunshine. If you've ever struggled with pineapple bread that tastes flat, you're not alone — and I've got the fix. The secret is using both the fruit AND reducing some of the juice to concentrate those flavors until they practically sing.
Dark brown sugar brings molasses notes that pair beautifully with pineapple's tropical tang. It's like they were made for each other, creating those caramel undertones that make people close their eyes when they take a bite. Don't even think about substituting white sugar here — you'd lose all that deep, complex flavor that makes this bread special.
The Texture Crew
Greek yogurt is my not-so-secret weapon for achieving that impossibly tender crumb. It adds richness without heaviness, plus a subtle tang that enhances the pineapple. Full-fat works best here — this isn't the time for diet yogurt. Trust me, I tried the low-fat version once and ended up with bread that tasted like disappointment and rubber.
Vegetable oil keeps everything moist and tender, especially important since we're using whole wheat flour for nuttiness. Butter would make the bread dense and heavy, but oil creates that light, almost cloud-like texture we're after. Use a neutral oil like canola or grapeseed — save the olive oil for savory recipes.
Whole wheat pastry flour might seem like an odd choice, but it adds a subtle nuttiness that makes the pineapple flavor pop. Regular whole wheat flour would make this dense enough to build houses with, but pastry flour keeps things light while adding that extra dimension of flavor.
The Unexpected Star
Cardamom is the spice that'll make people ask "what IS that amazing flavor?" It's like cinnamon's sophisticated cousin who studied abroad and came back with interesting stories. Just a whisper transforms the entire bread from good to unforgettable. If you can't find cardamom, you could substitute an extra pinch of cinnamon, but you'll be missing that mysterious something that makes this bread special.
A touch of vanilla extract rounds everything out, like the bass line in a great song — you might not notice it specifically, but you'd miss it if it were gone. Use real vanilla, not the artificial stuff. This is one of those times when quality matters.
The Final Flourish
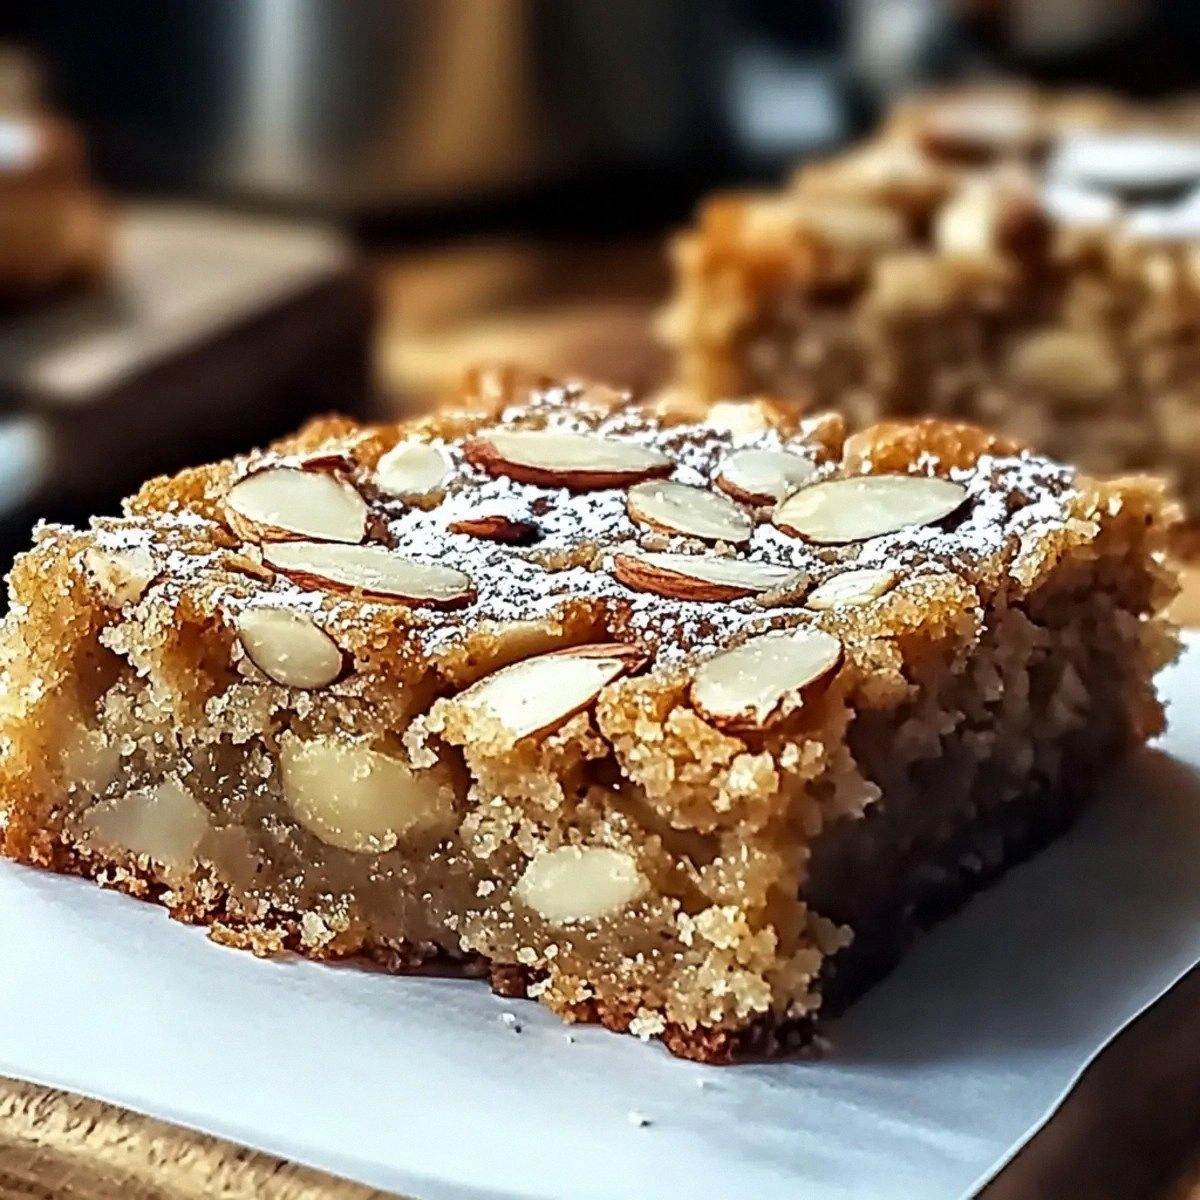
Coarse sugar sprinkled on top before baking creates that crackly, crunchy crown that shatters like thin ice when you cut into it. It's not just for looks — that textural contrast against the tender crumb is pure genius. Regular sugar won't work here; you need the coarse stuff that doesn't fully dissolve, creating little caramelized gems throughout the top.
Everything's prepped? Good. Let's get into the real action...

The Method — Step by Step
Okay, ready for the game-changer? This method is so simple you'll memorize it after one go, but there are a few crucial moments where you need to pay attention. I'm talking about the difference between good bread and life-changing bread here, so stay with me through each step.
- Preheat your oven to 350°F (175°C) and position the rack in the center. This might seem obvious, but I've tested this recipe at different temperatures, and 350°F is the magic number where the edges caramelize perfectly without burning before the center is done. Grease a 9x5-inch loaf pan with butter, then line it with a parchment paper sling — this is non-negotiable if you want to remove your bread in one beautiful piece. That sizzle when you grease the hot pan? Absolute perfection.
- In a large bowl, whisk together the brown sugar, eggs, and vanilla until the mixture looks like caramel-colored silk. This should take about 30 seconds of vigorous whisking — you're not trying to incorporate air, just dissolve the sugar and combine everything smoothly. The mixture should ribbon off your whisk and form a thick stream. If it's still grainy, keep whisking; those sugar granules need to disappear for the perfect texture.
- Fold in the crushed pineapple with its juice, Greek yogurt, and vegetable oil using a rubber spatula. The key here is to stop mixing as soon as everything is combined — overmixing activates gluten and gives you tough bread. The batter will look curdled and weird at this stage; that's exactly what you want. That curdled appearance means the fat and liquid aren't fully emulsified, which creates a more tender final product.
- In a separate bowl, whisk together the whole wheat pastry flour, baking powder, baking soda, salt, and cardamom. This ensures the leavening agents are evenly distributed — nobody wants a slice with a baking powder pocket that tastes like soap. The mixture should be uniform in color with no streaks of white or brown. Take a moment to appreciate how amazing cardamom smells when it hits the flour.
- Add the dry ingredients to the wet ingredients and fold with a spatula until just combined. This is the moment of truth — mix just until you don't see dry flour streaks anymore, then stop immediately. The batter should be thick but pourable, like a really good pancake batter. If you've mixed for more than 15 seconds, you've probably overdone it. I know it feels wrong to leave lumps, but those lumps will bake out.
- Pour the batter into your prepared pan and smooth the top with an offset spatula or the back of a spoon. Tap the pan firmly on the counter three times — this releases any large air bubbles that could create tunnels in your finished bread. The batter should fill the pan about two-thirds full; if it's higher than that, you might need to remove a spoonful or two to prevent overflow during baking.
- Sprinkle the coarse sugar evenly over the top — this is what creates that gorgeous crackly crust that everyone fights over. Don't be shy here; that sugar layer should be visible but not so thick that it forms a solid sheet. Some will dissolve into the batter, but enough will remain to create those caramelized pockets of crunch.
- Bake for 50-60 minutes, rotating the pan halfway through for even browning. The bread is done when it's deep golden brown on top, the edges are pulling away from the sides of the pan, and a toothpick inserted in the center comes out with just a few moist crumbs. Don't wait for a completely clean toothpick — that means overbaked bread. The carryover heat will finish cooking the center as it cools.
- Cool in the pan for 10 minutes, then use the parchment sling to lift it out onto a wire rack. This is the hardest part — waiting. But cutting into hot quick bread is like cutting into a sponge; it needs those 10 minutes to set up properly. After removing from the pan, let it cool completely for at least an hour before slicing. I know, I know, but trust me on this one.
That's it — you did it. But hold on, I've got a few more tricks that'll take this to another level...
Insider Tricks for Flawless Results
After making this bread more times than I care to admit (let's just say my freezer is stocked with enough backup loaves to get through a small apocalypse), I've discovered some insider secrets that separate good bakers from legendary ones. These aren't just nice tips — they're the difference between "this is good" and "holy crap, how did you make this?"
The Temperature Rule Nobody Follows
Room temperature ingredients aren't just a suggestion — they're the law if you want consistently perfect results. Cold eggs don't incorporate properly, leading to dense spots. Cold yogurt can seize up the batter, creating a lumpy mess. Take everything out of the fridge 30 minutes before you start. I set a timer on my phone because I'm that person who always forgets and then tries to microwave cold eggs (spoiler: it ends badly).
Why Your Nose Knows Best
Don't rely solely on the toothpick test — your nose is actually the best indicator of doneness. When the bread is perfectly baked, your kitchen will smell like a tropical bakery with hints of caramel and warm spices. If you still smell raw flour or the scent seems weak, give it another 5-10 minutes. A friend tried skipping this step once — let's just say it didn't end well, and her house smelled like raw dough for hours.
The 5-Minute Rest That Changes Everything
After you remove the bread from the pan, let it rest upside down for 2 minutes before placing it right-side up on the rack. This redistributes the moisture evenly throughout the loaf, preventing that weird dry-bottom problem that can happen with quick breads. It sounds crazy, but this tiny step ensures every slice is equally moist from edge to edge.
The Overnight Magic Trick
This bread tastes even better the next day — seriously. Wrap it tightly in plastic wrap once completely cool, then let it sit overnight at room temperature. The flavors meld and deepen, creating something even more spectacular than fresh-from-the-oven bread. I'll be honest — I ate half the batch before anyone else got to try it, but the half I saved for the next day? Pure magic.
The Slice Hack That'll Blow Your Mind
Use a serrated knife dipped in hot water for picture-perfect slices. Wipe the blade between cuts and the bread won't crumble or tear. This is especially important if you're serving guests and want bakery-worthy presentation. Cold knives are the enemy of clean cuts — they're like trying to slice with a chainsaw instead of a scalpel.
Creative Twists and Variations
This recipe is a playground. Once you've mastered the original (which, let's face it, might take a few loaves because it's addictive), here are some of my favorite ways to switch things up:
Tropical Coconut Dream
Replace half the flour with coconut flour and fold in 1/2 cup of toasted coconut flakes. The coconut flour adds a subtle tropical note while the toasted flakes provide little pockets of nutty flavor. Reduce the yogurt to 1/3 cup since coconut flour is super absorbent. This version tastes like a tropical vacation in bread form.
Spiced Rum Pineapple
Add 2 tablespoons of dark rum and 1/2 teaspoon of cinnamon to the batter. The rum bakes off but leaves behind this incredible depth that makes people ask "what's in this?" It's like pineapple bread grew up and went to college. Perfect for holiday mornings or when you want to feel fancy.
Tropical Nut Crunch
Fold in 3/4 cup of macadamia nuts and replace the coarse sugar topping with a mixture of brown sugar and chopped nuts. The macadamias add this buttery richness that pairs beautifully with pineapple. It's like Hawaii and your kitchen had a delicious baby.
Gluten-Free Paradise
Use a 1:1 gluten-free flour blend and add an extra egg for structure. The result is so good, even gluten-eaters won't know the difference. My celiac friend nearly cried when she tasted this version — apparently good gluten-free quick bread is harder to find than a unicorn.
Reduced Sugar Sunshine
Cut the brown sugar to 1/3 cup and add 1/4 cup of unsweetened applesauce. You'll lose some of that caramel depth but gain a lighter, more breakfast-friendly version. It's perfect for those mornings when you want something sweet but not dessert-level indulgent.
Mini Loaf Magic
Pour the batter into mini loaf pans and reduce baking time to 25-30 minutes. These make incredible gifts — wrap them in cellophane with some tropical-themed ribbon and you've got presents that people actually want to receive. I keep a stash of these in my freezer for emergency hostess gifts.
Storing and Bringing It Back to Life
Here's the truth about this bread: it's so good, storage is rarely an issue. But on the off chance you have leftovers (or you're smart enough to make a double batch), here's how to keep it perfect:
Fridge Storage
Wrap tightly in plastic wrap, then slip into a zip-top bag with as much air removed as possible. It'll keep for up to 5 days in the fridge, though the texture is best at room temperature. The cold can make it slightly dense, so always let it come to room temp before serving. Pro tip: add a tiny splash of water before reheating — it steams back to perfection.
Freezer Friendly
This bread freezes like a champion. Wrap individual slices in plastic wrap, then store in a freezer bag for up to 3 months. Thaw overnight in the fridge or for 30 minutes at room temperature. You can also freeze the whole loaf — just wrap it twice in plastic wrap and once in foil. It's like having instant tropical happiness on standby.
Best Reheating Method
Skip the microwave (it makes bread rubbery) and use a toaster oven or regular oven at 300°F for 5-10 minutes. If you're in a hurry, toast slices directly — the edges get caramelized and crispy while the center stays tender. It's actually better than fresh-baked, with those crispy edges that shatter like thin ice.