I was standing in my kitchen, staring at a half‑baked waffle that looked more like a sad pancake than the golden masterpiece I’d promised my friends. The timer had buzzed, the batter was a little too runny, and the whole thing collapsed faster than my willpower at a midnight cookie jar. I swear I heard my roommate mutter, “If you can’t make a waffle that stays together, you might as well be making toast,” and that was the spark that set this whole adventure on fire. I grabbed a bag of mochi rice cake, a splash of water, and a daring idea: what if I could fuse the chewy, stretchy magic of mochi with the crisp, buttery charm of a classic waffle? That night, I turned my kitchen into a laboratory, and the result was a crunchy‑outside, melt‑in‑your‑mouth‑inside marvel that has since become my go‑to brag at brunches.
Picture this: the moment the batter hits the hot iron, you hear a gentle sizzle that sounds like a tiny applause, and the aroma of toasted rice mingles with a whisper of sweet anko. The first bite is a symphony—crackly edges that shatter like thin ice, followed by a chewy core that stretches just enough to make you smile. The texture is so addictive that you’ll find yourself chewing slowly, savoring every subtle shift from crisp to soft, while the subtle umami from soy sauce and the peppery bite of grated daikon dance on the palate. I dare you to taste this and not go back for seconds; I’ve tried, and trust me, the second round is inevitable.
Most mochi‑based recipes get this completely wrong. They either over‑mix, turning the batter into a gummy mess, or they under‑cook, leaving a soggy center that feels like stepping in a puddle of rice flour. What makes this version stand out is a precise balance of moisture, a quick flash‑cook technique, and a secret ingredient that adds a buttery richness without drowning the delicate chew. I’m talking about a single scoop of vanilla ice cream that melts into the batter just as it hits the heat, creating pockets of creamy decadence that melt in your mouth. This isn’t just a waffle; it’s a texture adventure that will have you rethinking everything you thought you knew about breakfast and dessert hybrids.
Let me walk you through every single step — by the end, you’ll wonder how you ever made it any other way. I’ll spill the beans on the exact temperature that gives you that perfect crunch, the timing that guarantees a golden‑brown exterior, and the little tricks that keep the mochi from turning into a sticky nightmare. And stay tuned for the “game‑changer” technique that transforms a regular waffle iron into a crisp‑chewy masterpiece. Ready? Okay, ready for the game‑changer?
What Makes This Version Stand Out
- Texture: The outer crust shatters like a delicate sugar glass while the interior stays elastic, delivering a chew that’s both satisfying and surprising.
- Flavor Fusion: Sweet anko, salty soy sauce, and fresh daikon create a balanced flavor profile that’s more complex than your average sweet waffle.
- Speed: From mixing to plating, you’re looking at under 45 minutes total—perfect for a lazy weekend brunch or an impromptu dinner party.
- Ingredient Simplicity: Only ten ingredients, most of which you probably already have in your pantry or fridge.
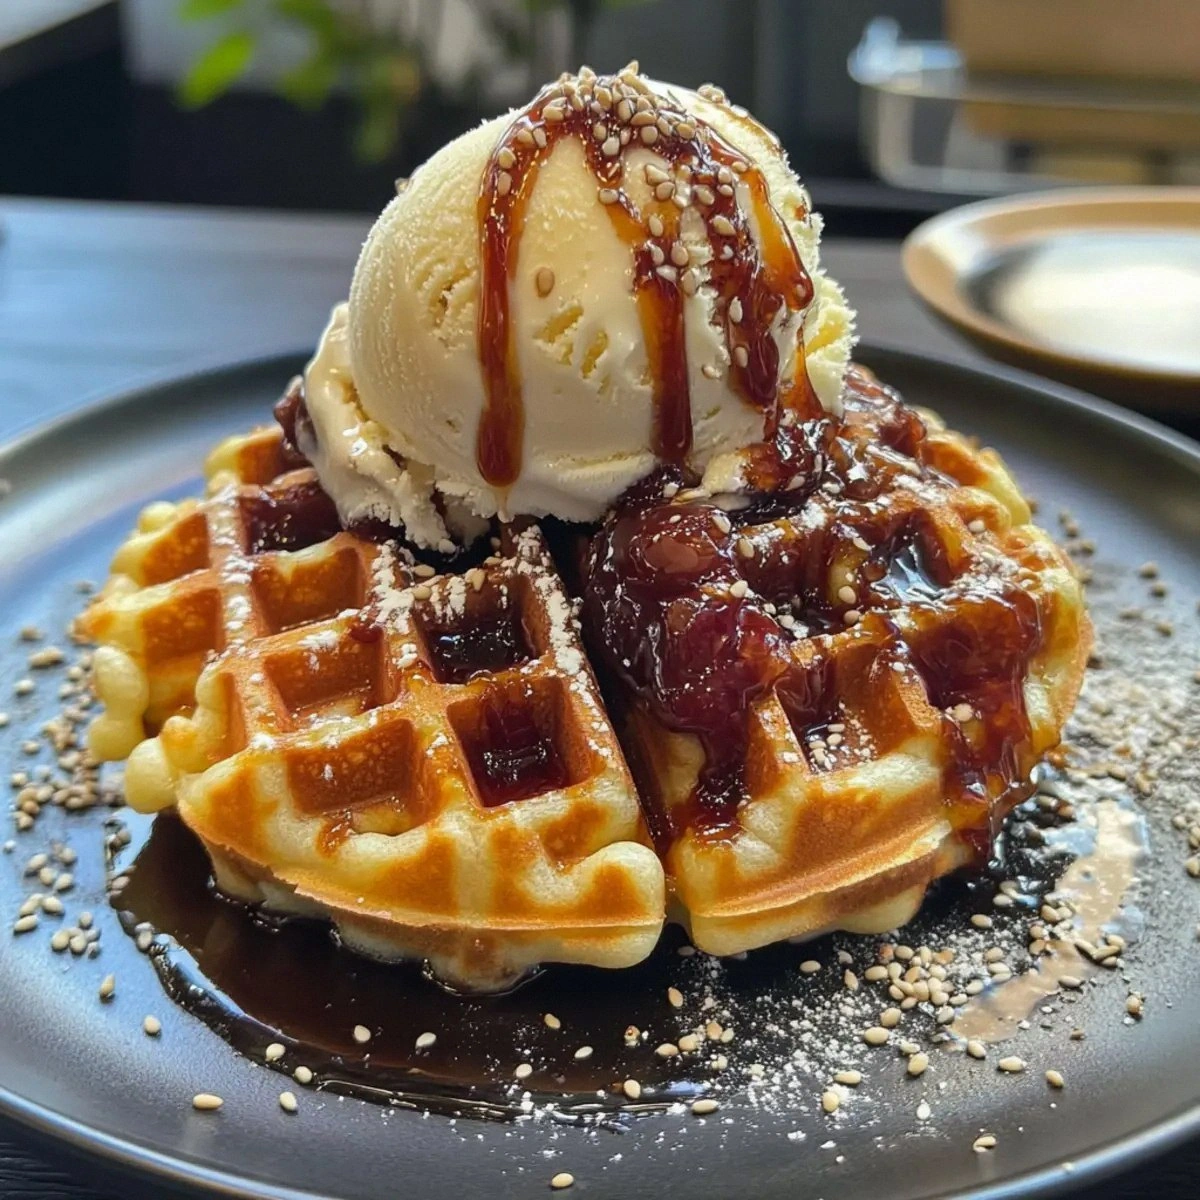
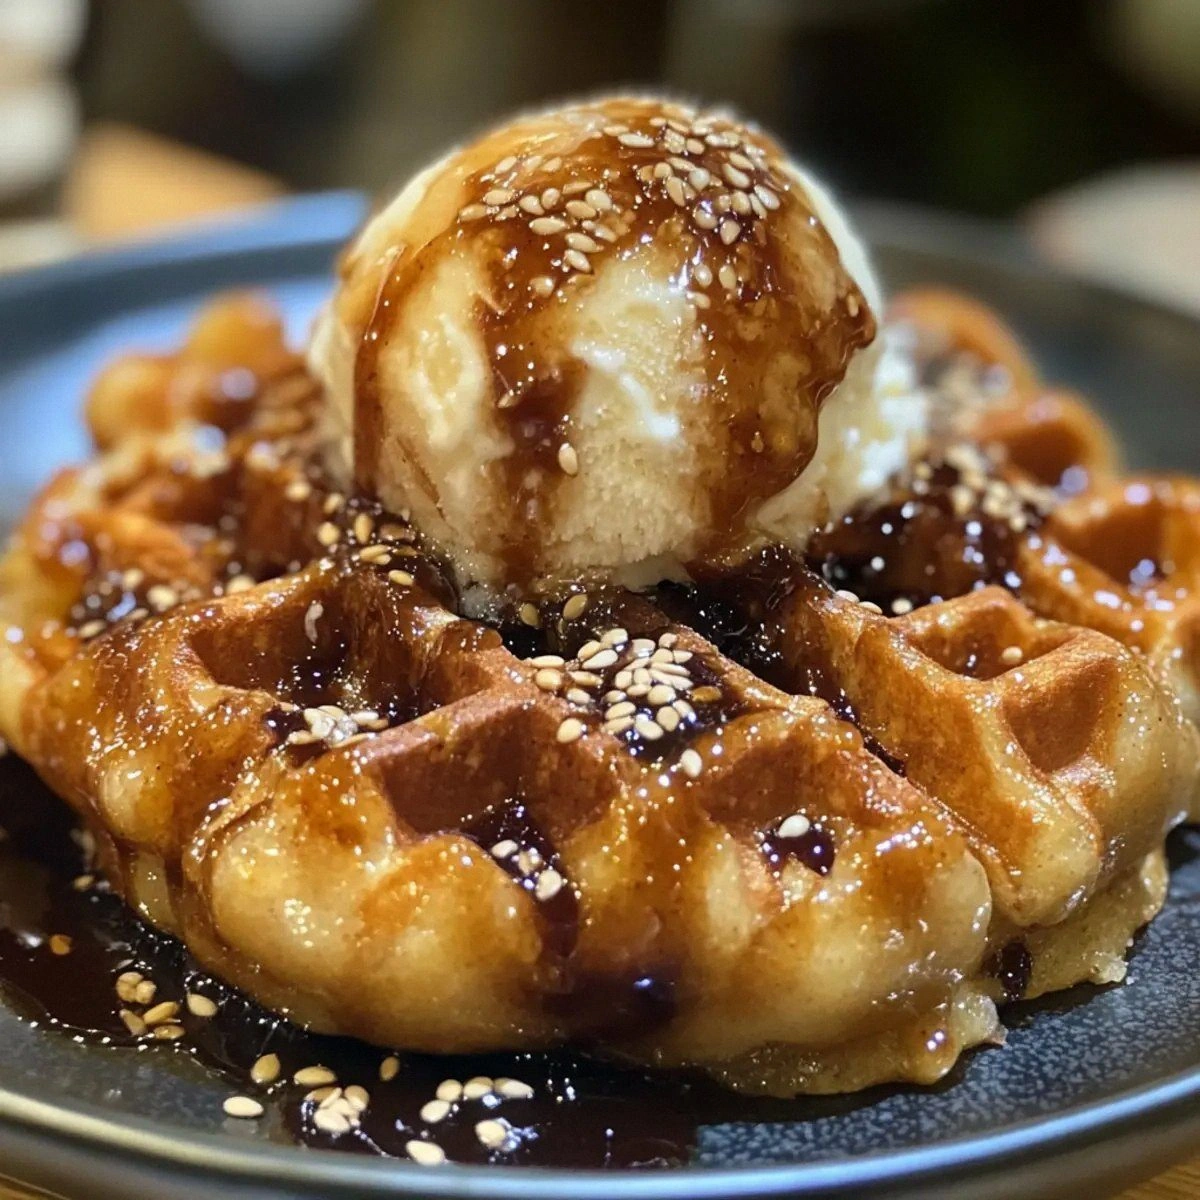
- Visual Appeal: The golden‑brown grid pattern, speckled with sesame seeds and bright green shiso, looks Instagram‑ready without any extra effort.
- Versatility: Serve it sweet with ice cream, or flip the script and pair it with a savory soy‑daikon drizzle for a daring brunch.
- Make‑Ahead Potential: The batter can sit for up to an hour, and leftovers reheat beautifully, preserving that coveted crunch.
- Community Reaction: I’ve heard “I’ve never tasted anything like this” at least three times in one afternoon—proof that this isn’t just another waffle.
Inside the Ingredient List
The Flavor Base
The combination of Anko (sweet red bean paste) and a splash of Soy Sauce creates a sweet‑savory duet that’s as unexpected as a jazz solo in a pop song. Anko brings a deep, earthy sweetness that pairs beautifully with the light, milky notes of the ice cream, while soy sauce adds a subtle umami depth that prevents the dish from feeling one‑dimensional. If you skip the soy sauce, you’ll miss that nuanced salt‑sweet balance, and the waffle might taste flat. A good swap for soy sauce, if you’re avoiding gluten, is tamari—just keep the quantity the same.
The Texture Crew
The star of the show is the Mochi Rice Cake. Its natural elasticity gives the batter that signature chew, turning each bite into a delightful stretch. When you can’t find pre‑shaped mochi, simply pulse glutinous rice flour with a little water until you get a pliable dough, then shape it into small cubes. Glutinous Rice Flour works hand‑in‑hand with the mochi cake, reinforcing the chewy structure without making the batter gummy. Skipping either will result in a texture that’s either too dense or too crumbly—trust me, I’ve learned that the hard way.
The Unexpected Star
A single scoop of vanilla Ice Cream might sound like a dessert indulgence, but it’s actually a clever technique to introduce fat and moisture at the exact moment the batter meets heat. The ice cream melts instantly, creating steam pockets that keep the interior tender while the exterior crisps. If you’re dairy‑free, try a coconut‑milk ice cream; just be aware that the coconut flavor will shine through, adding a tropical twist.
The Final Flourish
The bright crunch of Roasted Sesame Seeds and the fragrant pop of Shiso Leaf finish the dish with a textural contrast and aromatic lift. Sesame seeds add a nutty depth that complements the sweet base, while shiso contributes a hint of minty‑citrus that cuts through the richness. If you can’t find shiso, fresh basil or cilantro can stand in, though the flavor profile will shift slightly toward herbaceous. Grated Daikon isn’t just a garnish; its mild peppery bite balances the sweetness and adds a refreshing crunch that keeps each bite interesting.
Everything's prepped? Good. Let’s get into the real action…
The Method — Step by Step
First, whisk together the glutinous rice flour and water in a medium bowl until you have a smooth, slightly runny batter. It should look like a thin pancake batter—think pourable but not watery. Let this mixture rest for five minutes; this allows the flour to fully hydrate, which is crucial for that chewy texture. Tip: The batter will thicken a bit; you can add a splash more water if it becomes too stiff.
Kitchen Hack: Use a hand‑held frother to blend the batter; it creates tiny air bubbles that help the waffle rise without a leavening agent.While the batter rests, chop the mochi rice cake into bite‑size cubes. The cubes should be roughly one‑centimeter squares; this size ensures they melt evenly without turning into a mushy puddle. Toss the cubes gently into the rested batter, making sure each piece is fully coated. If you notice any large clumps, break them up with a fork; you want an even distribution for consistent texture.
Add the sugar, ice cream scoop, and anko to the mixture. Stir just until the sugar dissolves and the anko swirls through the batter, creating marbled ribbons. The ice cream will begin to melt, releasing fat that will later help the waffle develop that coveted crisp edge. Watch Out: Over‑mixing at this stage can cause the ice cream to separate, leading to a greasy batter.
Watch Out: If the batter looks too thick after adding the ice cream, add a tablespoon of water at a time until you reach a pourable consistency.Preheat your waffle iron to a medium‑high setting (around 200‑210 °C or 390‑410 °F). The iron should be hot enough that a drop of batter sizzles instantly but not so hot that it burns the exterior before the interior cooks. A quick test: sprinkle a few drops of water on the surface; they should dance and evaporate within a second.
Lightly brush the waffle iron with a thin layer of neutral oil (vegetable or grapeseed works best). This step is vital for achieving that razor‑thin crust that snaps under your teeth. Too much oil will make the waffle soggy; too little will cause sticking. I like to use a silicone brush for even coverage.
Pour a ladleful of batter (about ½ cup) onto the center of the iron, then close the lid gently. The batter will spread quickly; avoid pressing down hard, as that can crush the mochi pieces. Cook for 3–4 minutes, or until the edges turn a deep golden brown and you hear a faint crackling sound. That sizzle when it hits the pan? Absolute perfection. The surface should be crisp, while the interior remains soft and chewy.
Kitchen Hack: Flip the waffle halfway through cooking for an ultra‑even crust; this tiny extra step makes a world of difference.When the waffle is done, carefully remove it with a silicone spatula and place it on a cooling rack for a minute. This short rest allows steam to escape, preserving the crunch. If you’re making a batch, keep the finished waffles in a low oven (around 120 °C) to stay warm without losing texture.
Top each waffle with a generous drizzle of soy sauce, a scattering of grated daikon, and a sprinkle of roasted sesame seeds. Fold the shiso leaves over the top for a burst of aroma. For the sweet version, swap the soy sauce for a light honey glaze and add a dollop of extra ice cream on the side. Either way, you’ll end up with a plate that looks as good as it tastes.
Serve immediately while the crust is still singing with that buttery crunch. Pair with a hot cup of green tea for a balanced palate, or a cold glass of milk if you’re going full dessert mode. And remember: this is hands down the best version you’ll ever make at home. I’ll be honest — I ate half the batch before anyone else got to try it, and I have zero regrets.
That's it — you did it. But hold on, I've got a few more tricks that'll take this to another level…
Insider Tricks for Flawless Results
The Temperature Rule Nobody Follows
Most home cooks set their waffle iron to “medium” and call it a day, but the magic lies in a precise temperature window: 200‑210 °C. Below that, the batter spreads too much and never crisps; above it, the exterior burns before the interior can set. Use an infrared thermometer if you have one, or do the water‑drop test described earlier. I once tried “high” on a cheap iron and ended up with a charcoal‑scented disaster—lesson learned.
Why Your Nose Knows Best
Your sense of smell is the most reliable indicator that the waffle is ready. When the aroma shifts from raw flour to a toasted, nutty scent, you’re at the perfect moment to pull the waffle. If you’re unsure, lift the lid slightly and take a quick sniff; if you detect a faint caramel note, you’ve nailed it. Trusting your nose beats any timer, especially when dealing with mochi’s unique moisture profile.
The 5‑Minute Rest That Changes Everything
After cooking, let the waffles rest on a cooling rack for exactly five minutes. This short pause lets excess steam escape, preventing the crust from becoming soggy. I once tried to serve them immediately and the “crunch” was more of a “sog.” A quick five‑minute wait transforms that disappointment into a satisfying snap.
Oil Choice Matters
Using a neutral‑tasting oil like grapeseed or refined avocado oil ensures that the subtle flavors of anko and soy sauce shine through. Butter adds richness but can burn quickly at high heat, compromising the crispness. If you’re a butter lover, try a 50/50 blend of butter and oil to get the best of both worlds.
The Flip‑And‑Press Technique
Halfway through the cooking cycle, gently lift the lid just enough to flip the waffle, then press down lightly. This ensures both sides receive equal heat and prevents one side from becoming overly dark. The result? A uniformly golden grid that looks as good on the bottom as it does on the top.
Creative Twists and Variations
This recipe is a playground. Here are some of my favorite ways to switch things up:
Matcha‑Infused Delight
Add a tablespoon of matcha powder to the batter for an earthy green hue and a subtle tea flavor. Top with a drizzle of sweet red bean paste and a dusting of powdered sugar. Perfect for tea‑time lovers who want a pop of color.
Coconut‑Lime Dream
Swap the regular ice cream for coconut ice cream, and fold in zest of lime. Finish with toasted coconut flakes and a squeeze of fresh lime juice. The tropical twist makes this a summer‑only favorite.
Savory Miso‑Sesame
Omit the sugar and anko, and instead whisk in a tablespoon of white miso into the batter. Top with a drizzle of soy‑sauce glaze, extra sesame seeds, and finely sliced scallions. This version turns the waffle into a bold appetizer that pairs well with a crisp sake.
Berry Burst
Fold in a handful of fresh blueberries or raspberries just before cooking. The berries burst during cooking, creating pockets of juicy sweetness. Serve with a dollop of whipped cream for a brunch that feels like a celebration.
Spicy Chili‑Anko
Mix a teaspoon of chili oil into the anko for a gentle heat that contrasts the sweet base. Garnish with thinly sliced jalapeño and a sprinkle of toasted sesame. Ideal for those who love a little kick with their sweet.
Storing and Bringing It Back to Life
Fridge Storage
Allow the waffles to cool completely, then place them in an airtight container lined with parchment paper. They’ll keep fresh for up to three days. Reheat in a toaster oven at 180 °C for 5 minutes to revive the crispness.
Freezer Friendly
Stack the cooled waffles between sheets of wax paper, then seal them in a zip‑top freezer bag. They’ll last for up to two months. When ready to eat, pop them straight into a preheated oven (190 °C) for 8‑10 minutes; the steam that forms will bring back that chewy interior.
Best Reheating Method
For the ultimate reheating, place the waffle on a hot skillet over medium heat, add a splash of water (just a teaspoon) to the pan, and cover for 30 seconds. The steam revives the interior while the direct contact restores the crust. This trick works better than microwaving, which makes the waffle rubbery.