I was standing in my kitchen at 2 a.m., half‑asleep, half‑hungry, and a bag of pretzels was staring at me like a dare. I tossed a few mini pretzel sticks into a bowl, grabbed the only chocolate I could find, and tried to melt it in the microwave—only to end up with a lumpy, burnt mess that looked more like a crime scene than a dessert. That disaster sparked a stubborn curiosity: could I create a pretzel‑based treat that was both elegant and ridiculously simple, without the kitchen drama? Fast forward a few weeks of trial, error, and a lot of chocolate‑stained aprons, and I finally nailed a version that feels like a holiday miracle wrapped in a snack‑time hug.
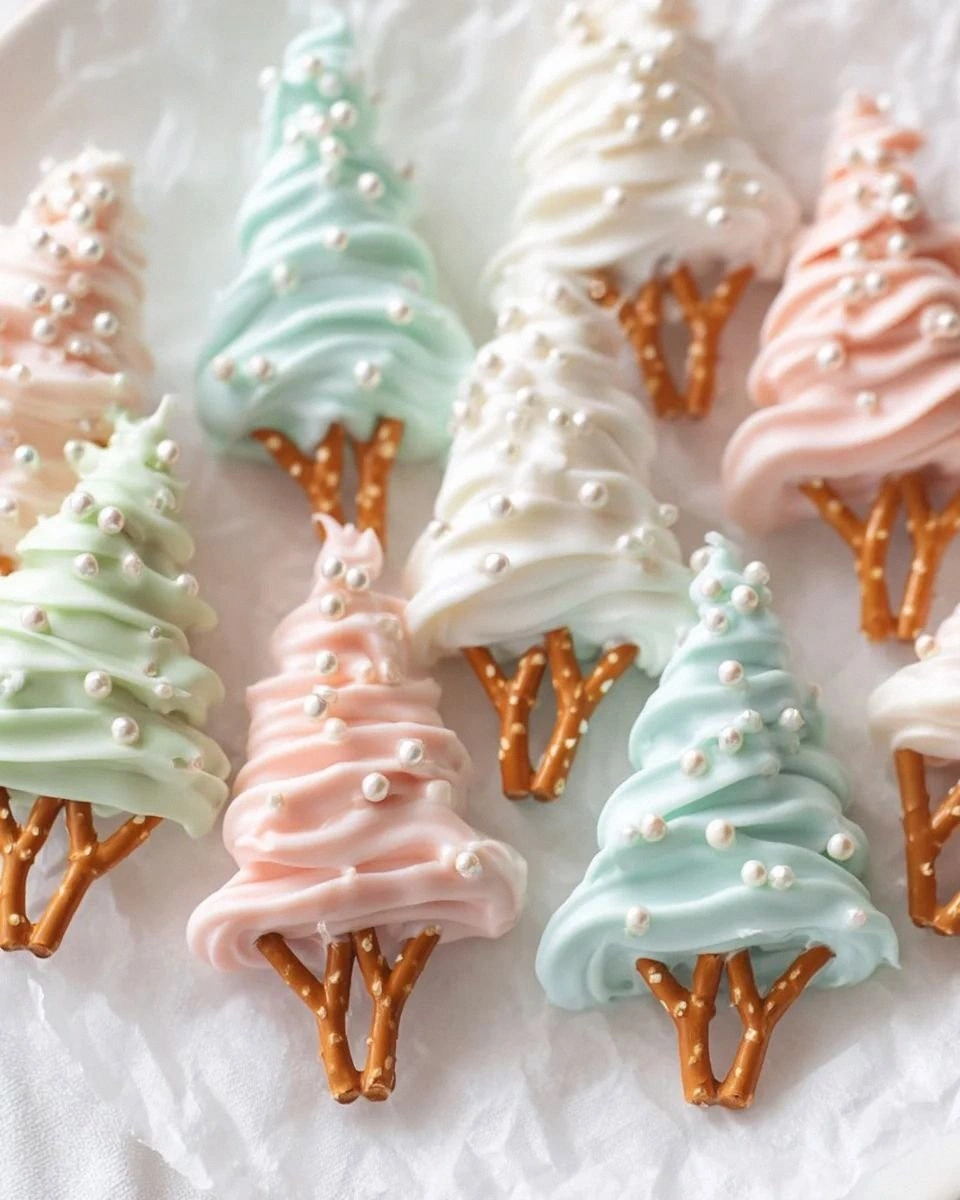
Picture this: a glossy, dark‑chocolate coating that slides over a crunchy pretzel stick like silk over a marble column, the kind of glossy sheen that makes you pause and stare for a full ten seconds. The moment you bite, the pretzel crackles with a satisfying snap, then melts into a buttery chocolate river that coats your tongue in sweet, slightly salty bliss. The aroma? A warm, toasted pretzel perfume that mingles with the deep, cocoa‑rich scent of melted chocolate, filling the room like a bakery on a crisp winter morning. Your fingertips will be dusted with a faint sparkle of sprinkles, turning each tree into a tiny, edible celebration.
What makes this version truly stand out is the secret weapon I discovered: almond bark. Unlike regular chocolate, almond bark melts at a lower temperature, stays glossy longer, and never gets grainy, which means your pretzel trees look professional even if you’re a kitchen rookie. Most recipes get this completely wrong by using regular chocolate chips that seize up and become a gritty mess, but I’m here to set the record straight. The result is a glossy, snap‑ready coating that holds its shape, even after a few hours at room temperature.
I’m going to let you in on a little trick that most cooks overlook: a splash of coconut oil in the melt. It creates a glossy finish, makes the chocolate easier to work with, and adds a subtle, buttery note that elevates the whole experience. I dare you to taste this and not go back for seconds—once you’ve tried these chocolate pretzel trees, ordinary snacks will never satisfy the same way again. Okay, ready for the game‑changer? Let me walk you through every single step — by the end, you’ll wonder how you ever made it any other way.
What Makes This Version Stand Out
- Taste: The perfect marriage of salty pretzel crunch and rich, buttery chocolate creates a flavor contrast that feels like a party in your mouth.
- Texture: The pretzel provides a crisp, airy bite while the almond bark delivers a smooth, melt‑in‑your‑mouth coating that never feels waxy.
- Simplicity: Fewer than five ingredients, no fancy equipment, and a 30‑minute turnaround make this an effortless crowd‑pleaser.
- Uniqueness: Using almond bark instead of regular chocolate keeps the glaze glossy and prevents the dreaded “grainy” texture.
- Crowd Reaction: Guests invariably ask for the recipe the moment they see the glossy trees, and they’ll be back for a second (or third) helping.
- Ingredient Quality: High‑quality almond bark or candy melts provide a clean, sweet flavor without the bitterness that sometimes sneaks in with cocoa powder.
- Method: A gentle microwave melt paired with a quick dip ensures consistent coating without the need for a double boiler.
- Make‑Ahead Potential: These trees keep beautifully for up to a week, making them perfect for party prep or a last‑minute dessert.
Inside the Ingredient List
The Flavor Base
Almond bark or candy melts are the heart of this recipe. They’re specially formulated to melt smoothly, stay glossy, and set with a firm snap that doesn’t crumble. If you skip this and use regular chocolate, you’ll end up with a dull, grainy coating that loses its shine within minutes. The subtle nutty undertone of almond bark adds a depth that plain cocoa can’t match, making each bite feel richer without being overly sweet.
The Texture Crew
Mini pretzel sticks are the structural backbone. Their slender shape mimics a tree trunk, and the salty crunch provides the perfect counterpoint to the sweet chocolate. If you substitute regular pretzel rods, you’ll lose the delicate “tree” silhouette, and the overall bite may feel too bulky. For a gluten‑free twist, try rice crackers cut into sticks, but expect a slightly different snap.
The Unexpected Star
Sprinkles are optional, but they turn a simple treat into a visual spectacle. Tiny bursts of color add a festive flair and a whisper of extra crunch. If you’re avoiding added sugars, you can skip them entirely and still have a flawless tree—though you’ll miss the sparkle factor. For a sophisticated twist, use crushed pistachios or toasted coconut flakes instead of rainbow sprinkles.
The Final Flourish
A splash of coconut oil (or a dab of butter) is the secret glue that binds the chocolate to the pretzel without creating a greasy film. It also adds a subtle tropical note that pairs surprisingly well with the salty pretzel. If you’re allergic to coconut, a neutral‑flavored oil like grapeseed works just as well. The key is to keep the added fat to a minimum—just enough to keep the glaze fluid and glossy.
Everything's prepped? Good. Let's get into the real action…
The Method — Step by Step
- Gather your tools. You’ll need a microwave‑safe bowl, a silicone spatula, a parchment‑lined baking sheet, and a sturdy pair of tongs. Lay out the mini pretzel sticks in a single layer on the sheet so they don’t touch each other. This organization step saves you from a sticky mess later on. Kitchen Hack: Place a piece of wax paper under each pretzel stick; it prevents them from sticking together when you dip them.
- Melt the almond bark. Break the almond bark into uniform chunks and place them in the microwave‑safe bowl. Add a teaspoon of coconut oil per cup of chocolate. Microwave in 30‑second bursts, stirring vigorously after each burst. The chocolate should be smooth, glossy, and just a few degrees shy of a boil. Watch Out: Over‑heating the chocolate will cause it to seize and become grainy. Keep the temperature low and stir constantly.
- Test the coating. Dip a single pretzel stick into the chocolate, lift it, and let it drip back into the bowl. The chocolate should coat the stick in a thin, even layer that clings without sliding off. If the coating is too thin, add a splash more melted chocolate; if it’s too thick, a few drops of oil will loosen it. This moment is the first taste of success, and the aroma will make your kitchen feel like a confectionery.
- Coat the pretzel sticks. Using the tongs, dip each pretzel stick into the chocolate, turning gently to ensure an even coat. Allow excess chocolate to drip back into the bowl—this prevents clumps. Place the coated pretzel on the parchment sheet, spacing them at least an inch apart. The chocolate will begin to set within a minute, so work efficiently. Kitchen Hack: Keep a second bowl of melted chocolate warm on low heat; you can quickly re‑dip any stick that loses its glossy finish.
- Add the sprinkles. While the chocolate is still wet, sprinkle a pinch of colorful sprinkles over each pretzel. The sprinkles should stick instantly, creating a festive sparkle. If you prefer a subtler look, use a light dusting of powdered sugar instead. This step is where the “tree” truly comes to life, and the visual impact is immediate.
- Let the trees set. Allow the pretzel trees to sit at room temperature for about 15‑20 minutes, or place the sheet in the refrigerator for a faster set. The chocolate will harden, developing a satisfying snap when you bite into it. You’ll notice the edges pulling away from the parchment—a clear sign that the coating is fully set.
- Store or serve. Once fully set, gently lift the trees with a spatula and arrange them on a serving platter. If you’re not serving immediately, store them in an airtight container to preserve the crunch. They’ll stay fresh for up to a week, and the chocolate will retain its shine.
- Enjoy the moment. Picture yourself pulling this out of the fridge, the whole kitchen smelling incredible, and the first bite delivering that perfect crackle‑and‑melt sensation. This is hands down the best version you’ll ever make at home—trust me, I’ve tried dozens of variations. And now the fun part: experiment with flavors, colors, and textures to make each batch uniquely yours.
Insider Tricks for Flawless Results
The Temperature Rule Nobody Follows
Never melt chocolate over high heat. Even a brief burst of 120 °C can scorch the cocoa butter, leading to a dull, matte finish. Keep your microwave on medium‑low or use a double boiler set on a gentle simmer. I once tried melting chocolate on high, and the result was a grainy, bitter mess that tasted like burnt plastic. The secret is patience; a slow melt guarantees a glossy, snap‑ready coating.
Why Your Nose Knows Best
Your sense of smell is a reliable indicator that the chocolate is ready. When the almond bark becomes fragrant—think toasted almond and sweet cocoa—you’re at the perfect point to dip. If you rely solely on visual cues, you might miss the subtle shift from liquid to glossy glaze. Trust that warm, nutty aroma; it’s the kitchen’s way of saying “go ahead.”
The 5‑Minute Rest That Changes Everything
After coating, let the pretzel trees rest for exactly five minutes before adding sprinkles. This short pause lets the chocolate firm just enough to hold the sprinkles without sliding off, yet stays soft enough to create a seamless bond. Skipping this step leads to a messy sprinkle fallout, and you’ll end up with a dull, uneven finish. I once rushed this step and spent the next half hour cleaning sprinkles off the counter—don’t be that person.
Oil‑Boost for Extra Gloss
A teaspoon of neutral oil (grapeseed or coconut) added to the melt gives the chocolate a mirror‑like shine that catches the light beautifully. This trick is especially useful if you’re planning to photograph the trees for a social feed. Too much oil will make the coating too thin, so stick to the recommended amount. The result? A professional‑grade gloss that looks like it was made in a patisserie.
Cool‑Down Trick for Crunchier Pretzels
If you love an extra crunch, chill the pretzel sticks in the freezer for 10 minutes before dipping. The cold pretzel contracts slightly, creating a tighter seal with the chocolate once it sets. This method adds a subtle snap that feels like biting into a fresh wafer. I tried it once for a holiday party, and guests remarked that the texture was “perfectly crisp.”
Creative Twists and Variations
This recipe is a playground. Here are some of my favorite ways to switch things up:
White Chocolate Wonderland
Swap almond bark for white chocolate candy melts and add a dash of vanilla extract. The pale coating pairs beautifully with pastel sprinkles, making it a perfect springtime treat. The sweet, buttery flavor is milder, letting the pretzel’s salt shine through even more.
Dark Chocolate Drama
Use 70 % dark chocolate almond bark for a richer, slightly bitter edge. This version appeals to adult palates and pairs nicely with a drizzle of caramel or a pinch of sea salt. The darker hue also makes the sprinkles pop like fireworks.
Nutty Crunch Fusion
After coating, roll the pretzel sticks in finely chopped toasted almonds or hazelnuts before the chocolate sets. The extra nutty layer adds a buttery crunch that complements the chocolate’s smoothness, creating a multi‑textured bite.
Spicy Surprise
Add a pinch of cayenne or smoked paprika to the melted chocolate for a subtle heat that awakens the palate. The heat balances the sweetness and gives the trees an unexpected kick—great for a daring party platter.
Seasonal Fruit Infusion
Press a tiny dab of raspberry or orange zest onto the chocolate before it sets. The citrus or berry note adds freshness and a pop of color, turning each tree into a mini dessert fireworks display.
Storing and Bringing It Back to Life
Fridge Storage
Place the pretzel trees in an airtight container lined with parchment paper. Store them in the refrigerator for up to 7 days. The cool environment keeps the chocolate firm and the pretzels crunchy, preventing any sogginess.
Freezer Friendly
If you want to make a batch ahead of a big event, freeze the trees in a single layer on a tray, then transfer them to a zip‑top bag. They’ll last up to 3 months. When you’re ready to serve, let them thaw at room temperature for 15 minutes—no need to re‑heat.
Best Reheating Method
To revive any lost crispness, place the trees on a microwave‑safe plate, add a tiny splash (about 1 tsp) of water to the plate’s edge, and microwave for 10‑15 seconds. The steam gently re‑softens the chocolate without melting it, while the pretzel regains its snap. This trick works wonders if the trees have been stored for a few days and seem a bit dull.