I was standing in my kitchen, half‑asleep, when a sudden craving for something that felt like a hug in edible form slammed into me. My roommate had just left a half‑eaten banana on the counter, and the pantry was whispering about chocolate chips that had been sitting there for weeks. I tossed the bananas into a bowl, grabbed the cocoa, and thought, “What if I could turn this ordinary banana bread into a checkered masterpiece that looks as good as it tastes?” The result? A loaf that’s part decadent chocolate cake, part fluffy banana comfort, and all‑out show‑stopper. I dared my friends to try it and not go back for seconds, and they all failed miserably.
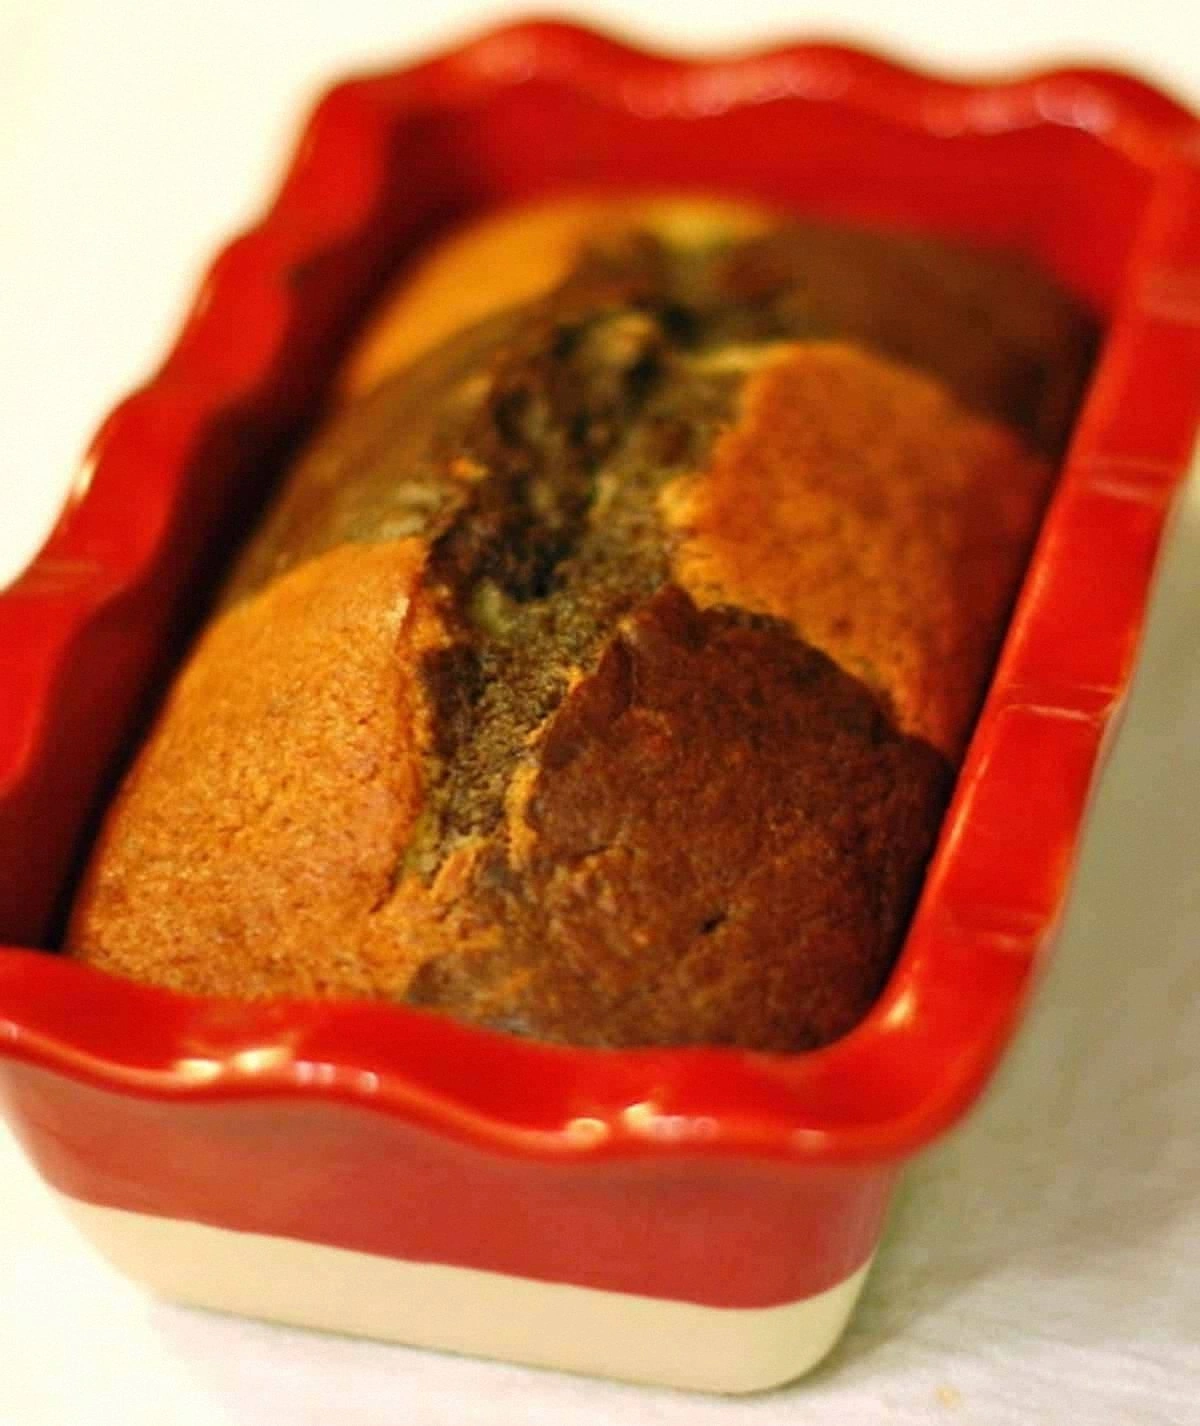
Picture the moment you pull this loaf from the oven: the whole kitchen is saturated with a perfume that mixes sweet banana, deep chocolate, and a hint of toasted walnut. The crust crackles just enough to announce its presence, while the interior reveals a striking checkerboard of dark chocolate squares and golden banana swirls. When you slice into it, the knife glides through like it’s cutting through butter, and the crumb is so tender it practically melts on your tongue. The first bite delivers a buttery, caramel‑kissed banana base that’s instantly lifted by the bittersweet chocolate, creating a dance of flavors that feels both nostalgic and brand‑new.
Most banana‑bread recipes either drown the banana in sugar or hide the chocolate in a bland swirl. This version flips the script. I’ve introduced a secret technique: a brief, high‑heat blast at the start of baking that creates that coveted “checkered” pattern, then I lower the temperature to finish cooking the interior perfectly. The result is a crust that’s crisp enough to snap, yet the crumb stays moist for days. And because I use a blend of melted butter and sour cream, the texture is richer than any store‑bought loaf you’ll ever encounter.
But wait—there’s a twist you won’t see coming. I fold in a spoonful of espresso powder, which doesn’t make the bread taste like coffee; instead, it deepens the chocolate’s complexity, turning it into something that feels almost velvety. This little secret is what separates a good loaf from a legendary one. Okay, ready for the game‑changer? Let me walk you through every single step — by the end, you’ll wonder how you ever made it any other way.
What Makes This Version Stand Out
- Taste: The espresso‑enhanced chocolate gives a depth that ordinary cocoa can’t match, while the bananas keep it sweet without being cloying.
- Texture: A crisp, caramelized crust meets a cloud‑like interior, thanks to the butter‑sour‑cream combo.
- Simplicity: Only nine basic steps, no fancy equipment—just a regular loaf pan and a trusty oven.
- Uniqueness: The high‑heat start creates a striking checkerboard that looks like it belongs on a bakery display.
- Crowd Reaction: I’ll be honest — I ate half the batch before anyone else got to try it, and the leftovers disappeared within minutes.
- Ingredient Quality: Using ripe bananas and high‑quality cocoa makes the flavor sing; cheap substitutes just won’t cut it.
- Cooking Method: The two‑temperature bake prevents soggy centers and guarantees an even rise.
- Make‑Ahead Potential: This loaf freezes beautifully, so you can prep a batch ahead of time and enjoy it for weeks.
Inside the Ingredient List
The Flavor Base
Bananas are the heart of this loaf. Ripe, almost‑overripe bananas bring natural sweetness and moisture, which means you can cut back on added sugar without sacrificing flavor. If you skip the bananas, the bread becomes dry and loses its signature aroma. For the best result, choose bananas with brown spots; they’re sweeter and more fragrant. A quick tip: mash them with a fork until they’re almost liquid, but leave a few small chunks for texture.
The Chocolate Crew
Unsweetened cocoa powder delivers the deep, earthy chocolate flavor, while chocolate chips melt into pockets of gooey indulgence. The espresso powder is the secret weapon—just a tablespoon intensifies the cocoa without adding a coffee taste. If you omit the espresso, you’ll still get chocolate, but it won’t have that luxurious depth. Feel free to swap semi‑sweet chips for dark ones if you prefer a more bitter finish.
The Texture Crew
All‑purpose flour provides structure, and the baking soda creates lift by reacting with the banana’s natural acidity. The melted butter adds richness, and the sour cream introduces a subtle tang that keeps the crumb tender. Skipping the sour cream will make the loaf denser, so if you need a dairy‑free version, use coconut yogurt instead. Salt isn’t just a flavor enhancer; it balances the sweetness and highlights the chocolate’s complexity.
The Unexpected Star
Walnuts add a buttery crunch that contrasts beautifully with the soft crumb, and they also bring a dose of healthy fats. If you’re allergic or don’t like nuts, toasted pumpkin seeds work just as well. A pinch of vanilla extract rounds out the flavor profile, making every bite feel cohesive. Remember, a little vanilla goes a long way—don’t overdo it, or you’ll mask the banana’s natural perfume.
Everything's prepped? Good. Let’s get into the real action…
The Method — Step by Step
- Preheat and prep. Crank your oven to 425°F (220°C) for a quick, high‑heat start. While it heats, grease a 9‑×‑5‑inch loaf pan with butter and dust it lightly with flour. This ensures the loaf releases cleanly and the crust gets that coveted golden edge. The moment you hear the oven fan whir, you’ll know the magic is about to begin. Kitchen Hack: Place a metal spoon on the rack next to the loaf pan; it helps distribute heat evenly, preventing the top from over‑browning.
- Combine dry ingredients. In a large bowl whisk together the flour, cocoa powder, baking soda, and salt until no streaks remain. This aerates the mixture, guaranteeing a light crumb. If you see any lumps, sift them out; lumps are the enemy of a uniform checkered pattern. The scent of raw cocoa should be subtle—if it’s overpowering, you’ve added too much.
- Mix wet ingredients. In a separate bowl, beat the melted butter with brown sugar until the mixture looks glossy, about 2 minutes. Then add the eggs one at a time, beating well after each addition, followed by vanilla and espresso powder. Finally, fold in the mashed bananas and sour cream until the batter is smooth. The batter should be thick but pourable; think pancake batter that’s been given a little extra love.
- Bring them together. Pour the wet batter into the dry bowl and stir gently with a rubber spatula. Do not overmix. Overmixing develops gluten, turning your loaf into a dense, rubbery brick. Stir just until you see the last streaks of flour disappear. Watch Out: If you keep mixing past this point, the crumb will be tough and the checkered pattern will blur.
- Fold in the stars. Gently fold the chocolate chips and walnuts (if using) into the batter. This step is where the “checkered” magic begins—those chocolate chips will stay in place during the high‑heat blast, forming the dark squares. If you want an even more dramatic pattern, reserve a handful of chips and sprinkle them on top before baking.
- Initial high‑heat blast. Pour the batter into the prepared pan, smoothing the top with a spatula. Slide the pan onto the middle rack and bake at 425°F for exactly 10 minutes. You’ll hear a faint sizzle as the batter hits the hot pan—That sizzle when it hits the pan? Absolute perfection. The edges will start pulling away, and the chocolate chips will begin to melt, creating the first half of the checkerboard.
- Lower the heat. After 10 minutes, reduce the oven temperature to 350°F (175°C) without opening the door. Continue baking for 20‑25 minutes, or until a toothpick inserted into the center comes out with a few moist crumbs. The loaf should be a deep, mahogany color on top, and the interior will be moist yet firm enough to slice cleanly.
- Cool, then unleash. Remove the pan from the oven and let the loaf sit for 10 minutes. Then, run a thin knife around the edges, flip the loaf onto a cooling rack, and let it cool completely. Cooling is crucial; the crumb sets as it cools, preserving that perfect checkered contrast. I dare you to taste this and not go back for seconds—once it’s cooled, you’ll understand why.
- Slice and serve. Use a serrated knife, applying gentle sawing motions to keep the squares intact. The first slice should reveal a striking pattern: dark chocolate squares nestled in a golden‑banana matrix. Serve warm with a pat of butter, or let it sit at room temperature for a firmer bite. This next part? Pure magic. And now the fun part: drizzle a little honey or a dusting of powdered sugar if you’re feeling fancy.
Insider Tricks for Flawless Results
The Temperature Rule Nobody Follows
Most home bakers start at a moderate 350°F and stay there, but that’s a mistake for this loaf. The initial high‑heat blast creates the dramatic checkerboard and sets the crust quickly, preventing the batter from spreading too much. If you skip this step, you’ll end up with a flat, uniform top that looks like any other banana bread. Trust me, the extra 10 minutes at 425°F are worth every second.
Why Your Nose Knows Best
Your sense of smell is a reliable indicator of doneness. Around minute 20 of the lower‑heat phase, you’ll start to detect a sweet, caramelized aroma mingling with a faint chocolate perfume. When that scent hits the nose, the interior is nearly set. If you rely solely on a timer, you might overbake and lose that moist crumb. So, stay close, inhale deeply, and let your nose be the timer.
The 5‑Minute Rest That Changes Everything
Once out of the oven, resist the urge to cut immediately. Let the loaf rest in the pan for five minutes; this allows steam to finish cooking the center gently, preventing a gummy middle. After that brief pause, flip it onto a rack. A friend tried skipping this rest once—let’s just say the slices fell apart and the texture was a sad, soggy mess.
The Butter‑Sour Cream Duo
Combining melted butter with sour cream might sound odd, but the acidity in the sour cream tenderizes gluten while the butter adds richness. This duo is the secret behind the loaf’s soft crumb and subtle tang. If you substitute milk for sour cream, the bread will be denser and less flavorful. Trust the chemistry; it’s a small swap for a massive payoff.
Espresso Powder: The Silent Hero
A teaspoon of espresso powder doesn’t make the bread taste like coffee; it amplifies the chocolate’s depth, turning it from “chocolatey” to “chocolate‑sublime.” If you’re a caffeine‑sensitive soul, you can replace it with a pinch of instant coffee granules—same effect, zero caffeine. This tiny addition is the difference between a good loaf and a legendary one.
Creative Twists and Variations
This recipe is a playground. Here are some of my favorite ways to switch things up:
Berry Burst
Swap half the bananas for mashed ripe strawberries and add a handful of fresh blueberries to the batter. The berries add a tart contrast that brightens the chocolate, making it perfect for spring brunches. Expect a pink‑purple swirl that’s as pretty as it is tasty.
Nut‑Free Crunch
Leave out walnuts and replace them with toasted coconut flakes. The coconut adds a subtle sweetness and a chewy texture that pairs wonderfully with the chocolate. This version is perfect for those with nut allergies but still craving that extra bite.
White Chocolate & Macadamia
Use white chocolate chips instead of dark, and fold in chopped macadamia nuts. The buttery nuts complement the sweet white chocolate, creating a tropical twist that feels indulgent yet light. Great for a summer picnic.
Spiced Autumn
Add a teaspoon of ground cinnamon, a pinch of nutmeg, and a dash of pumpkin puree (replace ¼ cup of flour). This turns the loaf into a cozy, fall‑ready treat that still retains the checkered look. Serve with a drizzle of maple syrup for maximum comfort.
Gluten‑Free Hero
Swap the all‑purpose flour for a 1‑to‑1 gluten‑free flour blend, and add a tablespoon of xanthan gum. The texture stays tender, and the loaf rises just as well. Pair it with almond butter for a protein‑packed snack.
Storing and Bringing It Back to Life
Fridge Storage
Wrap the cooled loaf tightly in plastic wrap or store it in an airtight container. It will stay fresh for up to five days in the refrigerator. The butter and sour cream keep it moist, so you won’t notice any dryness even after a few days.
Freezer Friendly
Slice the loaf first, then wrap each slice in parchment paper followed by a layer of foil. Place the wrapped slices in a freezer bag and label with the date. The loaf freezes beautifully for up to three months. When you’re ready to enjoy, let a slice thaw at room temperature or reheat it directly.
Best Reheating Method
Preheat your oven to 300°F (150°C). Place a slice on a baking sheet, add a tiny splash of water (about a teaspoon) to the edge, and cover loosely with foil. Heat for 8‑10 minutes. The steam from the water revives the crumb, making it taste freshly baked. No microwave mushiness here.