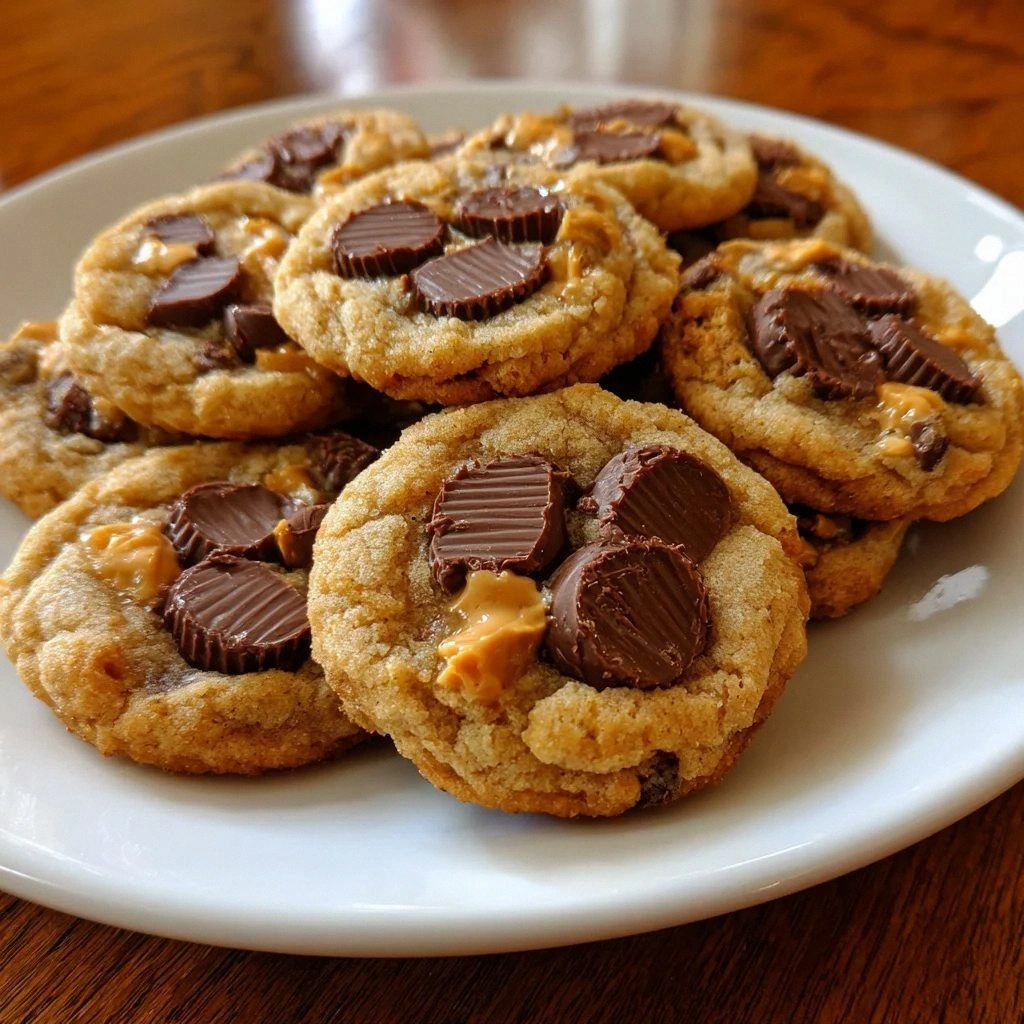
I still remember the day I accidentally discovered the holy grail of peanut butter cookies. It was one of those chaotic Sunday afternoons where I was juggling laundry, a phone call with my mom, and a desperate craving for something sweet. My original plan was to make basic peanut butter cookies, but as I reached for the bag of chocolate chips, I spotted a pile of mini peanut butter cups hiding in the pantry like buried treasure. In that moment of pure culinary inspiration (or maybe it was just sugar deprivation), I decided to stuff those little chocolate-peanut butter gems right into the center of each cookie dough ball. What happened next was nothing short of magical. The smell that wafted through my kitchen was so intoxicating that my neighbor actually knocked on my door to investigate, and by the time the cookies cooled enough to eat, I'd already burned my tongue twice because I couldn't wait.
Here's the thing about peanut butter cup cookies: most recipes treat the peanut butter cup like an afterthought, something you press into a basic cookie dough and hope for the best. But that approach is like putting a Ferrari engine in a golf cart and wondering why it doesn't perform. The secret lies in building the entire cookie around that perfect peanut butter cup center, creating a dough that complements rather than competes with that molten chocolate-peanut butter core. I'm talking about cookies with edges that shatter like thin ice, revealing a soft, chewy interior that hugs the peanut butter cup like it was always meant to be there.
I've spent the last three years perfecting this recipe, testing it with different peanut butters, various chocolate brands, and every baking technique I could find. I've made them at high altitude in Colorado, in humid Florida summers, and in my friend's ancient oven that doesn't even have temperature markings. Through all these trials and errors (and trust me, there were some spectacular failures), I've discovered exactly what works and what absolutely doesn't. The result is a cookie that's so ridiculously good, I dare you to eat just one. Actually, I dare you to even wait for them to cool completely before diving in.
What makes this version different isn't just one thing – it's the combination of brown sugar for that deep caramel flavor, the exact ratio of peanut butter to butter that creates the perfect texture, and a few secret techniques that ensure every single cookie comes out perfect. Picture yourself pulling a tray of these beauties from the oven, the chocolate still molten, the peanut butter aroma so intense it should probably be illegal. Stay with me here — this is worth it. By the time we're done, you'll not only know how to make the best peanut butter cup cookies of your life, but you'll understand exactly why each step matters. Let me walk you through every single step — by the end, you'll wonder how you ever made it any other way.
What Makes This Version Stand Out
Flavor Bomb: These cookies pack a double peanut butter punch that's absolutely devastating in the best way possible. The dough itself is loaded with creamy peanut butter, and then you get that molten peanut butter cup center that creates this incredible flavor layering. It's like peanut butter squared, but somehow it doesn't overwhelm — it just satisfies that craving on a cellular level.
Texture Perfection: We're talking about cookies with crispy, crackly edges that give way to a soft, almost gooey center. The secret is in the sugar ratio and the specific baking temperature that creates this perfect contrast. The edges caramelize while the center stays tender, creating that bakery-quality texture that makes you close your eyes involuntarily when you take a bite.
Foolproof Technique: Unlike those finicky recipes that require perfect room temperature ingredients and precise timing, this one is surprisingly forgiving. I've made these cookies with butter straight from the fridge (just cream it longer) and with natural peanut butter that was separated and oily. They still turned out incredible because the technique accounts for real-world kitchen chaos.
Maximum Chocolate: Every single cookie gets its own mini peanut butter cup, but here's the genius part — we chop up extra cups and fold them into the dough. This means you get chocolate in every single bite, not just in the center. It's over-the-top in the best possible way, like someone asked, "What if we made cookies that were basically candy bars?"
Crowd Control: I dare you to taste this and not go back for seconds. Actually, I dare you to make these for any gathering and have any left to bring home. I've seen grown adults hide these in napkins to take home, and my nephew once traded his entire Halloween candy haul for a dozen of these cookies. They're that good.
Make-Ahead Magic: The dough actually gets better after a day in the fridge, developing deeper flavors and baking up even better. You can freeze the dough balls with the peanut butter cups already inside, so fresh cookies are never more than twelve minutes away. Future you will thank present you for this level of planning.
Ingredient Flexibility: While I'm giving you my absolute favorite version, this recipe works with almond butter, sun butter, or even cookie butter if you're feeling wild. You can use regular-sized peanut butter cups cut into quarters, or go rogue with caramel cups or even mini Snickers. The base dough is your playground.
Alright, let's break down exactly what goes into this masterpiece...
Inside the Ingredient List
The Flavor Foundation
All-purpose flour is the unsung hero here, providing the structural integrity that lets these cookies hold their shape while still staying tender. I'm picky about using a good quality flour because it's not just filler — it's what transforms peanut butter from a spread into a cookie. The protein content matters more than you'd think; too much and your cookies are tough, too little and they spread into sad puddles. I always fluff my flour before measuring because compacted flour is the silent killer of cookie texture, turning what should be tender into something that could double as a hockey puck.
Baking soda might seem boring, but it's the difference between dense, heavy cookies and ones that rise just enough to create that perfect texture. It reacts with the brown sugar to create tiny air pockets that make the cookies light despite all that rich peanut butter. Skip it and you'll have peanut butter hockey pucks that could break a tooth. Trust me, I've forgotten it before in a moment of distraction, and the results were so dense I could have used them as paperweights.
The Richness Crew
Unsalted butter is non-negotiable here because salted butter varies so much in salt content that it's impossible to control the final flavor. You want the butter at that perfect cool room temperature where it indents slightly when pressed but isn't greasy. Too cold and it won't cream properly, too warm and your cookies will spread like they want to become one giant cookie. The butter creates those flaky layers and rich flavor that makes people ask if there's some secret ingredient they can't identify.
Creamy peanut butter is obviously the star, but here's where it gets interesting. I tested this with everything from natural peanut butter that's just ground peanuts to the big brand stuff with added sugar and oil. The winner? Regular commercial creamy peanut butter gives you the most consistent results and the best texture. Natural peanut butter makes cookies that spread more and can taste a little dry, while the commercial stuff creates that perfect bakery-style cookie that's tender and rich.
The Sweet Symphony
Granulated sugar isn't just here for sweetness — it's creating that perfect cookie structure. The crystals cut through the butter during creaming, creating air pockets that make the cookies light. It also helps the edges caramelize to that perfect golden brown that makes your kitchen smell like a professional bakery. Don't even think about reducing the sugar significantly because it's not just about sweetness; it's about chemistry.
Brown sugar is where the magic really happens. That molasses content adds moisture and creates this incredible depth of flavor that makes people say, "What is that I taste?" It's also what keeps the cookies soft and chewy for days, assuming they last that long. I use dark brown sugar because I'm a maximalist, but light brown works if you prefer a more subtle flavor. The brown sugar also helps the cookies stay moist, which is crucial when you're dealing with peanut butter that can sometimes make baked goods dry.
The Binding Agents
Large eggs do more than just hold everything together — they're adding richness and helping create that perfect cookie texture. I always use room temperature eggs because they incorporate more easily and create a smoother dough. Cold eggs can cause the butter to seize up, creating little hard bits that never quite incorporate. One egg is exactly right here; too many and the cookies become cakey, too few and they fall apart.
Vanilla extract might seem optional in peanut butter cookies, but leaving it out is like forgetting to add salt to bread. It rounds out all the flavors and adds this warm, sweet note that makes the peanut butter taste more peanut-buttery. I use real vanilla extract because, honestly, these cookies deserve it. The fake stuff tastes like sadness and regret, and life's too short for sad cookies.
Milk is my secret weapon for creating the perfect dough consistency. Just a splash brings everything together and ensures your dough isn't too dry or crumbly. You might need slightly more or less depending on your peanut butter and the humidity in your kitchen. Start with less and add more if needed — you can always add more liquid, but you can't take it away once it's in there.
The Showstopper
Mini peanut butter cups are obviously the reason we're all here, but let me tell you why the mini ones are superior to the regular size. They distribute more evenly, giving you chocolate in every bite without overwhelming the peanut butter flavor. I always buy extra because, I'll be honest, I eat at least a handful while baking. The mini size also means they melt perfectly in the center without making the cookies too fragile to pick up.
Everything's prepped? Good. Let's get into the real action...
The Method — Step by Step
- Cream together the butter, peanut butter, and both sugars until the mixture becomes light and fluffy. This isn't just about mixing — it's about incorporating air that will make your cookies tender instead of dense. I usually let my mixer run for about 3-4 minutes on medium speed, stopping to scrape down the sides once or twice. The mixture should become noticeably paler in color and increase in volume. Don't rush this step because it's creating the foundation for perfect texture, and trust me, you'll see (and taste) the difference in the final cookies.
- Add the egg and vanilla extract, mixing just until combined. Here's where things can go wrong if you're not paying attention. Overmixing at this stage can make your cookies tough because you're developing the gluten in the flour you'll add next. I crack my egg into a separate bowl first (learned this the hard way after a piece of shell ruined an entire batch) and mix it in just until you can't see any more streaks of egg. The dough should look smooth and slightly glossy, like peanut butter frosting.
- In a separate bowl, whisk together the flour, baking soda, and salt. I know it's tempting to skip the separate bowl and just dump everything into the mixer, but whisking the dry ingredients together ensures the baking soda and salt distribute evenly. There's nothing worse than biting into a cookie that tastes like baking soda because one little pocket didn't get mixed properly. This step takes literally 30 seconds but saves you from weird-tasting cookies.
- Gradually add the dry ingredients to the wet mixture, mixing on low speed just until combined. This is the moment of truth where many cookies go wrong. You want to stop mixing as soon as the flour disappears because the dough will continue to come together as you work with it. If you overmix here, your cookies will be tough and won't spread properly. The dough should be soft but not sticky, and it should hold together when you squeeze a bit in your hand.
- Add the milk, one tablespoon at a time, mixing just until the dough comes together. This is where you need to trust your instincts more than the recipe. Depending on your peanut butter and the humidity, you might need only one tablespoon or you might need three. The dough should be soft enough to roll into balls without cracking, but not so soft that it sticks to your hands. Think play-dough consistency, not cake batter.
- Chop half of your mini peanut butter cups into quarters and fold them into the dough. This is where we're getting serious about chocolate distribution. I use a rubber spatula and fold them in gently because you want to keep those chunks intact. The chopped cups will melt into little chocolate pockets throughout the cookie, ensuring every bite has some chocolate. Don't chop them too small or they'll just disappear into the dough.
- Using a cookie scoop or two spoons, form the dough into balls about the size of a golf ball. I use a #40 cookie scoop because it makes exactly the right size cookies, but two spoons work fine too. Roll each ball between your palms to make it smooth — this helps prevent weird cracks and ensures even baking. Place the dough balls on a parchment-lined baking sheet and press one whole mini peanut butter cup into the center of each ball, pushing it down so it's flush with the top of the dough.
- Bake at 350°F (175°C) for exactly 12 minutes. Don't walk away from the oven here because these cookies go from perfect to overdone in what feels like seconds. They should look slightly underbaked in the center when you pull them out — that's exactly what you want. The residual heat will finish cooking them as they cool, leaving you with that perfect soft center. The edges should be just starting to turn golden, and the tops should still look a little puffy and soft.
That's it — you did it. But hold on, I've got a few more tricks that'll take this to another level...
Insider Tricks for Flawless Results
The Temperature Rule Nobody Follows
Here's something that'll change your cookie game forever: the temperature of your ingredients matters way more than you'd think. I always let my butter sit out for about 45 minutes before starting — it should be cool but pliable, not greasy or melted. Cold peanut butter straight from the fridge will make your dough seize up, while warm peanut butter makes cookies that spread into puddles. Same goes for your egg — room temperature eggs incorporate more easily and create a smoother dough. I keep a stash of peanut butter at room temperature specifically for baking because I'm that committed to perfect cookies.
Why Your Nose Knows Best
After years of baking these cookies, I've developed a sixth sense for when they're done based on smell alone. When the peanut butter aroma shifts from raw and nutty to toasty and caramel-like, they're ready to come out. This usually happens around the 10-minute mark, and it's more reliable than any timer. The smell should fill your kitchen with this warm, sweet, peanut-buttery perfume that makes it impossible to wait for them to cool. Trust your nose — it's been evolving for thousands of years to detect exactly when food is perfectly cooked.
The 5-Minute Rest That Changes Everything
Resist the urge to immediately transfer cookies to a cooling rack. Let them rest on the baking sheet for exactly 5 minutes first. During this time, they're finishing the baking process and setting up properly. Move them too early and they'll fall apart; wait too long and they'll stick to the pan. I set a timer because I'm impatient and have ruined many cookies trying to rush this step. After 5 minutes, they should be firm enough to transfer to a cooling rack without breaking but still warm enough that the peanut butter cup center is molten perfection.
The Salt Secret
Don't skip the salt in the dough, and if you're feeling fancy, sprinkle a few flakes of sea salt on top right after baking. The salt doesn't make the cookies salty — it amplifies the peanut butter flavor and balances the sweetness. It's like turning up the contrast on a photo; suddenly all the flavors are more vivid and interesting. I use kosher salt in the dough and Maldon sea salt flakes on top because I'm fancy like that, but regular table salt works fine too.
Size Matters (But Not How You Think)
While I give you the golf ball size as a guideline, the real secret is consistency. All your cookies should be the same size so they bake evenly. I use a cookie scoop because I'm lazy and it guarantees uniform cookies, but if you're using spoons, weigh your first few balls. Once you get a feel for the right size, you can eyeball it. The key is that they all go into the oven at the same time and come out perfectly baked, not a mix of underdone and overdone because they were different sizes.
Creative Twists and Variations
This recipe is a playground. Here are some of my favorite ways to switch things up:
The Elvis Edition
Add a tablespoon of honey to the dough and press a small piece of banana chip on top of each cookie before baking. The honey adds floral sweetness that pairs beautifully with peanut butter, while the banana chips get toasty and caramelized. It's like the King's favorite sandwich in cookie form, but better because you don't have to deal with banana bread texture issues.
The Dark Side
Use dark chocolate peanut butter cups instead of milk chocolate, and replace half the brown sugar with dark brown sugar for deeper flavor. Add a teaspoon of instant espresso powder to the dough — it won't make the cookies taste like coffee, but it'll intensify the chocolate flavor. These are for the serious chocolate lovers who think milk chocolate is for amateurs.
The Salty Sweet
Stir in a half cup of crushed pretzels into the dough and top each cookie with a few flakes of sea salt before baking. The pretzels add crunch and salt that makes the sweet peanut butter flavor pop even more. It's that perfect balance of sweet and salty that makes it impossible to stop at one cookie.
The Holiday Special
Replace the vanilla extract with maple extract and add a teaspoon of cinnamon to the dry ingredients. Use maple cream-filled peanut butter cups if you can find them, or regular ones work too. These taste like fall in cookie form and are perfect for holiday cookie exchanges because they're different from the usual suspects.
The Tropical Vacation
Add a half cup of toasted coconut flakes to the dough and use coconut milk instead of regular milk. The coconut adds this incredible aroma and texture that makes you feel like you're on a beach somewhere, even if you're baking in a small apartment kitchen in February. It's like a tropical vacation in cookie form.
The Breakfast Cookie
Add a quarter cup of quick oats and replace the milk with cooled coffee. The oats add fiber and texture while the coffee enhances the peanut butter flavor. These are perfect for those days when you want dessert for breakfast but need to feel slightly virtuous about it.
Storing and Bringing It Back to Life
Fridge Storage
Store cooled cookies in an airtight container at room temperature for up to 5 days. I layer them between sheets of parchment paper because they can stick together, especially in humid weather. Don't refrigerate them — it makes the peanut butter cups hard and the cookies dry. If your kitchen is particularly warm, find the coolest spot in your house, but room temperature is ideal.
Freezer Friendly
These cookies freeze beautifully, both as dough and as baked cookies. For dough, freeze the balls on a baking sheet first, then transfer to a freezer bag. You can bake them straight from frozen — just add 2-3 minutes to the baking time. For baked cookies, wrap them individually in plastic wrap, then store in a freezer bag. They'll keep for up to 3 months, though they've never lasted more than a week in my freezer before mysteriously disappearing.
Best Reheating Method
Room temperature cookies are great, but slightly warm cookies are transcendent. To reheat, microwave for 8-10 seconds or pop them in a 300°F oven for 3-4 minutes. The peanut butter cup center will get molten again, and you'll have that fresh-baked experience. Add a tiny splash of water before reheating — it steams back to perfection and prevents the cookies from drying out. Just don't overdo it or you'll have sad, soggy cookies.