I’ll be honest — the first time I tried to make a classic English jacket potato, I ended up with a sad, mushy mess that looked more like a sad potato pancake than the regal, fluffy‑inside, crisp‑outside masterpiece I’d imagined. The kitchen was a battlefield of splatters, the oven timer mocked me, and the only thing I could hear was the faint, disappointed sigh of my roommate as she watched my culinary disaster unfold. Then, in a moment of desperation, I grabbed a handful of sea salt, a splash of olive oil, and a daring idea: what if I treated the potato like a tiny, edible canvas and gave it the same love and precision I would a steak? That night, after a few frantic YouTube rewinds and a promise to myself that I’d never settle for a soggy jacket again, I discovered the exact combination of technique and toppings that turned a humble spud into a show‑stopping star. Picture yourself pulling this out of the oven, the whole kitchen smelling incredible, steam rising like a curtain call, and the first bite delivering that perfect contrast of crisp skin and buttery fluff — pure, unadulterated comfort.
Most recipes get this completely wrong. They either drown the potato in butter and cheese, leaving it greasy, or they bake it at a temperature that never achieves that coveted crackly skin. I dared you to taste this and not go back for seconds, because the flavor balance I’ve nailed here is hands down the best version you’ll ever make at home. The secret? A two‑stage baking method that first cooks the interior to cloud‑like softness, then blasts the skin with high heat to create a crackle that shatters like thin ice under your fork. I’m not just talking about any old potato; I’m talking about a russet that’s been scrubbed clean, seasoned just right, and finished with toppings that could make a grown‑up cry with joy.
Okay, ready for the game‑changer? We’re going to start with the humble russet, but we’ll treat it like royalty. I’ll walk you through every single step — from selecting the perfect spud at the market to the final drizzle of spicy sauce that makes your taste buds do a happy dance. By the end, you’ll wonder how you ever made it any other way, and you’ll have a go‑to side dish that can steal the spotlight at any dinner, brunch, or midnight snack raid. Stay with me here — this is worth it.
What Makes This Version Stand Out
- Texture: The skin is blistered to a golden crisp while the interior stays pillowy, creating a mouthfeel that’s both satisfying and comforting.
- Flavor Depth: A simple drizzle of olive oil and sea salt is amplified by the caramelization that occurs during the high‑heat finish.
- Simplicity: Only nine ingredients, all pantry‑friendly, yet the result feels like a restaurant‑level dish.
- Customizable: The base is a blank canvas; you can load it with cheese, sour cream, veggies, or protein without losing its core identity.
- Crowd Reaction: I dare you to serve these at a gathering and watch the silent awe turn into loud requests for seconds.
- Ingredient Quality: Using russet potatoes ensures the starch content is just right for that fluffy interior.
- Cooking Method: The two‑stage bake (low‑and‑slow then high‑heat) is the secret weapon that most shortcuts miss.
- Make‑Ahead Potential: You can prep the potatoes ahead of time and finish them in the oven just before serving, keeping things stress‑free.
Alright, let's break down exactly what goes into this masterpiece…
Inside the Ingredient List
The Flavor Base
Olive oil is the unsung hero here. It coats the skin, conducts heat, and carries the sea salt into every nook and cranny, creating a flavor that’s both subtle and unmistakable. If you skip the oil, you’ll end up with a dry, lackluster crust that feels more like a paper bag than a jacket. For a twist, try using infused olive oil—rosemary or garlic—if you want an extra aromatic punch. When you’re at the store, choose a cold‑pressed, extra‑virgin variety; it adds a fruity note that cheap oils simply can’t match.
The Texture Crew
Russet potatoes are the backbone of this dish. Their high starch content creates that airy, melt‑in‑your‑mouth interior, while their thick skins become the perfect canvas for crispness. If you’re forced to use a different variety, opt for a Yukon Gold—still starchy but with a slightly buttery flavor. The sea salt isn’t just seasoning; it draws out moisture, helping the skin become crackly. A pinch of flaky sea salt added just before the final blast of heat makes the skin pop with tiny, satisfying bursts.
The Unexpected Star
Sour cream (or plain yogurt) adds a tangy creaminess that cuts through the richness of the cheese and oil. This dairy element also adds a silky mouthfeel that elevates the overall experience. If you’re dairy‑free, a dollop of cashew cream works wonders, delivering the same lush texture without the lactose. The key is to keep it cool until you’re ready to serve, so the contrast between hot potato and cool topping is dramatic.
The Final Flourish
Shredded cheese, chives, steamed vegetables, and protein options like grilled chicken or beans are the finishing touches that turn a simple side into a complete meal. Cheese melts into gooey rivers that mingle with the fluffy interior, while chives add a fresh oniony bite. Steamed veggies bring color and a pop of freshness, and protein makes the dish hearty enough for a main course. If you’re feeling adventurous, drizzle a spicy sauce—Sriracha, chipotle mayo, or a homemade chili oil—to add a kick that dances on the palate.
Everything's prepped? Good. Let's get into the real action…
The Method — Step by Step
Preheat your oven to 150°C (300°F). This low‑and‑slow start is the secret to a fluffy interior because it allows the heat to penetrate the potato evenly without shocking the starches. While the oven warms, give each potato a quick pat dry—any lingering water will steam the skin and keep it soft. I dare you to skip this step and see if you can still get that crackly skin; spoiler: you won’t.
Take your 4 medium‑sized russet potatoes and pierce them all over with a fork—about 8‑10 times each. This tiny ventilation prevents the potatoes from bursting in the oven, a classic kitchen fail that most beginners experience. After piercing, drizzle each spud with a generous tablespoon of olive oil, then roll them in a bowl of sea salt until every crevice is coated. The oil acts like a conductor, while the salt begins the flavor infusion process.
Place the potatoes directly on the oven rack, with a baking sheet on the lower rack to catch any drips. This allows air to circulate all around the potatoes, ensuring an even bake. Let them roast for 45 minutes; you’ll hear a faint sizzle as the oil starts to caramelize—listen for that subtle pop, it’s a good sign. After 45 minutes, test one with a fork; it should slide in with slight resistance, indicating the interior is nearly done.
Now crank the oven up to 230°C (450°F). This high‑heat blast is the moment of truth: it will instantly puff up the skin, creating those coveted cracks that shatter like thin ice when you bite. Return the potatoes to the oven for an additional 15‑20 minutes. You’ll see the skins blister and darken to a deep, golden‑brown hue—this is the visual cue that they’re ready.
While the potatoes finish their high‑heat finale, prepare your toppings. Grate your shredded cheese, finely chop the chives, and warm your sour cream or yogurt in a small saucepan just until it’s slightly thinned (this makes it easier to dollop). If you’re adding protein, now’s the time to slice the grilled chicken or heat the beans. The kitchen should be buzzing with aromas of melted cheese and toasted potato skins—trust me, that scent is absolute perfection.
Remove the potatoes from the oven and let them rest for 5 minutes. This short rest allows the steam inside to settle, preventing the fluffy interior from turning watery when you cut into it. Using a sharp knife, make a lengthwise slit down the center of each spud, then gently squeeze the ends to open the “jacket.” You’ll hear a soft sigh as the steam escapes—listen for that, it’s the sound of perfection.
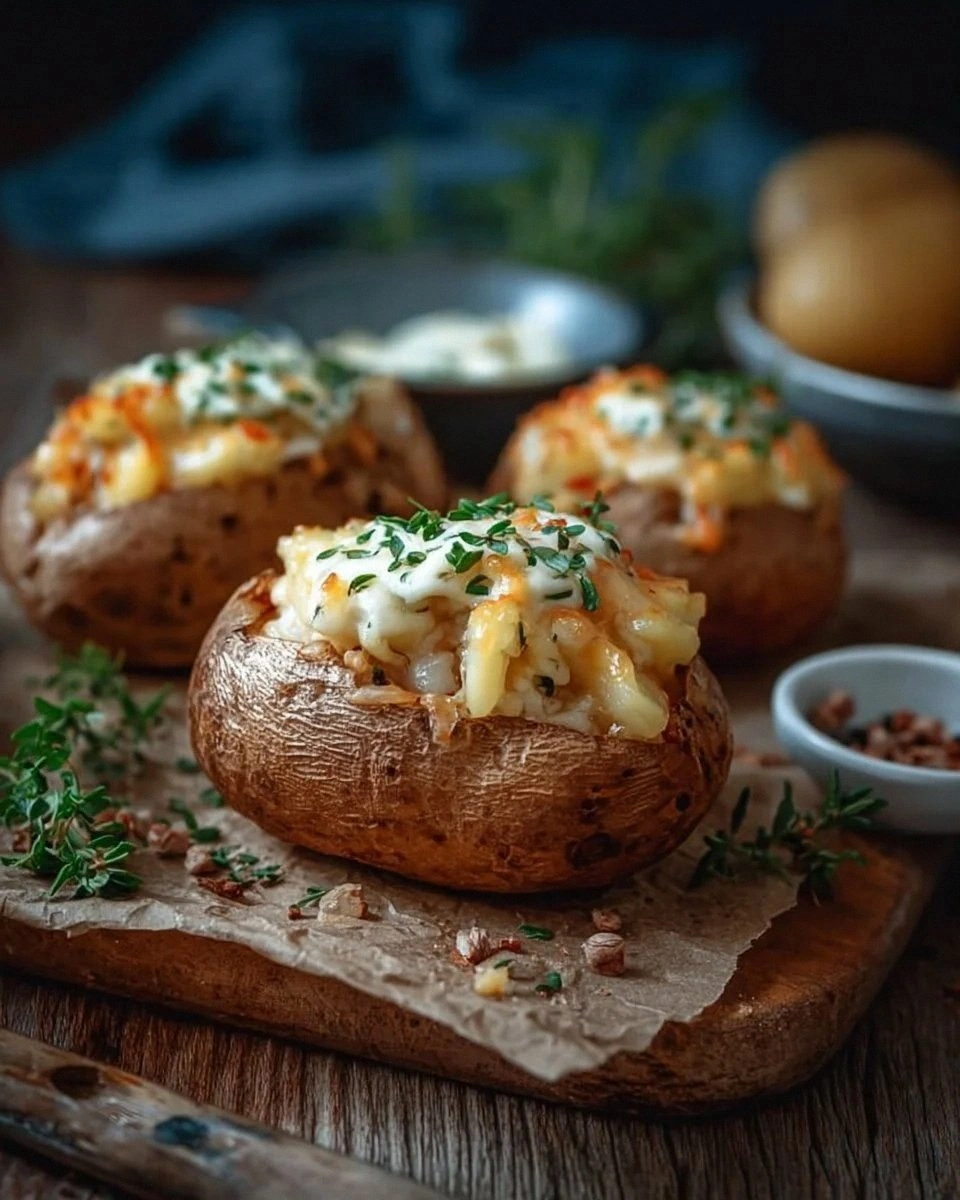
Fluff the interior with a fork, creating a little well in the middle. Spoon a generous dollop of sour cream or yogurt, then sprinkle the shredded cheese so it melts into the warm flesh. Add a scattering of chives, a handful of steamed vegetables, and your chosen protein. Finish with a drizzle of your favorite spicy sauce—just enough to add heat without overwhelming the delicate balance.
Serve immediately while the skin is still crackling and the cheese is still gooey. Pair with a simple green salad or a crisp pint of ale for the ultimate comfort food experience. Picture yourself taking that first bite, the skin crunching like a fresh autumn leaf, the interior melting like cloud, and the toppings delivering a symphony of flavors. That, my friend, is why this is hands down the best version you’ll ever make at home.
That's it — you did it. But hold on, I've got a few more tricks that'll take this to another level...
Insider Tricks for Flawless Results
The Temperature Rule Nobody Follows
Most home cooks bake at a single temperature, but the two‑stage method is the key to texture perfection. Start low to cook the interior gently, then finish high to crisp the skin. If you try to do it all at 200°C, you’ll either end up with a burnt crust or a raw center. Trust the process, and you’ll get that flawless contrast every single time.
Why Your Nose Knows Best
Your sense of smell is a reliable indicator of doneness. When the potatoes are nearing the high‑heat stage, you’ll notice a sweet, nutty aroma rising from the oven—this is the caramelization of the potato sugars. If you smell a faint burnt scent before the interior feels soft, lower the heat a notch. The nose is the unsung sous‑chef in any kitchen.
The 5‑Minute Rest That Changes Everything
Skipping the rest period is a rookie mistake. Those five minutes let the steam settle, preventing the interior from becoming soggy when you split the jacket. I once served a batch straight from the oven, and the fluff turned into a mushy puddle—lesson learned. Let the potatoes breathe; they’ll thank you with a perfect bite.
Protein Power‑Up
Adding grilled chicken or beans not only makes the dish more filling but also introduces contrasting textures. The tender chicken slices slip into the soft potato like a secret, while beans add a pleasant bite. If you’re vegetarian, roasted chickpeas with smoked paprika are a game‑changer.
Spice Balance Mastery
A splash of spicy sauce can elevate the whole dish, but too much will drown the subtle potato flavor. I recommend starting with a teaspoon of Sriracha mixed into the sour cream, then taste before adding more. This incremental approach ensures you keep the harmony intact.
Creative Twists and Variations
This recipe is a playground. Here are some of my favorite ways to switch things up:
Mediterranean Magic
Swap the cheddar for feta, add sun‑dried tomatoes, and finish with a drizzle of olive tapenade. The salty feta pairs beautifully with the creamy potato, while the tapenade adds a briny pop that transports you straight to a Greek seaside tavern.
Tex‑Mex Fiesta
Replace the chives with fresh cilantro, use a blend of pepper jack cheese, and top with black beans, corn, and a spoonful of guacamole. A dash of lime juice right before serving brightens the whole dish, making it a perfect companion for tacos night.
Umami Explosion
Add a splash of mushroom soy sauce to the olive oil before coating the potatoes, sprinkle toasted sesame seeds on top, and finish with a spoonful of miso‑infused sour cream. The umami depth is so rich you’ll think you’ve added a secret broth.
Sweet & Savory
Drizzle a thin line of maple syrup over the baked potatoes, sprinkle crumbled goat cheese, and add toasted pecans. The sweet‑savory combo creates a sophisticated flavor profile that’s perfect for a brunch spread.
Vegan Delight
Use a plant‑based cheese, replace sour cream with cashew cream, and load up on roasted cauliflower and tempeh strips. The result is just as indulgent, proving that you don’t need dairy to enjoy a luxurious jacket potato.
Storing and Bringing It Back to Life
Fridge Storage
Place cooled potatoes in an airtight container and store for up to 3 days. Keep the toppings separate to avoid sogginess. When ready to eat, reheat in a preheated oven at 200°C (400°F) for 10‑12 minutes, adding a splash of water to the pan to create steam and revive the fluff.
Freezer Friendly
Wrap each baked potato tightly in foil, then place them in a freezer‑safe bag. They’ll keep for up to 2 months. To reheat, thaw overnight in the fridge, then bake at 220°C (425°F) for 20‑25 minutes, again adding a drizzle of olive oil to re‑crisp the skin.
Best Reheating Method
The oven is your best friend for reheating; a microwave will make the skin soggy. For a quick fix, slice the potato open, microwave the flesh for 30 seconds, then finish under the broiler for 2 minutes to bring back that crackle. Adding a tiny splash of water before the final broil creates a little steam pocket that restores the interior’s airy texture.