I’ll be honest — the first time I tried to make English muffins, I ended up with something that looked more like a sad, flat pancake than the airy, crater‑filled circles I’d seen in coffee shop windows. The kitchen was a battlefield of flour clouds, a stubborn dough that refused to rise, and a lingering doubt that maybe I should just stick to buying them. Then, on a rainy Tuesday, a friend dared me to “make the best English muffin you’ve ever tasted,” and I accepted the challenge with a grin and a half‑hearted promise that I’d only try once. I spent the next three hours experimenting with temperature, hydration, and a secret technique that turned a bland, dense loaf into a fluffy, buttery masterpiece that practically sings when you split it open.
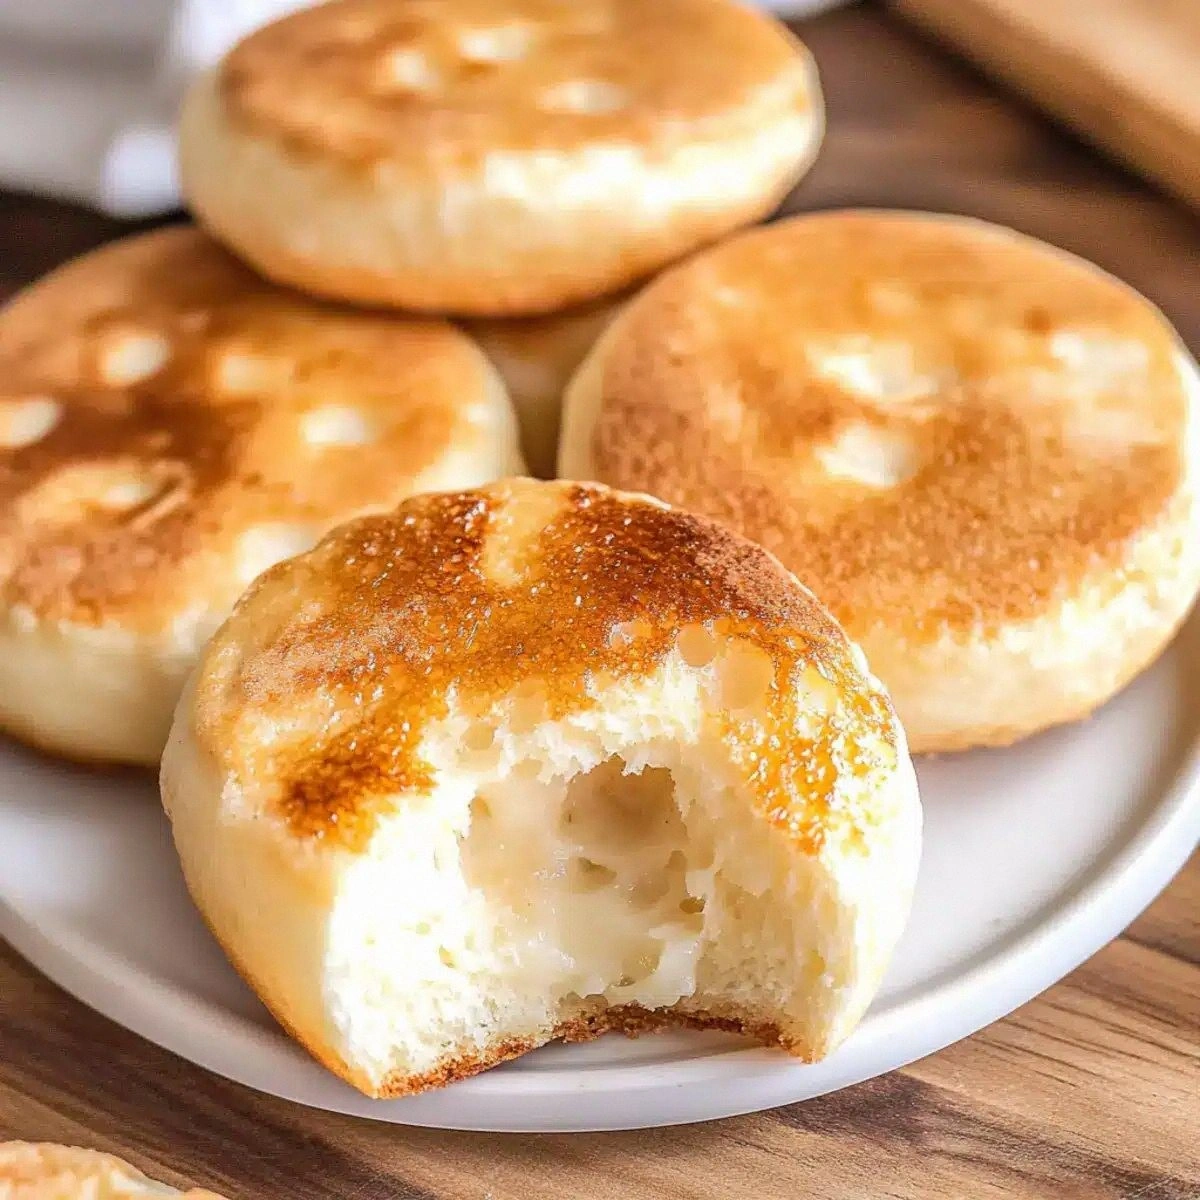
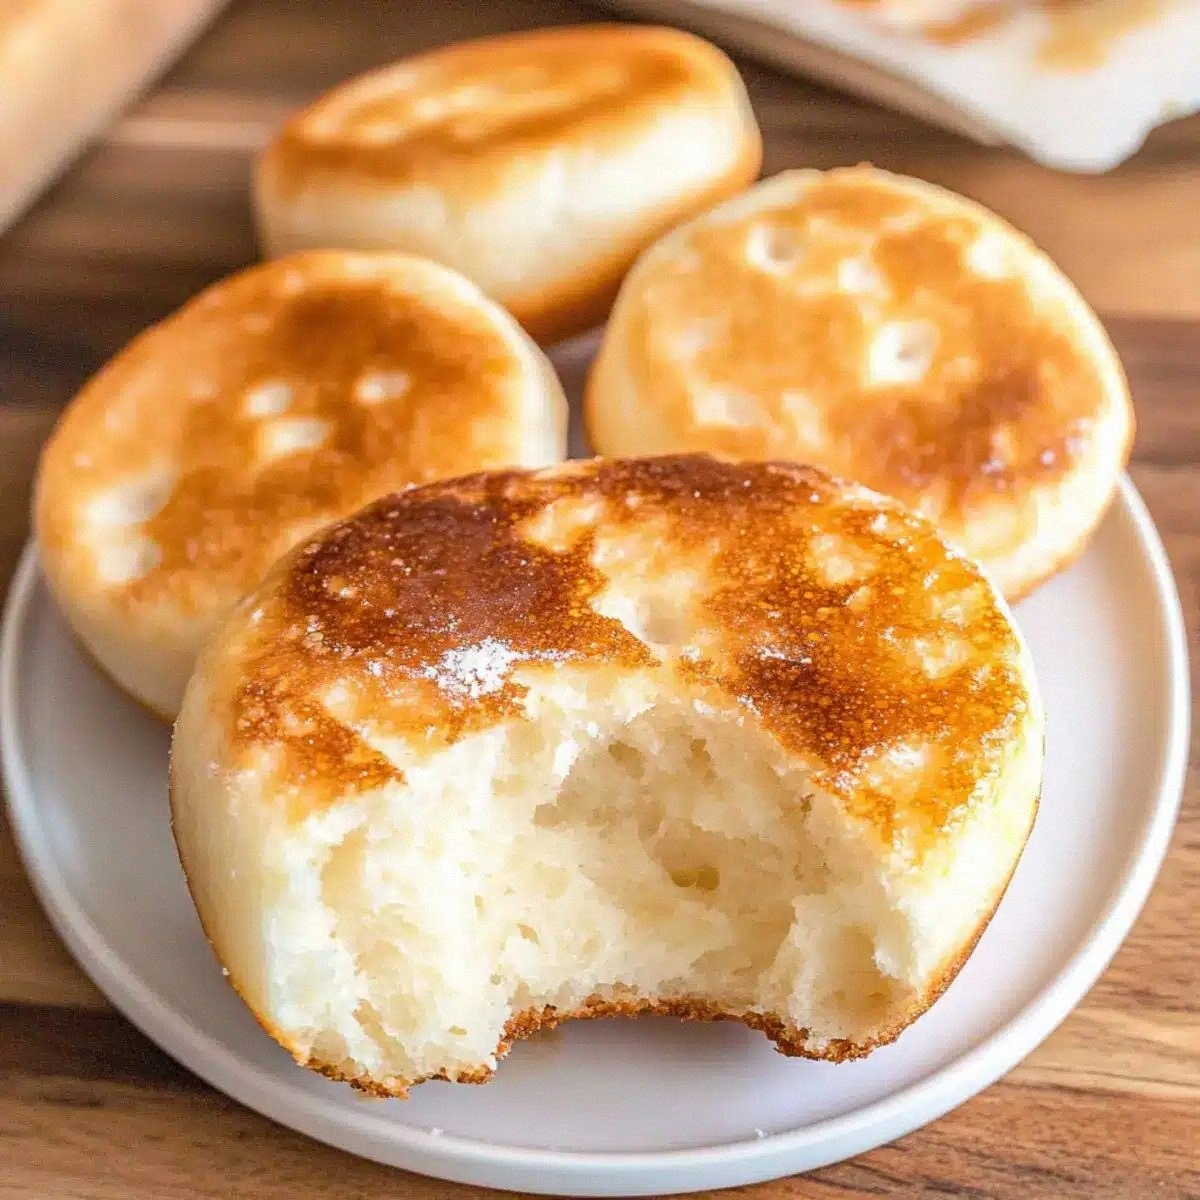
Picture this: the moment the dough hits the pan, you hear a gentle sizzle that’s louder than a whisper but softer than a shout, the aroma of toasted wheat and melted butter swirling through the kitchen like a warm hug. The surface of each muffin forms those iconic nooks and crannies that trap butter, jam, or honey like tiny treasure chests. When you bite into the toasted exterior, you’re met with a crisp, caramelized crust that cracks delightfully, giving way to an interior that’s soft, pillowy, and just a touch tangy from the yeast. The whole experience is a symphony of textures—crunch, chew, melt—all in one bite.
What makes this version stand out? Most recipes either over‑hydrate the dough, leaving you with gummy muffins, or they under‑mix, resulting in a dense, bread‑like texture that never gets those signature holes. I’ve cracked the code by balancing the liquid ratio, using a short, high‑heat stovetop “cook‑then‑bake” method, and dusting the muffins with cornmeal for that perfect, slightly gritty base that keeps them from sticking. The secret ingredient? A splash of warm milk that adds richness without making the dough heavy, and a quick butter glaze that creates a golden, glossy finish.
I dare you to taste this and not go back for seconds. The flavor is buttery, slightly sweet, and the texture is so perfect that you’ll start questioning every store‑bought muffin you’ve ever bought. Let me walk you through every single step — by the end, you’ll wonder how you ever made it any other way.
What Makes This Version Stand Out
- Flavor: The combination of warm water, milk, and a touch of sugar feeds the yeast, creating a subtle sweetness that’s balanced by a buttery richness.
- Texture: A high‑hydration dough gives you those airy holes, while the cornmeal dusting adds a slight crunch on the bottom.
- Simplicity: Only eight ingredients, all pantry staples, and no fancy equipment required—just a skillet and a baking sheet.
- Uniqueness: The “cook‑then‑bake” technique locks in moisture, giving you a muffin that’s crisp on the outside and cloud‑soft inside.
- Crowd Reaction: Guests will ask for the recipe before the first bite is even finished, and you’ll get that satisfied grin that says “I’ve nailed it.”
- Ingredient Quality: Using real butter (not margarine) and fresh yeast makes a world of difference in flavor depth.
- Cooking Method: The stovetop sear creates those iconic nooks; the oven finish ensures even cooking without a soggy bottom.
- Make‑Ahead Potential: Freeze them after cooling, then re‑toast; they taste just as fresh as the day you made them.
Inside the Ingredient List
The Flavor Base
Warm water is the catalyst that awakens the yeast, and the temperature must be just right—too hot and you’ll kill the yeast, too cold and it’ll stay dormant. I always heat the water in the microwave for 20 seconds, then give it a quick stir with a spoon to even out the heat. The instant dry yeast is a time‑saver; it dissolves instantly, but give it a minute to proof so you can see that frothy foam that tells you it’s alive and kicking. Granulated sugar isn’t there to sweeten the muffin dramatically; it’s a food source for the yeast, ensuring a steady rise and a subtle flavor boost.
The Texture Crew
All‑purpose flour provides the structure, but the key is to handle it gently. Over‑mixing develops gluten, leading to a tough muffin, so stop stirring as soon as the dough comes together. Salt enhances flavor and controls yeast activity, preventing an over‑rise that could cause the muffins to collapse. Warm milk adds richness and a slight tenderness that plain water can’t achieve, while melted butter brings that luxurious mouthfeel we all crave.
The Unexpected Star
Cornmeal for dusting might seem like a minor detail, but it’s a game‑changer. It creates a non‑stick surface and adds a faint, nutty crunch that contrasts beautifully with the soft interior. If you’re gluten‑free, you can swap it for a gluten‑free cornmeal or even fine polenta; just make sure it’s not pre‑flavored. A quick tip: toast the cornmeal in a dry pan for a minute before using it to amplify its aroma.
The Final Flourish
Butter, melted and folded in at the end, coats the dough strands, preventing them from sticking together and creating that melt‑in‑your‑mouth crumb. If you’re looking to cut calories, you can substitute half the butter with a light olive oil, but the classic flavor comes from the dairy fat. Finally, a quick dusting of cornmeal on the cooking surface ensures each muffin lifts cleanly, leaving a golden‑brown base that’s crisp without being hard.
Everything's prepped? Good. Let's get into the real action...
The Method — Step by Step
Start by combining the warm water, instant dry yeast, and granulated sugar in a medium bowl. Stir gently, then let the mixture sit for about five minutes. You’ll see a frothy foam appear—this is the yeast waking up and doing its job. If you don’t see any bubbles, the water was probably too hot or the yeast is dead; that’s the first watch‑out point, so keep an eye on it.
Watch Out: Using water hotter than 120°F will kill the yeast, resulting in flat muffins.In a separate large mixing bowl, whisk together the flour, salt, and warm milk. Make a well in the center, then pour in the yeast mixture and the melted butter. Using a wooden spoon, mix until a shaggy dough forms; you’ll notice the dough looks a bit sticky—don’t panic, that’s the hydration we want.
Kitchen Hack: Let the dough rest for 10 minutes after the first mix; this autolyse period relaxes the gluten and makes the dough easier to shape.Turn the dough onto a lightly floured surface and knead gently for about two minutes—just enough to bring it together into a smooth ball. Over‑kneading will develop too much gluten, making the muffins tough. If the dough feels overly sticky, dust the surface with a little extra flour, but keep it minimal to preserve the moisture.
Place the dough ball back into the bowl, cover it with a clean kitchen towel, and let it rise in a warm spot for 45 minutes to an hour, or until it has doubled in size. This is the moment of truth: the dough should feel puffy, and you’ll notice a faint, yeasty aroma filling the kitchen. If it hasn’t risen, give it a few more minutes—sometimes the ambient temperature needs a boost.
While the dough is rising, preheat a large non‑stick skillet over medium‑high heat and sprinkle a thin layer of cornmeal onto the surface. The cornmeal should sizzle as soon as it hits the pan; that’s the sound of a future perfect crust forming.
Punch down the risen dough gently to release excess gas, then divide it into eight equal pieces. Shape each piece into a ball, then flatten each ball into a disc about ½‑inch thick. Lightly dust both sides with a little more cornmeal, ensuring an even coating that will prevent sticking and add that subtle crunch.
Kitchen Hack: Use a rolling pin for uniform thickness; a ruler of ½‑inch depth guarantees even cooking.Place the discs onto the hot, cornmeal‑dusted skillet. Cook for about 3‑4 minutes on the first side, until the bottom is golden brown and the tops begin to set. You’ll hear a gentle crackle—That sizzle when it hits the pan? Absolute perfection. Flip the muffins carefully with a spatula, then cover the skillet with a lid and reduce the heat to low. Let them steam for another 4‑5 minutes; this steam‑phase creates those coveted nooks and crannies.
After the second side is cooked, transfer the muffins onto a baking sheet and pop them into a preheated oven at 350°F (175°C) for 5‑7 minutes. This final bake dries out any residual moisture and gives the tops a uniform golden hue. Keep an eye on them—if they start to darken too quickly, lower the oven temperature by 25°F.
Remove the muffins from the oven and let them cool on a wire rack for at least 10 minutes. While they’re still warm, split each muffin with a fork—yes, a fork, not a knife—to preserve the interior texture. The fork will pull apart the nooks, creating those perfect pockets for butter to melt into.
Finally, spread a generous pat of softened butter on each half while they’re still warm. The butter will melt into the crumb, creating a glossy, aromatic finish that makes the muffins irresistible. Serve them toasted with jam, honey, or a poached egg for a brunch that will have everyone begging for seconds.
That's it — you did it. But hold on, I've got a few more tricks that'll take this to another level. Stay with me here — this is worth it.
Insider Tricks for Flawless Results
The Temperature Rule Nobody Follows
Most home bakers think “room temperature” is a vague concept, but for yeast you need a precise range: 105‑115°F (40‑46°C). Use a kitchen thermometer to check your water and milk; this eliminates the guesswork and guarantees a consistent rise. I once tried to eyeball the temperature and ended up with a batch that never doubled—lesson learned.
Why Your Nose Knows Best
During the rise, trust your senses. When the dough has doubled, it will emit a faint sweet‑yeasty aroma that’s unmistakable. If you’re unsure, press a finger gently into the dough; it should spring back slowly, like a soft rubber ball. Ignoring this cue can lead to over‑proofing, which makes the muffins collapse after cooking.
The 5‑Minute Rest That Changes Everything
After shaping the discs, let them rest for five minutes before cooking. This short rest relaxes the gluten, allowing the surface to expand more easily in the skillet, which translates to bigger, more defined nooks. A friend once skipped this step and ended up with muffins that were dense in the center—don’t make that mistake.
Steam Is Your Secret Weapon
Covering the skillet after flipping creates a mini‑steam chamber that keeps the interior moist while the exterior browns. Think of it like a tiny oven inside your pan. If you leave the lid off, you’ll get a crusty exterior but a dry interior—balance is key.
Butter Brush Before the Finish
A quick brush of melted butter on the tops just before the final oven bake adds a glossy finish and a richer flavor profile. It also helps the muffins achieve that deep golden color without burning. I swear this simple step turned my “good” muffins into “best‑ever” muffins.
Creative Twists and Variations
This recipe is a playground. Here are some of my favorite ways to switch things up:
Whole Wheat Whirl
Swap half of the all‑purpose flour for whole‑wheat flour. The muffins gain a nutty depth and a slightly denser crumb, perfect for a hearty breakfast. Pair with avocado and a sprinkle of chili flakes for a savory spin.
Cheddar & Herb Delight
Fold in ½ cup shredded sharp cheddar and a tablespoon of chopped fresh rosemary into the dough before the first rise. The cheese melts into pockets, creating a savory bite that pairs wonderfully with tomato soup.
Cinnamon Swirl
Mix 2 teaspoons cinnamon and 1 tablespoon brown sugar, then sprinkle over the flattened discs before cooking. The result is a sweet, aromatic muffin that’s perfect with cream cheese frosting.
Gluten‑Free Adventure
Replace the all‑purpose flour with a 1‑to‑1 gluten‑free flour blend and add a tablespoon of xanthan gum. The texture remains fluffy, and the cornmeal dusting still gives that satisfying crunch.
Mini Muffin Bites
Roll the dough into small balls (about 1‑inch diameter) and use a mini‑griddle or a large skillet to cook them. These bite‑size versions are perfect for snack trays, and they toast up in just a few minutes.
Storing and Bringing It Back to Life
Fridge Storage
Place cooled muffins in an airtight container lined with a paper towel to absorb excess moisture. They’ll stay fresh for up to five days. Before serving, reheat them in a toaster or a hot skillet for a quick crisp.
Freezer Friendly
Wrap each muffin tightly in plastic wrap, then place them in a freezer‑safe zip‑lock bag. They freeze beautifully for up to three months. When you’re ready to enjoy, let them thaw at room temperature, then give them a quick toast with a dab of butter.
Best Reheating Method
Add a tiny splash of water (about a teaspoon) to the muffin halves before reheating in the oven or toaster. The steam revives the interior, while the buttered exterior crisps up again. This trick brings the muffins back to that just‑baked perfection you fell in love with.