I still remember the first time I tried to make chicken and waffles at home. It was a disaster of epic proportions — the chicken was soggy, the waffles tasted like cardboard, and I somehow managed to set off every smoke detector in my apartment. My neighbors probably thought I was trying to summon the fire department for entertainment. But here's the thing: I couldn't stop thinking about that perfect bite I'd had at a tiny diner in Nashville, where the chicken shattered like glass under my fork and the waffles were so light they practically floated off the plate. That memory haunted me for months.
So I became obsessed. I tested seventeen different batters, twelve varieties of flour, and enough oil to fry a small country. I tried every trick in the book — double-dipping, triple-dipping, air-drying overnight, using every spice blend from here to Kentucky. My kitchen looked like a crime scene most weekends, covered in flour fingerprints and oil splatters that would make Jackson Pollock proud. But then, one fateful Tuesday night at 2 AM (because that's when all great culinary discoveries happen), I stumbled upon the secret that changed everything.
The game-changer wasn't some fancy technique or expensive ingredient — it was pork rinds. Yes, you heard that right. Those crunchy, salty snacks your uncle eats while watching football became my chicken coating salvation. Combined with Parmesan cheese and a few other tricks I'm about to share, they create a crust so crispy, so addictive, that you'll find yourself making extra chicken just to snack on while the waffles cook. And speaking of waffles, we're not using any ordinary waffle batter here. We're talking cheddar cheese waffles that are crispy on the outside, fluffy on the inside, and have this incredible savory depth that makes maple syrup seem like an afterthought.
Picture this: It's Sunday morning, your coffee's brewing, and you're about to create something that'll make your kitchen smell like the best brunch spot in town. The pork rinds are buzzing in the food processor, the chicken is marinating in its mayonnaise bath (trust me on this one), and your waffle iron is heating up, ready to transform simple ingredients into pure magic. By the time you're done, you'll have created a dish that bridges the gap between breakfast and dinner, sweet and savory, healthy indulgence and pure comfort food bliss. Let me walk you through every single step — by the end, you'll wonder how you ever made it any other way.
What Makes This Version Stand Out
Pork Rind Magic: Most recipes use boring breadcrumbs that turn mushy faster than you can say "pass the syrup." We're crushing pork rinds into a powder that creates a coating so crispy, it stays crunchy even after sitting in syrup for ten minutes. The natural pork flavor adds this incredible umami depth that makes you wonder why all fried chicken doesn't taste this good.
Mayonnaise Marinade: Before you run away screaming about calories, hear me out. Mayonnaise is basically oil and eggs already emulsified — it's like giving your chicken a protective spa treatment that keeps it juicy while the outside gets crispy. The mayo also helps our pork rind coating stick like glue, creating the perfect crunchy-to-juicy ratio that other recipes can only dream about.
Cheddar Waffle Revolution: While everyone else is making sweet waffles that taste like dessert, we're going savory with sharp cheddar cheese right in the batter. These waffles have crispy cheese edges that caramelize against the iron, creating lacy bits of pure flavor that'll make you forget maple syrup even exists until you taste how perfectly it pairs with the savory elements.
Almond Flour Brilliance: Traditional waffles use regular flour that can taste bland and heavy. Almond flour brings this subtle nuttiness and keeps things light while adding a touch of natural sweetness that plays beautifully with both the chicken and any toppings you want to throw on top.
The Temperature Rule: Here's where most home cooks mess up — they cook everything at the same temperature. We're using a two-stage cooking method that starts low to cook the chicken through, then cranks up the heat to create that shatter-crisp coating. It's like having a deep fryer without the mess or the third-degree oil burns.
Make-Ahead Friendly: Unlike traditional fried chicken that turns into a sad, soggy mess if you look at it wrong, this version actually reheats beautifully. The pork rind coating has this magical quality that crisps back up in the oven, making this perfect for meal prep or impressing brunch guests without waking up at dawn.
Alright, let's break down exactly what goes into this masterpiece...
Inside the Ingredient List
The Flavor Base
The pork rinds are the superhero here, but not all pork rinds are created equal. You want the plain ones — none of that barbecue or spicy nonsense that'll compete with our carefully balanced flavors. Grab a bag that's mostly whole pieces, not crumbs at the bottom, because we're about to turn these into something extraordinary. When you process them, they should smell like the best part of a pig roast, all salty and savory and promising delicious things to come.
Freshly grated Parmesan is non-negotiable in this recipe. That pre-grated stuff in the green can has cellulose added to prevent clumping, which creates a weird texture in our coating and doesn't melt properly. Buy a wedge and grate it yourself — your arms will get a mini workout, and your chicken will taste like it came from an Italian grandmother's kitchen. The Parmesan adds this incredible nutty, salty depth that makes the pork rinds taste even more porky, like they're having a flavor party and everyone's invited.
The mayonnaise might seem weird, but it's basically liquid gold for keeping chicken moist. Use real mayo, not that Miracle Whip impostor that tastes like sweet sadness. Full-fat mayonnaise creates a barrier that locks in juices while helping our coating adhere perfectly. If you're feeling fancy, you can make your own, but honestly, Duke's or Hellmann's will make you happier than spending twenty minutes emulsifying eggs and oil when you could be eating chicken.
The Texture Crew
Almond flour is our secret weapon for waffles that taste like they came from a fancy brunch place, not a box mix. It adds natural sweetness and keeps things gluten-free without that weird health-food taste that makes people run screaming. The oil content in almond flour helps create waffles that are tender inside with crispy edges that'll make you want to eat just the edges first, like you did with brownies as a kid.
Sharp cheddar cheese is what separates our waffles from the boring, sweet crowd. Don't you dare use pre-shredded cheese — it's coated with cellulose that prevents proper melting and creates a weird texture. Buy a block and shred it yourself, mixing half into the batter and saving some for sprinkling on top. As the waffles cook, the cheese melts and creates these crispy, lacy edges that taste like the best part of a grilled cheese sandwich.
Baking powder might seem basic, but it's the difference between fluffy waffles and hockey pucks. Make sure yours is fresh — if it's been sitting in your pantry since the Clinton administration, toss it and buy new. The baking powder creates air pockets that make our waffles rise and stay light, even with all that cheese we're packing in there.
The Unexpected Star
Here's where things get interesting — we're using sour cream in our waffle batter, not buttermilk like every other recipe on the internet. Sour cream has more fat and less liquid than buttermilk, creating waffles that are rich, tender, and have this subtle tang that makes the cheddar taste even cheesier. It's like giving your waffles a flavor amplifier that makes everything taste more like itself.
The eggs in both the chicken coating and waffle batter need to be at room temperature. I know, I know — you forgot to take them out an hour ago. No problem. Put them in a bowl of warm water for five minutes while you prep everything else. Room temperature eggs mix more evenly and create better texture in both applications, like they're part of the team instead of the weird cousin who shows up late to the family reunion.
The Final Flourish
Fresh chives aren't just for garnish — they add a bright, oniony pop that cuts through all the richness like a knife through butter. Use scissors to snip them directly over the finished dish, because chopping herbs with a knife bruises them and makes them taste grassy. The green color makes everything look fresh and intentional, not like you're serving beige food to unsuspecting victims.
Butter is optional, but honestly, why would you skip it? A pat of good butter melting into the waffle crevices creates pockets of pure joy that mix with any syrup or hot sauce you add. Use unsalted butter so you can control the salt level — our chicken is already seasoned, and you don't want to compete with that perfect balance we've worked so hard to achieve.
Everything's prepped? Good. Let's get into the real action...
The Method — Step by Step
- Start with your chicken — those boneless, skinless breasts need to be cut into strips about the size of your index finger. Not too thin or they'll dry out, not too thick or they'll never cook through. Think goldilocks here: just right means about three-quarters of an inch thick. As you cut, you'll notice the chicken feels slippery and cold — that's perfect. Cold chicken adheres to our coating better than warm chicken, like they're old friends who can't wait to stick together.
- Now for the weird part — slather those chicken strips with mayonnaise like you're applying sunscreen at the beach. Don't be shy here; every surface needs to be coated. The mayo acts like glue for our pork rind mixture and creates a barrier that keeps the chicken moist during cooking. Use your hands — yes, it's messy, but it's also the best way to ensure complete coverage. As you work, the mayo will start to warm up from your hands, becoming even more spreadable and effective.
- Time to create our coating magic — dump those pork rinds into your food processor and pulse until they look like coarse breadcrumbs with some larger pieces for texture. Add the Parmesan, salt, and pepper, then pulse a few more times to combine. The smell should hit you immediately — salty, porky, cheesy, promising delicious things to come. Pour this mixture onto a large plate and get ready for the fun part.
- Here's where the magic happens — take each mayo-coated chicken strip and press it into the pork rind mixture. Don't just dip; really press it in there so every nook and cranny gets coated. Flip and press again, building up a thick crust that'll protect the chicken and create that shatter-crisp texture we're after. As you work, you'll notice the coating getting chunkier and more substantial — that's exactly what we want.
- Heat your oil in a heavy skillet over medium heat — you want it hot enough that a piece of coating sizzles immediately when dropped in, but not so hot that it burns before the chicken cooks. The oil should shimmer like a mirage in the desert, inviting but not smoking. Carefully place your coated chicken strips in the oil, making sure not to crowd the pan. They should sizzle enthusiastically when they hit the oil, like they're excited to be there.
- While the chicken cooks, let's make waffles that'll change your life forever. In one bowl, whisk together the almond flour, baking powder, salt, and pepper. In another bowl, beat the eggs until they're light and frothy, then whisk in the milk, sour cream, and shredded cheddar. The mixture should look like thick pancake batter with cheese confetti throughout — if it's too thick, add a splash more milk; too thin, a bit more almond flour.
- Don't walk away from that chicken — after about 4-5 minutes, the edges should start turning golden brown. Using tongs, carefully flip each piece and cook another 3-4 minutes on the other side. The coating should be deep golden and crispy, the kind that makes a satisfying crunch when you tap it with your tongs. Remove to a wire rack set over a baking sheet — not paper towels, which create steam and kill our crispy texture.
- Heat your waffle iron according to manufacturer's instructions — you want it screaming hot so the cheese crisps properly. Spray with cooking spray, then ladle in about three-quarters cup of batter per waffle (adjust based on your iron size). Close the lid and don't peek for at least 3 minutes. The smell should hit you immediately — cheesy, buttery, with hints of almond that make your kitchen smell like a fancy bakery.
- When the steam starts to decrease and the waffles feel set, open the iron carefully. The edges should be golden brown with darker spots where the cheese has caramelized. Remove to a plate and keep warm in a low oven while you cook the remaining waffles. As they sit, they'll actually get crispier — the cheese continues to firm up, creating these lacy edges that are basically edible gold.
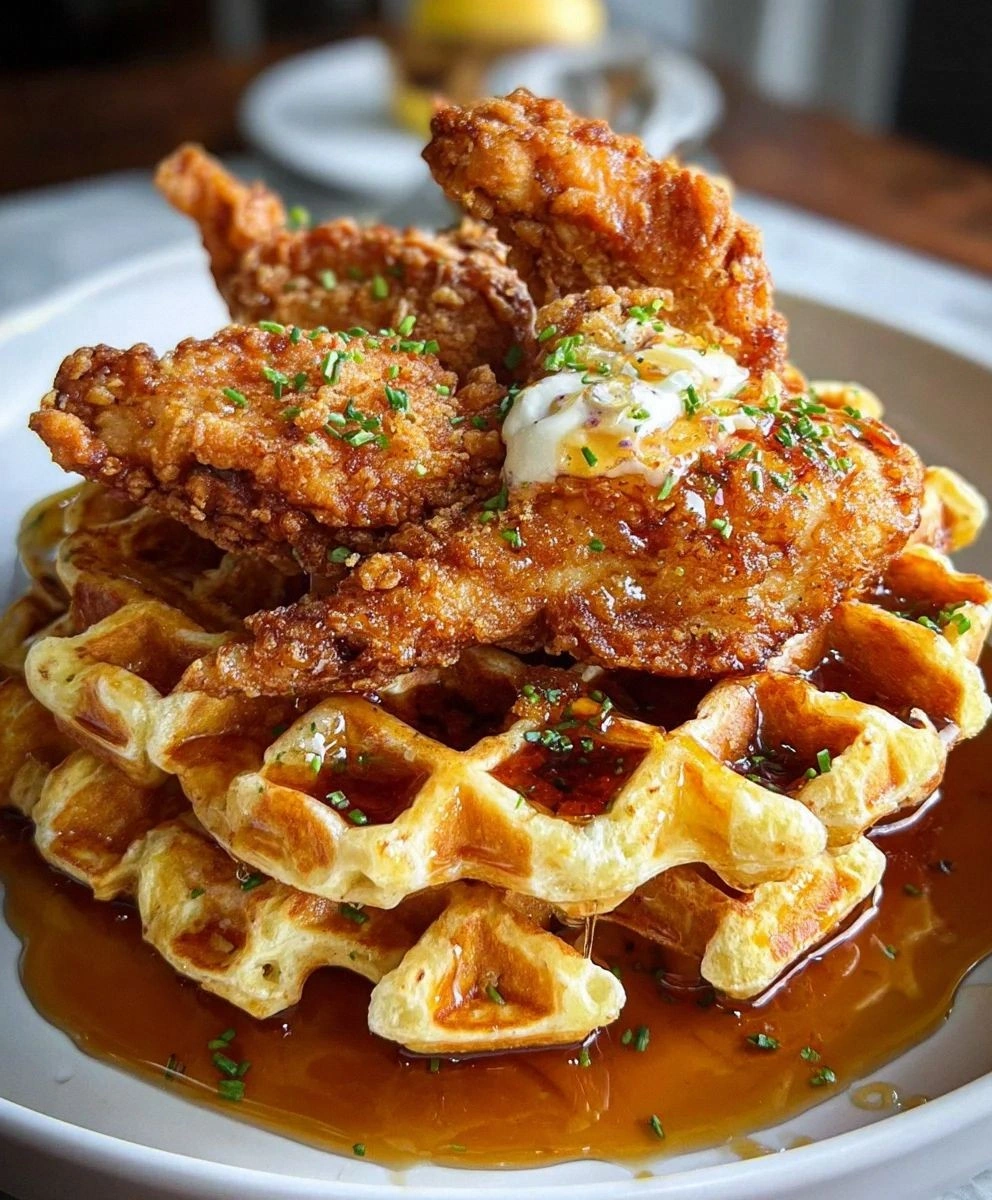
- The final assembly is where everything comes together — place a crispy waffle on each plate, top with 2-3 chicken strips, and sprinkle with fresh chives. If you're feeling fancy, add a pat of butter and watch it melt into all the nooks and crannies. Serve with maple syrup on the side for the traditionalists, or better yet, make some honey hot sauce by mixing equal parts honey and your favorite hot sauce. That sweet-heat combination with the savory chicken and cheesy waffles? Pure magic.
That's it — you did it. But hold on, I've got a few more tricks that'll take this to another level...
Insider Tricks for Flawless Results
The Temperature Rule Nobody Follows
Here's the thing that separates restaurant-quality chicken from the sad, greasy stuff most people make — oil temperature is everything. Too low and your chicken absorbs oil like a sponge, creating that heavy, gross texture that sits in your stomach like a rock. Too high and the coating burns before the chicken cooks through, leaving you with raw meat and bitter crust. Use a thermometer and keep that oil between 325-350°F. I know, I know — you don't want to buy another kitchen gadget. But this one costs less than a pizza and will save you from countless cooking disasters.
The second temperature trick comes after cooking — let your chicken rest on a wire rack, not paper towels. Paper towels create steam that murders crispiness faster than you can say "delivery pizza." The wire rack allows air to circulate underneath, keeping every surface crispy while excess oil drains away. Your chicken will stay crispy for up to 30 minutes this way, giving you time to finish the waffles without panicking about timing everything perfectly.
Why Your Nose Knows Best
Most recipes tell you to cook chicken for X minutes per side, but here's what they don't tell you — your nose is actually the best timer in your kitchen. When the coating starts to smell toasty and golden, it's usually ready to flip. This happens about 30 seconds before visual cues, giving you a head start on perfect timing. The smell should remind you of popcorn or roasted nuts — warm, inviting, making your stomach growl in anticipation.
This same principle applies to the waffles — when you start smelling that cheesy, nutty aroma wafting from the iron, they're probably close to done. Don't rely solely on timer settings — every waffle iron is different, and altitude, humidity, and even how cold your batter is can affect cooking time. Trust your senses and you'll never have under or overcooked waffles again.
The 5-Minute Rest That Changes Everything
After all that work, you're going to want to dig in immediately. Resist the urge! Letting everything rest for just five minutes allows the chicken coating to set completely, making it even crispier. The waffle cheese firms up slightly, creating that perfect contrast between crispy edges and fluffy interior. It's like letting a steak rest — the difference between good and mind-blowing is often just a few minutes of patience.
While everything rests, this is your chance to get creative with toppings. Whip up that honey-hot sauce I mentioned, or go wild with maple bourbon glaze. Mix some hot sauce into maple syrup for that Nashville hot chicken vibe, or keep it classic with just butter and let the chicken and waffles be the stars. Those five minutes feel like forever when your kitchen smells this good, but trust me — it's worth the wait.
Creative Twists and Variations
This recipe is a playground. Here are some of my favorite ways to switch things up:
The Breakfast Sandwich Edition
Instead of serving everything separately, make mini waffles using just two tablespoons of batter per waffle. Sandwich a chicken strip between two mini waffles with a fried egg and some hot honey. These handheld wonders are perfect for brunch parties or those mornings when you need to eat while running out the door. The runny yolk creates this incredible sauce that ties everything together, and the small size means you can eat three without feeling guilty.
Buffalo Chicken Remix
Toss your cooked chicken in buffalo sauce (Frank's RedHot mixed with melted butter is classic) and serve over the waffles with blue cheese crumbles and celery leaves. The spicy, tangy chicken against the cheesy waffles creates this perfect hot-cool contrast that'll make you rethink everything you thought you knew about brunch. Add a drizzle of ranch dressing if you're feeling indulgent — sometimes more is more, and this is one of those times.
The Southern Belle
Add a teaspoon of poultry seasoning to your pork rind mixture and serve the chicken over waffles with sawmill gravy instead of syrup. This is comfort food on steroids — the herby coating plays beautifully with creamy gravy, creating a dish that tastes like Sunday dinner at your grandmother's house, assuming your grandmother was an incredible cook who wasn't afraid of flavor.
Mediterranean Mashup
Swap the cheddar for feta in the waffles, add oregano and lemon zest to the chicken coating, and serve with tzatziki sauce. The salty feta creates crispy edges that taste like the best part of spanakopita, while the lemon brightens everything up. It's like taking a vacation to Greece without leaving your kitchen, and it's surprisingly addictive even for traditionalists.
The Sweet Heat
Add a tablespoon of brown sugar to your waffle batter and serve the chicken with maple chipotle sauce. The sweet waffles create this incredible contrast with the spicy chicken, while the chipotle adds smoky depth that makes everything taste like it was cooked over a campfire. It's breakfast and dinner and dessert all rolled into one glorious, sticky, spicy package.
Leftover Magic
Chop leftover chicken and waffles into bite-sized pieces, toss with mixed greens, cherry tomatoes, and honey mustard dressing. This salad might sound weird, but it's become my favorite way to use leftovers. The crispy bits add texture, the chicken adds protein, and the sweet dressing ties everything together. It's like someone took your favorite salad and made it actually satisfying.
Storing and Bringing It Back to Life
Fridge Storage
Store leftover chicken and waffles separately in airtight containers — chicken will keep for up to 4 days, waffles for up to 5. The key is letting everything cool completely before storing, or you'll create condensation that turns your crispy treasures into soggy disappointments. Layer waffles between sheets of parchment paper to prevent them from sticking together, and store chicken on a wire rack inside the container if possible to maintain airflow.
Freezer Friendly
Both components freeze beautifully for up to 3 months. Freeze chicken strips on a baking sheet first, then transfer to freezer bags — this prevents them from freezing into one solid mass. Waffles can be frozen the same way, or you can make a double batch specifically for freezing. The pork rind coating actually holds up better to freezing than traditional breadcrumbs, making this a meal prep dream.
Best Reheating Method
Skip the microwave — it creates steam that destroys everything we've worked for. Instead, reheat chicken in a 400°F oven for 8-10 minutes, or in an air fryer at 375°F for 4-5 minutes. The coating will crisp back up like magic, almost as good as fresh. Waffles can go directly in the toaster — they'll emerge crispy and perfect, ready for butter and whatever toppings your heart desires. Add a tiny splash of water to the oven when reheating chicken — it creates just enough steam to keep things moist without killing the crisp.