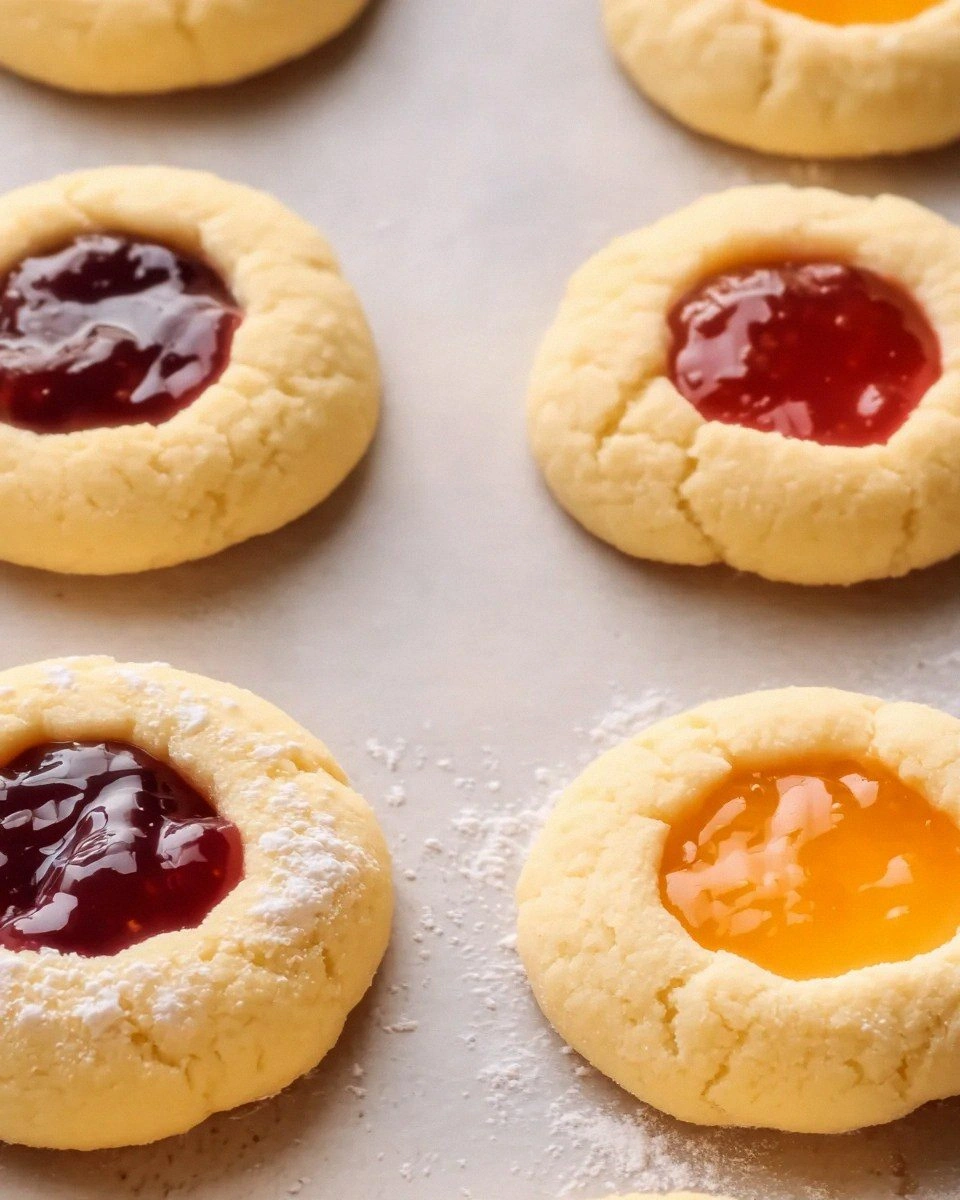
I still remember the first time I attempted thumbprint cookies. It was a snow-day afternoon, flour snowing down my counter faster than the storm outside, and I was convinced I could wing it without a recipe. The result? Sad, spreading blobs that merged into one sheet-pan amoeba, their jam centers burnt and bitter. Fast-forward through three more snow days, two botched grocery runs, and one existential baker's crisis, and I finally cracked the code. What emerged from my oven was a batch so buttery, so tender, so perfectly poised between crisp and chewy that I ate six before the cooling rack even hit the counter. I dare you to taste these and not go back for seconds—actually, make that fourths.
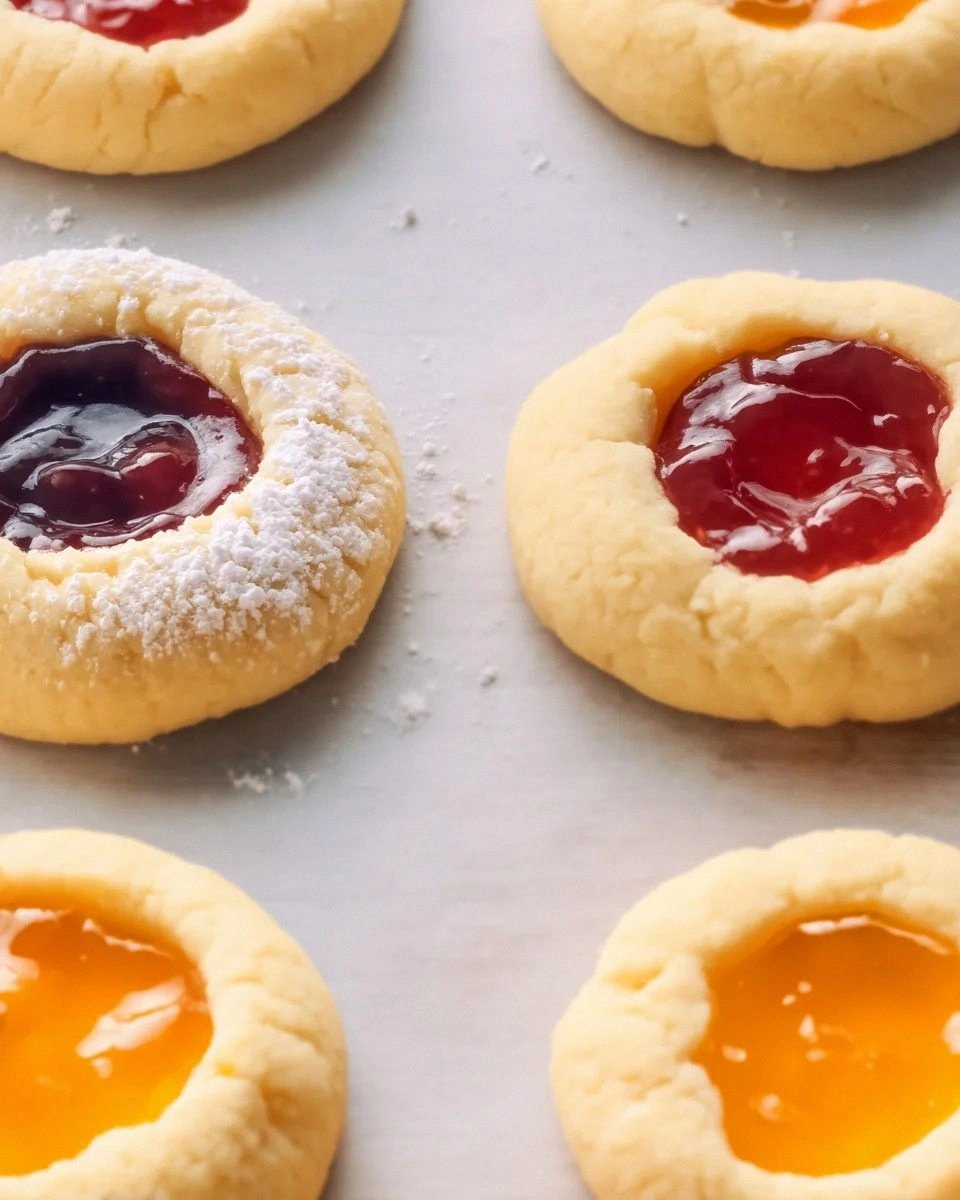
Picture yourself pulling these out of the oven, the whole kitchen smelling like a Scandinavian bakery hugged you. The vanilla perfumes the air, the jam bubbles like stained glass, and the bottoms sport that gorgeous golden glow that whispers, "I'm ready for my close-up." These are not the dry, sandy thumbprints you've suffered through at office parties. These are the kind that shatter delicately at first bite, then melt into a buttery sigh, the jam providing a bright pop that keeps everything in perfect balance. If you've ever struggled with thumbprints that spread into unrecognizable puddles or tasted like sweetened cardboard, you're not alone—and I've got the fix.
Okay, ready for the game-changer? We'll brown half the butter for nutty depth, chill the dough just enough to lock in shape, and spoon the jam while it's hot so it sets like glossy candy. We'll also swap some sugar for maple syrup because, trust me, it caramelizes the edges like nothing else. Stay with me here—this is worth it. By the time you sandwich these between your fingers and feel that tender snap, you'll wonder how you ever made it any other way.
I'll be honest: I ate half the batch before anyone else got to try it. My excuse was "quality control," but really, I was in a buttery trance. These cookies are dangerous in the best possible sense, and once you master the technique, you'll find yourself volunteering to bring dessert everywhere just to show off. Let me walk you through every single step—by the end, you'll wonder how you ever made it any other way.
What Makes This Version Stand Out
This is hands down the best version you'll ever make at home, and here's why. Most recipes get this completely wrong by treating thumbprints like sugar-cookie cutouts with a hole. Nope. We're building flavor in layers, protecting texture like it's fragile treasure, and using a few sneaky tricks that bakery pros swear by.
- Browned-Butter Boost: We take half the butter to the edge of toasted hazelnuts, then chill it back to solid. The result is a cookie that tastes like it has secret shortbread ancestry and leaves a whisper of caramel on your tongue long after the last crumb.
- Maple Syrup Magic: Replacing some granulated sugar with pure maple syrup keeps the centers soft and the edges lacy. It also helps the jam set glossy instead of gummy, so your cookies look like tiny jewel boxes rather than preschool craft projects.
- Chill-and-Press Technique: After scooping, we refrigerate the dough for just ten minutes, then press the wells with a warm spoon. This prevents the dreaded spread and gives you picture-perfect craters every single time.
- Two-Temperature Bake: We start hot for lift, finish low for color. Most recipes blast them at one temp and wonder why the bottoms scorch before the tops set. Not here, friends.
- Jam-First Filling: We pipe jam before baking, not after. The brief oven time concentrates the fruit, turning it into chewy fruit leather that stays put when you stack or gift the cookies.
- Vanilla Bean Finish: A quick brush of vanilla-bean glaze after cooling perfumes the whole cookie and makes the colors pop like a stained-glass window at sunrise.
Alright, let's break down exactly what goes into this masterpiece...
Inside the Ingredient List
Every ingredient here earns its keep. Skip one and the whole symphony falls flat, so let's meet the players before they take the stage.
The Flavor Base
Butter is the star, and we treat it like royalty. Use European-style with 82% fat for the silkiest mouthfeel; the higher fat means less water, which translates to cookies that hold their shape instead of pancaking across your sheet. If you must substitute, go with refined coconut oil for the non-browned portion, but expect a mild coconut whisper that some purists will side-eye. Salted butter works in a pinch—just dial back the added salt. Whatever you do, don't melt all of it; we need cold cubes for the final dough to keep things tender.
Maple syrup isn't just for pancakes. Grade B (now called Grade A Dark) has robust, earthy notes that stand up to toasty butter and tangy jam. If you're trapped in a corn-syrup zone, honey can pinch-hit, but it will brown faster, so drop the oven temp by 10°F. Avoid fake pancake syrup; its chemical aftertaste will haunt your cookies like a bad ex.
The Texture Crew
All-purpose flour is fine, but swapping in 15% cake flour gives you that short, delicate crumb that shatters like thin ice. Too much cake flour and the dough turns into Play-Doh; too little and you're back to hockey-puck territory. Measure by spooning and leveling—never scoop—or you could add an extra 2 tablespoons per cup, turning tender into tough.
Confectioners' sugar melts faster than granulated, creating that whisper-soft center. If you only have granulated, blitz it in a blender for 30 seconds and pretend you planned it. Cornstarch in the powdered sugar helps prevent spread, so don't swap it one-for-one with regular sugar unless you enjoy cookie amoebas.
The Unexpected Star
Egg yolk, not the whole egg, binds the dough without adding springy structure. The fat emulsifies with butter for a cookie that bends before it breaks. Save the white for an omelet or meringue; we want richness, not bounce. If you're egg-free, two tablespoons of canned coconut cream do a respectable impersonation.
The Final Flourish
Choose a jam with attitude: raspberry for tang, apricot for sunshine, or sour cherry for sophisticated pucker. Cheap jam loaded with corn syrup will bubble like lava and burn before the cookie sets. Splurge on the fruit-forward stuff, or simmer down frozen berries with a squeeze of lemon and a kiss of sugar until it coats the back of a spoon.
Everything's prepped? Good. Let's get into the real action...
The Method — Step by Step
- Start by browning the butter. Dice one stick into small cubes so it melts evenly. Slide them into a stainless skillet over medium heat; swirl, don't stir, until the foam subsides and the milk solids turn chestnut. The aroma will swing from sweet cream to toasted hazelnuts—pour it immediately into a heat-proof bowl and chill until semi-solid, about 45 minutes. This is the moment of truth; blink and you'll have blackened butter and a kitchen that smells like regret.
- While the butter chills, whisk both flours, salt, and baking powder in a medium bowl. The baking powder gives just enough lift to keep the cookies from turning into shortbread pucks, but not so much that they dome like muffins. Think of it as a gentle nudge rather than a shove.
- In a stand mixer, beat the remaining cold butter with the maple syrup and powdered sugar until the mixture looks like fluffy clouds tinged café au lait. Scrape the bowl twice; you don't want streaks of unmixed butter ruining the final texture. Add the egg yolk and vanilla, then beat until the bowl holds soft peaks that curl like ribbons—about two minutes on medium-high.
- Scrape in the cooled brown butter, now the texture of soft clay. Beat just until it disappears; over-mixing here will whip air into the dough and cause spread. We want a cohesive, almost marshmallowy mass that clings to the paddle in one glossy curtain.
- Turn the speed to low and add the flour mixture in three quick pulses. Stop the instant the last streak disappears. The dough will look like damp sand but hold together when pinched. If it feels greasy, pop it in the fridge for ten minutes; warm dough is the enemy of cute thumbprints.
- Scoop heaping tablespoons and roll into smooth spheres. Arrange on a parchment-lined sheet with two inches between; they expand more than you'd expect. Chill the tray for ten minutes while the oven preheats to 375°F. This next part? Pure magic.
- Now the fun part. Press the back of a lightly floured ½-teaspoon measure into each ball to form a deep well. The dough may crack—just pinch the edges back together like you're fixing a tiny pothole. Work quickly so the warmth of your hands doesn't melt the butter.
- Pipe or spoon jam into each well, mounding slightly. The heat will settle it into a glossy pool, so don't worry if it looks like a fruit volcano. Bake for 8 minutes, then drop the temperature to 325°F and bake another 6-7 minutes, until the edges turn the color of toasted almonds. That sizzle when jam hits the hot pan? Absolute perfection.
- Cool on the sheet for 5 minutes; they're fragile when molten. Transfer to a rack and let the jam set into chewy fruit leather. If you rush this step, you'll burn your tongue and smear the tops—patience, cookie ninja.
That's it—you did it. But hold on, I've got a few more tricks that'll take this to another level...
Insider Tricks for Flawless Results
The Temperature Rule Nobody Follows
Your butter should feel like chilled Play-Doh, not greasy lipstick. If the dough shines under the light, it's too warm and will pancake. Pop the whole mixing bowl in the freezer for five minutes and thank me later. A friend tried skipping this step once—let's just say it didn't end well, and her Instagram post was captioned "Cookie Monster carnage."
Why Your Nose Knows Best
Don't trust the timer alone; trust your nostrils. When the jam starts to smell like hot fruit leather and the edges perfume the kitchen with toasted nuts, they're done. Pull them even if they look pale in the center; carry-over heat finishes the job and prevents the dreaded burnt-bottom blues.
The 5-Minute Rest That Changes Everything
Let the sheet rest on a cold burner for five minutes before transferring to a rack. This brief sauna relaxes the jam so it sets glossy, not wrinkled. Skip it and you'll have craters that look like the surface of Mars. Texture matters as much as taste—remember, we eat with our eyes first.
Creative Twists and Variations
This recipe is a playground. Here are some of my favorite ways to switch things up:
Mocha Thumbprints
Swap 2 tablespoons of flour for cocoa powder and add 1 teaspoon espresso powder to the dough. Fill with dulce de leche and sprinkle with flaky salt. Coffee lovers will form cults in your honor.
Lemon-Coconut Clouds
Replace maple syrup with lemon curd, fold in ¼ cup desiccated coconut, and fill with raspberry jam. The coconut toasts to golden ribbons and the citrus cuts the sweetness like a zesty palate cleanser.
Savory-Sage Surprise
Omit the sugar, add 1 tablespoon finely minced fresh sage, and fill with caramelized onion jam. Serve these alongside cheese platters and watch guests try to figure out why they can't stop eating cookies with wine.
Spiced Chai Latte
Whisk ½ teaspoon each of cardamom, cinnamon, and ginger into the flour. Fill with peach jam and drizzle with white-chocolate "foam." They taste like your favorite cold-weather drink in cookie form.
Peanut Butter & Jelly Grown-Up
Sub ⅓ cup butter with creamy peanut butter, use honey instead of maple, and fill with grape jelly. Kids inhale them; adults reminisce. Bring these to a potluck and you'll leave with an empty plate and ten new best friends.
Black Forest Midnight
Add 2 tablespoons kirsch to the dough, fill with cherry preserves, and top with micro-shaved dark chocolate. Serve after a fancy dinner and pretend you're in a Berlin café at 2 a.m.
Storing and Bringing It Back to Life
Fridge Storage
Layer cookies in an airtight tin with parchment between stacks; they'll keep five days at room temp or two weeks refrigerated. Cold air stales baked goods faster than a bad stand-up set, so bring them to room temp before serving. Add a tiny splash of water to the tin and seal for 30 minutes; the gentle steam revives the tender crumb without sogginess.
Freezer Friendly
Flash-freeze on a tray until solid, then pack into freezer bags with the air squeezed out. They'll survive two months in the arctic wasteland of your freezer. Thaw unwrapped so condensation forms on the counter, not the cookie. Ten minutes at 300°F on a dry sheet refreshes them to bakery-level glory.
Best Reheating Method
A toaster oven beats the microwave every time. Three minutes at 275°F restores crisp edges and gooey centers. The microwave turns jam into molten lava and the cookie rubbery—avoid unless you enjoy dental challenges. Future pacing: picture yourself pulling these out of the toaster oven on a rainy Tuesday night, the whole apartment smelling like weekend mornings.