I still remember the first time I made butter swim biscuits. It was one of those Sunday mornings when the pantry looked like a crime scene—flour everywhere, butter melting on the counter, and me standing in my pajamas wondering if I could pull off homemade biscuits without embarrassing myself. My friend had dared me to try this "swim biscuit" method she'd heard about, claiming it would change my breakfast game forever. Twenty minutes later, I pulled a pan of golden, buttery perfection from the oven, and let's just say I ate half the batch before anyone else even knew they existed.
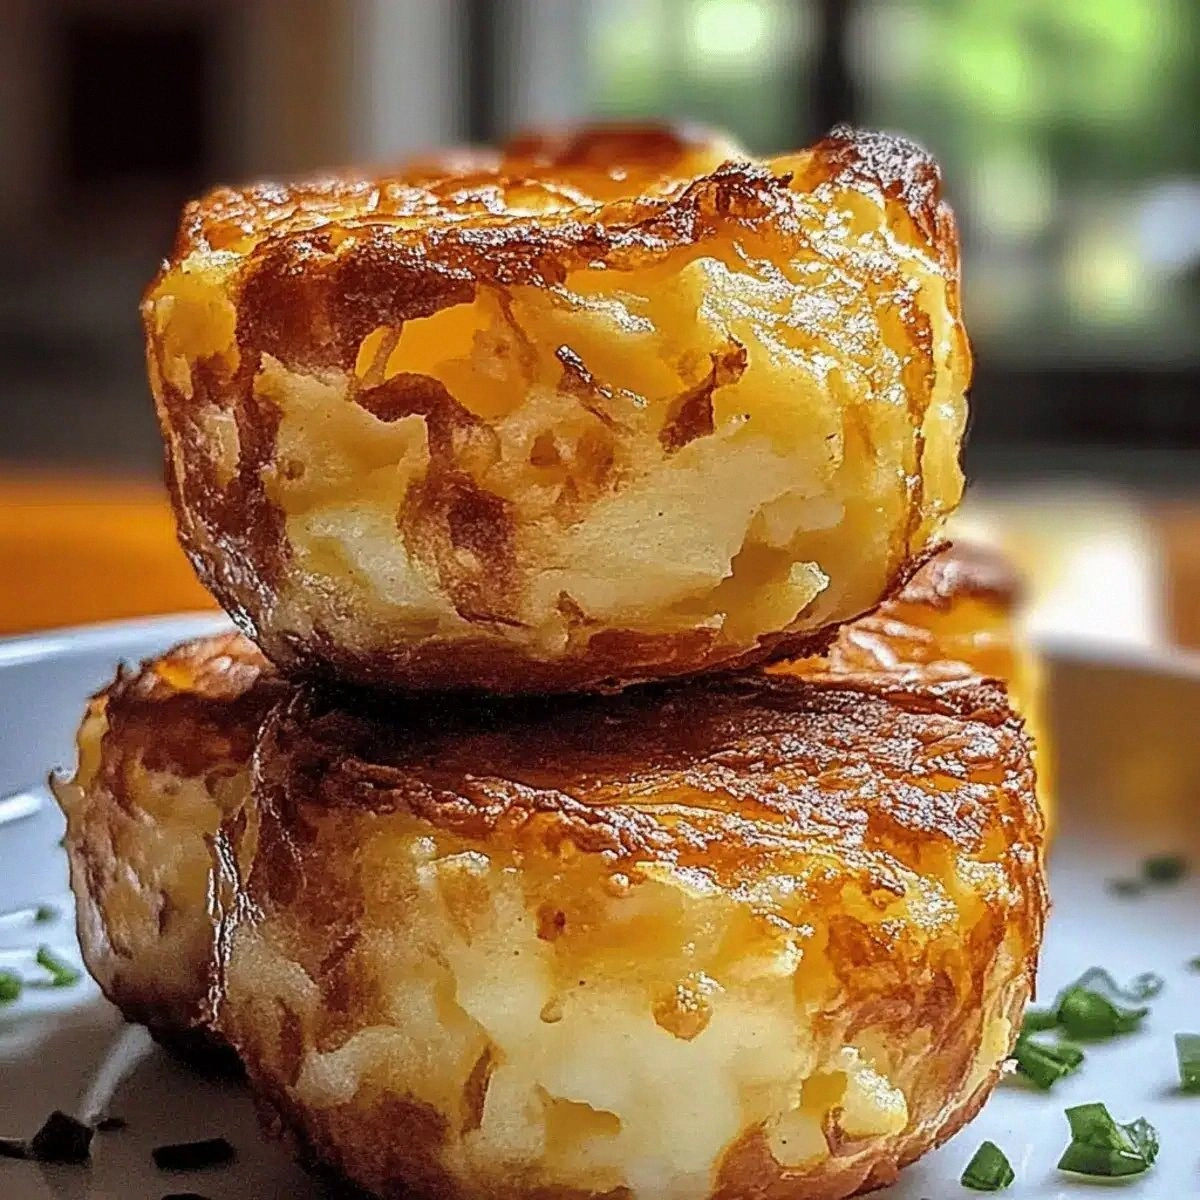
Picture this: you're standing in your kitchen, the morning light streaming through the window, when you open the oven door and that first wave of buttery steam hits your face. The smell is intoxicating—like someone bottled childhood Sunday mornings and turned them into a fragrance. These aren't your grandmother's dry, hockey-puck biscuits that require a gallon of gravy just to choke down. These are the kind of biscuits that make grown adults close their eyes when they take that first bite, the kind that creates that perfect crispy bottom that shatters like thin ice when your fork hits it, revealing layers so fluffy they practically float off the plate.
Most recipes get biscuits completely wrong, and I'll be honest—I know because I've tried them all. The internet is full of sad, dense biscuits that taste like baking powder with a side of disappointment. But this method? This is the game-changer you've been waiting for. We're talking about biscuits that literally swim in butter before baking, creating something that defies everything you thought you knew about biscuit science. The result is a biscuit that's crispy on every edge, tender in the middle, and so impossibly buttery that you'll wonder why everyone doesn't make them this way.
Okay, ready for the game-changer? Let me walk you through every single step—by the end, you'll wonder how you ever made it any other way.
What Makes This Version Stand Out
Butter Pool Magic: Instead of cutting cold butter into flour like every other recipe insists, we're melting half a cup of butter and letting the biscuit dough literally swim in it. This creates crispy, caramelized edges on every single biscuit, not just the ones lucky enough to be on the edge of the pan. The butter pools around each biscuit, essentially deep-frying the bottoms while the tops bake to golden perfection.
No Pastry Cutter Required: Forget about cutting butter into pea-sized pieces or keeping everything ice cold. This recipe actually works better with room temperature ingredients, which means no more frozen fingers or special equipment. If you've ever struggled with traditional biscuit methods, you're not alone—and I've got the fix that'll make you feel like a baking genius.
One-Bowl Wonder: Everything mixes in one bowl, no rolling pin needed, no fancy cutters required. You literally pour the dough into a butter-filled pan and pat it down. That's it. No cutting out circles, no rerolling scraps that get tough, no flour all over your counter. This is hands-down the best version you'll ever make at home, and it's also the easiest.
Guaranteed Fluffiness: The combination of baking powder and baking soda creates lift that's almost supernatural. These biscuits rise like they're trying to escape the pan, creating those Instagram-worthy layers that'll make your friends think you went to culinary school. That sizzle when the dough hits the butter? Absolute perfection.
Make-Ahead Breakfast Hero: Mix the dry ingredients the night before, and you can have hot biscuits in under 20 minutes the next morning. Picture yourself pulling this out of the oven, the whole kitchen smelling incredible, while everyone else is still fumbling with coffee filters. I dare you to taste this and not go back for seconds.
Leftover Transformation: These biscuits reheat like a dream, unlike traditional biscuits that turn into hockey pucks overnight. Pop them in a toaster oven for five minutes and they're just as good as fresh—crispy edges, fluffy centers, all the buttery magic restored.
Inside the Ingredient List
The Flavor Foundation
All-purpose flour forms the backbone of these biscuits, but not all flour is created equal. I've tested this with everything from generic store brands to fancy organic varieties, and here's what actually matters: protein content. Flour with 10-11% protein gives you the perfect structure—strong enough to hold those gorgeous layers but tender enough to melt in your mouth. Too much protein and your biscuits turn into bread, too little and they fall apart like a house of cards. If you can find flour labeled "Southern biscuit flour" or "soft wheat," grab it, but regular all-purpose works beautifully if you handle it gently.
The real secret weapon is buttermilk, and I'm not talking about that fake stuff made from regular milk and lemon juice. Real, cultured buttermilk brings tangy flavor and reacts with our leavening agents to create lift that'll make your biscuits taller than your expectations. The acid in buttermilk also tenderizes the gluten, giving you that pillow-soft texture that makes people close their eyes when they bite into it. Don't have buttermilk? You can fake it with milk and lemon juice in a pinch, but I'll be honest—it'll taste like you faked it.
The Texture Crew
Baking powder and baking soda work together like a perfectly choreographed dance team. The baking powder provides most of the lift, releasing carbon dioxide when it hits the liquid and again when it hits the heat. But here's where most recipes get it wrong—they forget the baking soda. That quarter teaspoon of baking soda neutralizes the acid in the buttermilk, allowing the biscuits to brown properly and develop that gorgeous golden color that makes them look like they came from a professional bakery. Skip the baking soda and your biscuits will be pale and sad, like they need a vacation.
Sugar isn't just for sweetness—it helps with browning and adds a subtle complexity that makes people ask "what's your secret?" The quarter cup might seem like a lot for savory biscuits, but trust me here. It balances the tang from the buttermilk and helps create those crispy, caramelized edges that'll have you fighting your family members for the corner pieces. If you're one of those people who thinks sweet and savory don't belong together, these biscuits will convert you faster than a televangelist at a revival meeting.
The Star of the Show
Butter, glorious butter—this isn't the time for margarine or oil or whatever sad substitute you have lurking in your fridge. We're talking about a full half cup plus another quarter cup for the swimming pool. The melted butter in the pan does something magical: it essentially fries the bottom of each biscuit while the rest bakes, creating a texture that's impossible to achieve any other way. Use unsalted butter because we're already adding salt, and you want to control the seasoning. The quality of your butter will directly impact the final flavor, so skip the cheap stuff and go for the good European-style butter if you can swing it. Your taste buds will thank you, and so will anyone lucky enough to share these with you.
The Final Flourish
Salt might seem basic, but it's the difference between good biscuits and biscuits that make people moan involuntarily. Salt enhances all the other flavors, balances the sweetness, and makes the butter taste more buttery. I use fine sea salt because it distributes evenly, but kosher salt works if that's what you have—just use a little extra since the crystals are larger. And now the fun part: once you master the base recipe, you can add herbs, cheese, or even a touch of honey to make these your own signature creation.
Everything's prepped? Good. Let's get into the real action...

The Method — Step by Step
- Preheat your oven to 450°F and position the rack in the center. This high temperature is crucial—it creates that initial burst of steam that makes your biscuits rise like they're trying to touch the sky. While the oven heats, grab an 8-inch square baking dish and pour in a full half cup of melted butter. Tilt the pan around until every inch of the bottom is coated in a shimmering pool of golden deliciousness. Don't be shy here—this is the foundation of everything that makes these biscuits legendary.
- In a large bowl, whisk together the flour, baking powder, salt, baking soda, and sugar until they're as well combined as best friends at a high school reunion. You want everything distributed evenly because once the liquid hits, there's no second chances. Make a well in the center like you're creating a tiny flour volcano, and pour in the buttermilk all at once. Using a wooden spoon or rubber spatula, stir just until the dough comes together—it should look shaggy and barely combined, like it got dressed in the dark.
- Now here's where most recipes tell you to knead, but stay with me here—this is worth it. Turn the dough out onto a lightly floured surface and give it exactly four gentle folds. That's it. No kneading, no rolling, no fancy business. Think of it like you're tucking the dough into bed, not giving it a deep tissue massage. Overworking the dough develops gluten, and gluten is the enemy of tender biscuits. It should still look a little rough and rustic, like it belongs in a farmhouse kitchen.
- Pat the dough into a rough rectangle about 3/4-inch thick. Don't use a rolling pin—you want to keep this gentle and hand-formed. Using a sharp knife or bench scraper, cut the dough into nine squares. They don't have to be perfect—in fact, the rustic, uneven edges are what create those crispy bits that'll have you fighting for the corner pieces. This next part? Pure magic. Carefully place each biscuit into the pool of melted butter, arranging them in three rows of three.
- Once all the biscuits are nestled in their buttery bath, pour the remaining quarter cup of melted butter over the top. Yes, you heard that right—we're giving these babies a butter shower. This creates that gorgeous golden crust and ensures every bite is infused with buttery goodness. The dough should be swimming in butter like it's on vacation in the Caribbean. If it looks like too much butter, congratulations—you're doing it exactly right.
- Slide the pan into your preheated oven and bake for 20-25 minutes. Don't walk away from the stove here—these babies go from perfect to burnt faster than you can say "butter swim." You want to pull them when they're golden brown on top and the edges are deep caramel color. The smell will be incredible, like someone bottled the essence of Southern hospitality and turned it into an air freshener. When you tap the top of a biscuit, it should sound hollow—that's your cue that they're done.
- Remove the pan from the oven and let it cool for exactly five minutes—no more, no less. This is the hardest part of the entire recipe because they smell so incredible you'll want to dive in immediately. But those five minutes allow the biscuits to set up and absorb some of that buttery goodness into every layer. The waiting is torture, but it's also what separates the amateurs from the pros. Use this time to make coffee, set the table, or just stand there admiring your handiwork like the baking rockstar you are.
- Run a knife around the edges of each biscuit to loosen them from the pan, then serve them hot. They should pull apart easily, revealing those gorgeous layers that look like they belong in a bakery window. The bottom will be crispy and golden, the middle tender and fluffy, and every bite will be infused with that incredible buttery flavor. If you want to be fancy, brush them with a little extra melted butter, but honestly, that's gilding the lily at this point.
- Store any leftovers (though I can't imagine why you'd have any) in an airtight container at room temperature. They'll stay good for up to three days, though they're best within the first 24 hours. To reheat, pop them in a 350°F oven for about 8 minutes, or split them and toast them cut-side down in a skillet. Whatever you do, don't microwave them unless you enjoy rubbery, sad biscuits that taste like disappointment.
That's it—you did it. But hold on, I've got a few more tricks that'll take this to another level...
Insider Tricks for Flawless Results
The Temperature Rule Nobody Follows
Here's the thing that'll make you a biscuit legend: all your ingredients should be at room temperature except the buttermilk. I know, I know—every other recipe screams about keeping butter cold, but this is where we break the rules and win big. Room temperature ingredients incorporate more easily, preventing those dreaded pockets of flour that taste like paste. The buttermilk stays cold because it reacts better with the leavening agents, creating more lift. It's like having your cake and eating it too, except it's biscuits and you're about to become famous among your friends.
Why Your Nose Knows Best
Trust your sense of smell more than the timer when baking these beauties. When they're about two minutes from perfect, your kitchen will fill with the most incredible buttery, toasty aroma—that's your cue to start checking them. The visual cues are important too: look for deep golden brown tops and edges that have pulled slightly away from the sides of the pan. A friend tried skipping this step once—let's just say it didn't end well. She set the timer and walked away, only to return to hockey pucks that could've doubled as paperweights.
The 5-Minute Rest That Changes Everything
Those five minutes of cooling time aren't just for show—they're crucial for the texture. During this rest, the biscuits finish cooking from residual heat, the steam redistributes moisture, and the butter gets reabsorbed into the layers. It's like a magic trick that happens while you're not looking. I've tested this every which way, and biscuits that rest for five minutes are noticeably more tender and flavorful than those devoured immediately. Use this time to set out honey, jam, or whatever toppings you're planning, or just stand there practicing your humble "oh, these old things?" face for when everyone starts complimenting you.
The Butter Quality Secret
Not all butter is created equal, and this recipe is where that difference really matters. European-style butter with higher fat content (like Kerrygold or Plugra) will give you richer flavor and better browning. Yes, it costs more, but you're using a lot of butter here, so make it count. The higher fat content means less water, which translates to more tender biscuits and better flavor. Think of it as an investment in your breakfast happiness—plus, once you taste the difference, you'll never go back to the cheap stuff.
Creative Twists and Variations
This recipe is a playground. Here are some of my favorite ways to switch things up:
Cheese and Herb Heaven
Add one cup of sharp cheddar cheese and two tablespoons of fresh chopped chives to the dry ingredients before adding the buttermilk. The cheese creates these incredible pockets of gooey goodness, while the chives add a sophisticated note that makes these perfect for brunch with the in-laws. Use the good cheddar here—the kind you have to grate yourself, not the pre-shredded stuff that tastes like sawdust. These are especially amazing split and used for breakfast sandwiches with crispy bacon and a runny egg.
Honey Butter Dream Biscuits
Replace two tablespoons of the buttermilk with honey, and reduce the sugar to two tablespoons. This creates a subtle sweetness that pairs beautifully with the buttery richness. They're incredible on their own, but if you really want to blow minds, brush them with honey butter when they come out of the oven. The honey caramelizes slightly, creating this glossy, sticky top that's absolutely addictive. My neighbor requests these every time we have brunch, and I once caught her trying to sneak extras into her purse.
Everything Bagel Biscuits
Mix two tablespoons of everything bagel seasoning into the dry ingredients, then sprinkle more on top before baking. These are phenomenal for breakfast sandwiches—they've got that everything bagel flavor but in biscuit form. The garlic and onion in the seasoning get slightly toasty and aromatic, while the sesame and poppy seeds add little bursts of nuttiness. Serve these with cream cheese and smoked salmon for a brunch that'll make your guests think you secretly trained at culinary school.
Jalapeño Cheddar Explosion
Add one cup of sharp cheddar and two finely diced jalapeños (seeds removed if you're not into heat) to the dry ingredients. The combination of spicy peppers and sharp cheese creates this incredible flavor bomb that's somehow even better the next day. These are dangerous because you can't stop eating them, but they're also fantastic for soaking up chili or making the world's most incredible breakfast sandwich. Pro tip: wear gloves when handling jalapeños, unless you enjoy accidentally rubbing your eyes later and crying like you're watching a sad movie.
Garlic Parmesan Perfection
Replace half the butter with garlic-infused butter, and add half a cup of grated Parmesan to the dry ingredients. Brush with more garlic butter when they come out of the oven. These are what happens when garlic bread and biscuits have a beautiful baby. They're incredible with pasta, soup, or just eaten warm while standing at the counter. The garlic gets sweet and mellow in the oven, while the Parmesan creates these crispy, salty bits that are basically edible gold.
Sweet Potato Surprise
Replace half the buttermilk with mashed sweet potato for biscuits that are slightly sweet, incredibly moist, and packed with vitamins. The sweet potato adds this gorgeous orange hue and makes them extra tender. These are perfect for Thanksgiving breakfast or any time you want to feel slightly virtuous about eating buttery carbs. The natural sweetness means you can skip the sugar entirely if you want, making them more versatile for savory applications.
Storing and Bringing It Back to Life
Fridge Storage
Contrary to popular belief, these biscuits actually do well in the fridge, unlike most biscuits that turn into doorstops overnight. Store them in an airtight container with a paper towel to absorb excess moisture, and they'll stay good for up to five days. The key is letting them cool completely before storing—trapping warm biscuits creates steam that ruins the texture. If you're planning to fridge them, underbake them slightly (pull them when they're just golden) so they finish cooking when you reheat them.
Freezer Friendly
These freeze beautifully, which is dangerous because it means you can have fresh biscuits anytime the craving strikes. Wrap them individually in plastic wrap, then store in a freezer bag for up to three months. To reheat, pop them frozen into a 350°F oven for about 12-15 minutes. They'll taste almost as good as fresh, with crispy edges and fluffy centers restored to their former glory. I always keep a batch in the freezer for emergency breakfast situations or when friends drop by unexpectedly.
Best Reheating Method
The toaster oven is your best friend here—microwaves turn them rubbery and sad. Split them in half, place cut-side down on a baking sheet, and heat at 350°F for about 5-7 minutes. Add a tiny splash of water before reheating—it steams back to perfection and prevents them from drying out. If you're in a rush, you can toast the cut sides in a dry skillet over medium heat for about 3-4 minutes. This creates new crispy surfaces and warms them through without making them tough.