When I first tried to rescue a batch of overripe bananas for a quick snack, I accidentally turned a simple mash into a sticky, soggy mess. The kitchen smelled of banana and disappointment as I stared at the brown pulp that seemed to have a mind of its own. That night, a friend dared me to make a gluten‑free banana nut bread that would actually taste like a treat, not a health‑food experiment. I laughed, grabbed the recipe, and promised myself that this would be the most mouth‑watering loaf I’d ever bake. The moment the dough hit the pan, the air filled with the sweet aroma of caramelized sugar and toasted nuts, and I knew I was onto something special.
The first bite was a revelation: a moist crumb that clung to the knife, a subtle sweetness that didn’t overpower, and a nutty crunch that echoed in the background. I was instantly hooked, and I couldn’t wait to share the secret behind this ultimate banana nut bread. Every element of the recipe has been fine‑tuned to deliver a loaf that feels like a warm hug on a cold morning, yet is light enough to pair with coffee or tea. The technique I’ll reveal next will turn an ordinary baking routine into an art form that even the most skeptical home bakers will swear by.
Picture yourself pulling this loaf from the oven, the whole kitchen smelling incredible, the crust crackling like a golden sunrise. The first slice releases a cloud of fragrant steam that tastes of vanilla, banana, and toasted walnuts, and you’re instantly transported to a cozy kitchen in the heart of a bustling city. It’s the kind of bread that turns a simple breakfast into a celebratory moment, making every bite feel like a reward for the effort you invested. If you’ve ever struggled to keep banana bread moist or gluten‑free, you’re not alone — and I’ve got the fix that will change your baking game forever.
Let me walk you through every single step — by the end, you’ll wonder how you ever made it any other way. I’ll show you how to balance flavors, textures, and nutrition while keeping the process simple and approachable. Whether you’re a seasoned baker or a kitchen novice, this recipe will elevate your bread‑making skills to new heights. Ready to taste a loaf that will have you craving seconds? I dare you to taste this and not go back for seconds.
What Makes This Version Stand Out
- Moisture: The combination of banana, applesauce, and coconut sugar locks in hydration, preventing the bread from drying out even after a week in the fridge. Unlike traditional banana bread, this loaf stays soft without the need for added oils or butter. The result is a tender crumb that melts in your mouth.
- Texture: Chopped walnuts provide a satisfying crunch that contrasts with the silky interior. The nuts also add a subtle nutty aroma that lingers long after the first bite. Each forkful delivers a balanced mouthfeel.
- Flavor: The vanilla extract amplifies the banana’s natural sweetness, while the coconut sugar introduces a caramel undertone. This pairing creates a complex flavor profile that feels both familiar and adventurous. You’ll notice a depth that keeps you coming back for more.
- Gluten‑Free Simplicity: A pre‑blended gluten‑free flour mix eliminates the guesswork of selecting the right ratios. The recipe works with most commercial blends, so you can bake confidently regardless of your pantry. No more trial and error.
- Make‑Ahead Potential: The loaf can be baked ahead of time and frozen without sacrificing quality. When you thaw a slice, it regains its fresh‑baked aroma and moisture. This makes it a perfect option for busy mornings.
- Nutrition: With a balanced mix of protein, healthy fats, and complex carbs, this bread provides sustained energy. The walnuts contribute omega‑3 fatty acids, while the bananas offer potassium and vitamin B6. It’s a wholesome choice for a satisfying breakfast.
Alright, let's break down exactly what goes into this masterpiece. The ingredients are carefully chosen to create harmony between taste, texture, and nutrition. Each component has a role that enhances the loaf’s overall quality. With the right balance, you’ll achieve a loaf that feels like a dessert yet fits perfectly into any meal.
Inside the Ingredient List
The Flavor Base
Bananas are the heart of this loaf, providing natural sweetness, moisture, and a distinct banana flavor that is unmistakable. The riper the fruit, the more intense the taste; aim for bananas that are half brown to fully caramelized. If you’re short on bananas, you can substitute with ½ cup of unsweetened applesauce for a milder flavor. Remember, the banana’s natural sugars help the bread rise, so don’t skip it.
The Texture Crew
Walnuts add a satisfying crunch and a buttery texture that balances the softness of the crumb. They also contribute healthy fats and protein, elevating the bread’s nutritional profile. If walnuts are out of season, pecans or almonds can be used; just be sure to chop them finely so they integrate well. A pinch of cinnamon can enhance the nutty flavor, but it’s optional.
The Unexpected Star
Coconut sugar is the secret to a subtle caramel undertone that pairs beautifully with banana. Unlike regular sugar, coconut sugar has a lower glycemic index and a richer flavor profile. If you prefer a lighter taste, you can reduce the amount by half, but be prepared for a slightly less sweet loaf. This ingredient also helps maintain moisture throughout the baking process.
The Final Flourish
The gluten‑free flour blend provides structure and stability. It’s designed to mimic the behavior of wheat flour while keeping the loaf light. The baking soda and salt are essential for leavening and flavor balance; don’t skip them, or the bread will be flat and bland. The vanilla extract ties everything together, giving the loaf a fragrant finish.
Everything's prepped? Good. Let's get into the real action.
The Method — Step by Step
- Preheat and Prep: Heat your oven to 350°F (175°C) and line a 9×5-inch loaf pan with parchment paper. The parchment ensures a clean release and prevents the loaf from sticking. While the oven warms, set your mixing bowl and whisk ready; you’ll need a steady hand for the next steps.
- Mashed Banana: In a large bowl, mash the ripe bananas with a fork until they’re smooth with a few small lumps. The texture should be thick but pourable; this consistency helps distribute moisture evenly. If you prefer a smoother loaf, use a hand blender for a finer mash.
- Wet Mix: Add the eggs, applesauce, vanilla, and coconut sugar to the mashed bananas. Whisk until the mixture is glossy and the sugar dissolves. This wet blend forms the foundation of the loaf’s flavor and moisture profile.
- Dry Mix: In a separate bowl, whisk together the gluten‑free flour blend, baking soda, and salt. Stir until the dry ingredients are fully incorporated. A well‑mixed dry mix prevents clumps and ensures even baking.
- Combine: Gently fold the dry mixture into the wet mixture, stirring until just combined. Be careful not to over‑mix; a few streaks of flour are fine. Over‑mixing can make the loaf dense and tough.
- Walnut Addition: Fold in the chopped walnuts, reserving a handful for topping if desired. The walnuts should be evenly distributed to avoid pockets of crunch. This step adds both texture and a nutty aroma that permeates the loaf.
- Bake: Pour the batter into the prepared loaf pan and smooth the top with a spatula. Place the pan in the oven and bake for 30–35 minutes. The loaf should develop a golden crust and a slight crackle when you tap the bottom.
- Check: Insert a toothpick into the center; it should come out clean or with a few moist crumbs. If it’s still wet, bake for an additional 5 minutes. The loaf should smell toasty, with hints of caramel and vanilla.
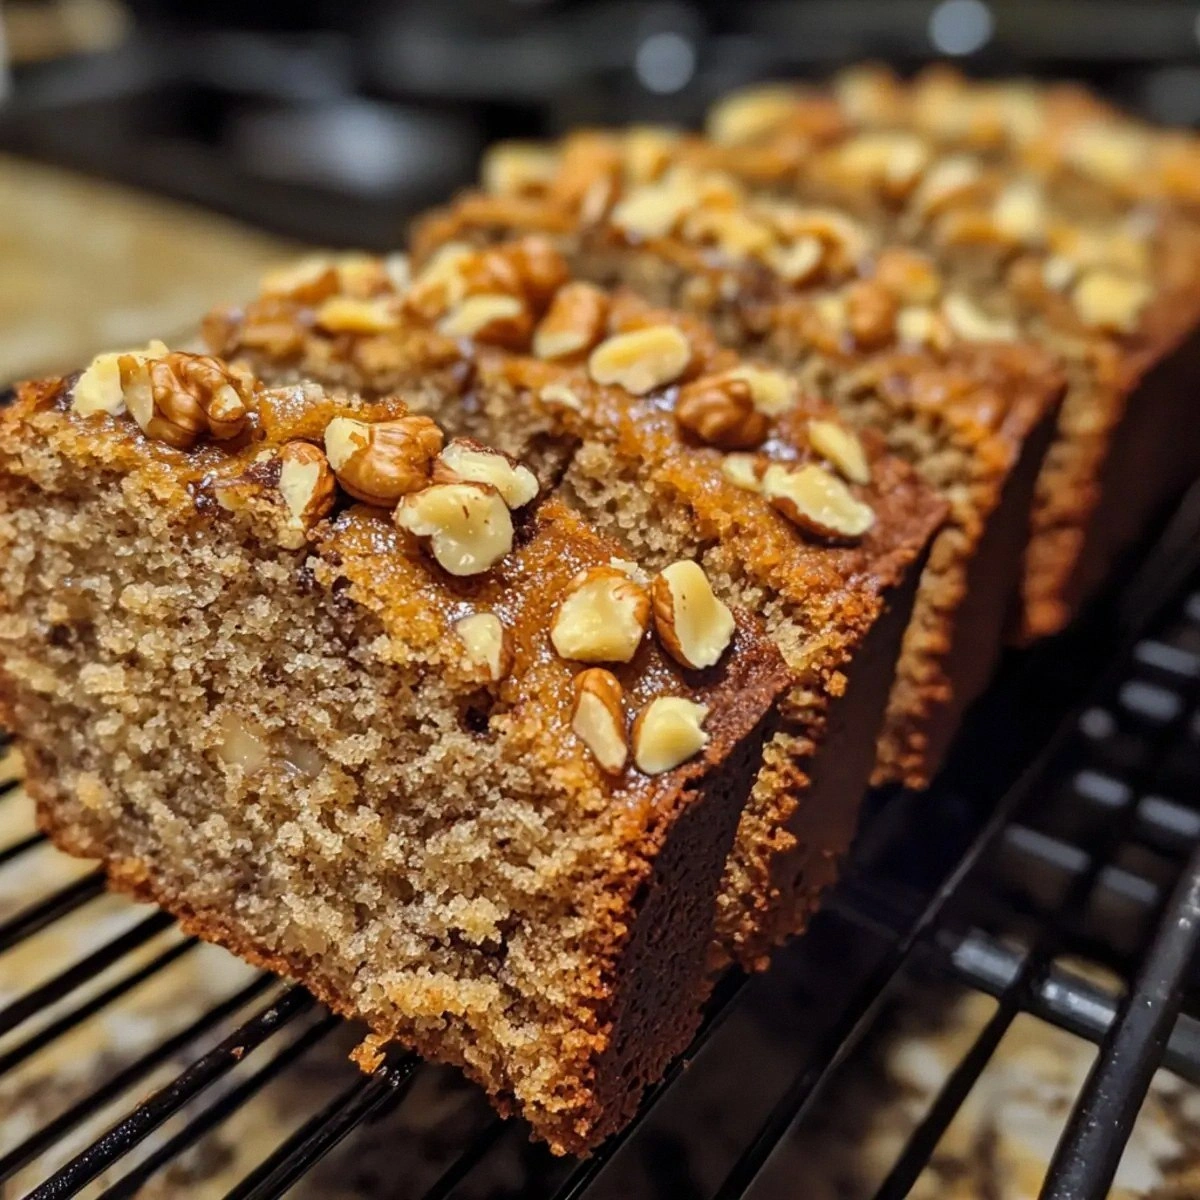
- Cool: Remove the loaf from the oven and let it cool in the pan for 10 minutes before transferring to a wire rack. This step allows the steam to escape and prevents sogginess. Once cooled, slice and enjoy the perfect combination of moistness and crunch.
That's it — you did it. But hold on, I've got a few more tricks that'll take this to another level.
Insider Tricks for Flawless Results
The Temperature Rule Nobody Follows
Many bakers set their oven to 350°F, but the exact temperature can vary by oven. Use an oven thermometer to ensure accuracy; a 5°F difference can mean the difference between a perfect crust and a soggy loaf. Once you find the sweet spot, mark the temperature on the oven for future reference.
Why Your Nose Knows Best
Before you open the oven, pause and inhale the aroma of the batter. A strong, sweet scent indicates the sugar has caramelized, signaling the loaf is nearly done. Trust your nose; it’s a reliable indicator of doneness.
The 5‑Minute Rest That Changes Everything
After baking, let the loaf rest in the pan for 5 minutes before moving it to a rack. This brief rest allows the crumb to set, making it easier to slice without crumbling. It also helps the interior finish cooking without over‑baking the crust.
Layering the Flavor
For an extra burst of flavor, sprinkle a pinch of sea salt over the top before baking. The salt enhances the sweetness and balances the richness of the walnuts. A light dusting also gives the loaf an appealing finish.
Storing for Longevity
Wrap the cooled loaf tightly in plastic wrap and store at room temperature for up to three days. For longer storage, slice and freeze individual portions; thaw at room temperature for a few hours before serving. The bread remains moist and flavorful even after freezing.
Creative Twists and Variations
This recipe is a playground. Here are some of my favorite ways to switch things up:
Chocolate Chip Banana Bread
Fold in ½ cup of dark chocolate chips just before baking. The chocolate adds a rich, bittersweet contrast to the banana sweetness. Serve warm for a decadent treat.
Almond Butter Swirl
Swirl 2 tablespoons of almond butter into the batter for a nutty, creamy texture. The almond butter creates a marbled effect when baked, adding visual appeal and flavor depth.
Maple Walnut Fusion
Replace the coconut sugar with ¼ cup of pure maple syrup and add a teaspoon of ground cinnamon. The maple introduces a subtle spiced sweetness that complements the walnuts.
Spiced Citrus Twist
Add the zest of one orange and a pinch of cardamom to the batter. The citrus brightens the flavor profile, while cardamom adds an exotic warmth.
Protein-Packed Power
Stir in ½ cup of vanilla protein powder to boost the protein content. The protein powder will slightly change the crumb, making it denser but more filling.
Storing and Bringing It Back to Life
Fridge Storage
Wrap the loaf tightly in plastic wrap and store at room temperature for up to three days. If you need to keep it longer, slice and freeze individual portions. The bread stays fresh and moist, and you can grab a slice whenever you want.
Freezer Friendly
Place the cooled loaf in a freezer bag, removing as much air as possible. The loaf can be kept for up to three months. When ready to eat, thaw at room temperature for a few hours.
Best Reheating Method
To revive the loaf’s moisture, sprinkle a tiny splash of water over the surface before microwaving for 20–30 seconds. The steam will restore the bread’s softness and aroma. Alternatively, reheat in a preheated oven at 350°F for 10 minutes.