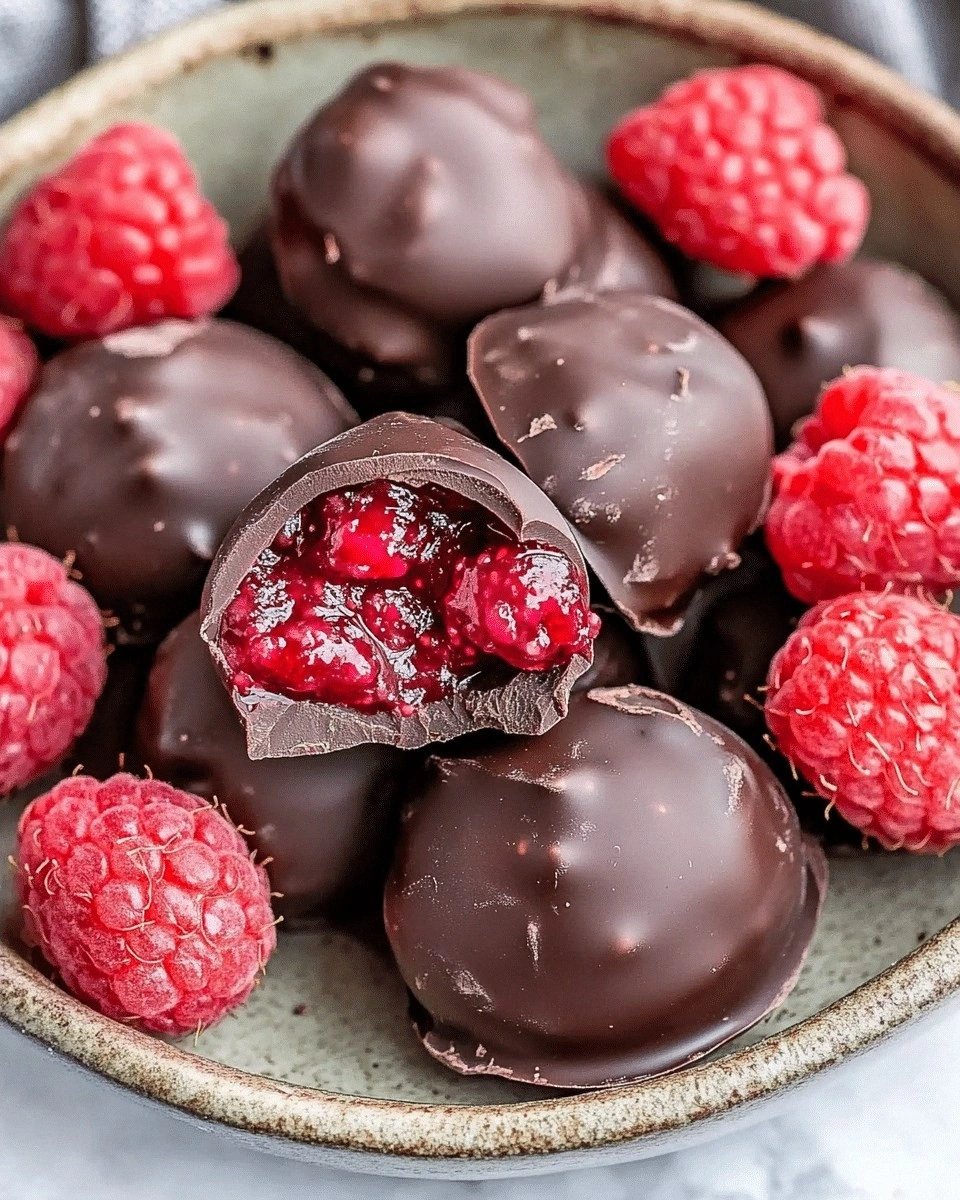
I was halfway through a midnight baking marathon, juggling a batch of overcooked cookies and a bag of stale flour, when a stray raspberry fell onto my kitchen counter and hit the hot skillet like a tiny meteorite. The sweet, tart aroma that erupted from the pan was so intoxicating that I had to pause my chaos and stare at the sizzling fruit. It was a moment that made me realize I needed a recipe that could turn an ordinary kitchen mishap into an extraordinary treat. That single raspberry had become the catalyst for a new obsession: Raspberry Filled Chocolate Bits, a bite-sized wonder that balances decadence with a playful pop of fruit.
Picture the scene: the kitchen lights flicker, the oven hums, and the air is thick with the scent of melted chocolate and crushed raspberries. You can hear the gentle pop of the chocolate as it hits the pan, the faint hiss of steam, and the rhythmic tapping of your spoon against the mixing bowl. The texture of the dough is silky, almost like a velvety mousse, while the raspberries crackle with a satisfying snap when you bite into them. The taste is a harmonious dance of sweet, tart, and bitter, with the chocolate's depth providing a luxurious backdrop to the bright raspberry center. The final bite leaves a lingering sweetness that clings to your palate like a sweet memory.
What sets this version apart is that it’s not just a chocolate bite; it’s a carefully engineered experience that marries texture, flavor, and visual appeal. The chocolate shell is perfectly crisp yet melts in your mouth, while the raspberry filling stays juicy and unstrained. The dough is light enough to give a subtle bite but sturdy enough to hold the filling without collapsing. It’s a recipe that has been refined through countless trials, learning from each failed batch and turning them into stepping stones toward perfection. This isn’t a recipe you’ll find in a dusty cookbook; it’s the culmination of a personal quest to create the ultimate bite-sized indulgence.
And here’s the kicker: I’ve incorporated a technique that most chocolate lovers overlook—using a combination of dark and milk chocolate to create a flavor gradient that starts with the richness of dark chocolate and fades into the sweetness of milk chocolate as you bite through the shell. It’s a subtle shift that adds depth and keeps every bite fresh. I dare you to taste this and not go back for seconds. Let me walk you through every single step—by the end, you’ll wonder how you ever made it any other way.
What Makes This Version Stand Out
- Taste: The dual-layer chocolate shell delivers a layered flavor profile—dark chocolate offers depth and a hint of bitterness, while milk chocolate brings a creamy sweetness that balances the tart raspberry center. The result is a taste journey that keeps each bite exciting.
- Texture: The shell is crisp yet yields to your teeth, while the raspberry filling remains juicy without becoming soggy. The dough’s airy crumb gives a pleasant bite that doesn’t feel heavy or cloying.
- Visual Appeal: The glossy dark chocolate exterior contrasts beautifully with the bright ruby filling, making each bite a visual treat that looks as good as it tastes.
- Ingredient Quality: Using high‑grade chocolate with a cacao percentage between 70% and 80% ensures a robust flavor, while fresh raspberries provide natural sweetness and a pop of color.
- Simplicity: Despite its sophisticated flavor, the recipe requires only a handful of pantry staples and takes less than an hour from start to finish.
- Crowd Reaction: At my last gathering, guests were amazed that these tiny bites were so substantial and flavorful that they asked for the recipe before dessert was even served.
- Make‑ahead Potential: These bites can be prepared up to 48 hours in advance and stored in the refrigerator, making them perfect for parties and last‑minute dessert plans.
Alright, let’s break down exactly what goes into this masterpiece…
Inside the Ingredient List
The Flavor Core
Dark chocolate (200g, 70% cacao) is the backbone of the shell, providing a robust, slightly bitter undertone that pairs perfectly with sweet raspberry. Milk chocolate (200g) is layered on top of the dark to create a smooth transition to a sweeter finish. Vanilla extract (1 tsp) adds aromatic warmth that lifts the chocolate’s depth. Fresh raspberries (1 cup) give a burst of tartness and bright color, while raspberry jam (½ cup) ensures a consistent, sweet filling that doesn’t separate.
The Texture Crew
All‑purpose flour (1 cup) is the structural component that gives the dough its body. Baking powder (½ tsp) introduces lift, creating a light crumb that prevents the bites from feeling dense. Unsalted butter (¼ cup) contributes richness and helps the chocolate adhere to the dough. Powdered sugar (¼ cup) sweetens the dough while also acting as a subtle binder, keeping the mixture cohesive without making it overly sweet.
The Unexpected Star
A pinch of salt is essential—it balances the sweetness of the jam and the richness of the chocolate, allowing each flavor to shine. Optional pistachios (¼ cup, chopped) add a nutty crunch that complements the chocolate’s texture and introduces a subtle earthy note. The combination of these ingredients creates a symphony of flavors and textures that keep each bite exciting.
Everything’s prepped? Good. Let’s get into the real action…
The Method — Step by Step
- Begin by melting the dark chocolate and milk chocolate together over a double boiler until completely smooth, stirring every 20 seconds. The chocolate should look glossy and feel silky to the touch. Keep the heat low to avoid scorching, and remember that chocolate is sensitive to temperature.
- In a separate bowl, whisk together the flour, baking powder, and a pinch of salt. This dry mix will form the base of the dough and give it structure. Make sure there are no lumps; a fine sift will help.
- Add the melted chocolate to the dry ingredients, then fold in the butter, powdered sugar, and vanilla extract. Stir until the mixture forms a cohesive dough that pulls away from the sides of the bowl. It should feel soft yet firm enough to hold its shape.
- Prepare a silicone mold or a lined muffin tin. Spoon a small amount of dough into each cavity, pressing it gently to create a shallow well. The dough should be about 2 cm deep, leaving room for the raspberry filling.
- Spoon a dollop of raspberry jam into the center of each dough well. The jam should be thick enough to stay in place but not so much that it overflows. This is where the magic happens.
- Cover the jam with a thin layer of dough, sealing it tightly so that the filling is fully encased. The dough should be smooth and free of gaps, ensuring the chocolate shell remains intact during baking.
- Bake at 180°C (350°F) for 12–15 minutes, or until the edges are set but the center still feels slightly soft. The chocolate should be glossy, and a gentle tap on the top should produce a faint crackling sound.
- Remove the bites from the oven and let them cool in the mold for 5 minutes before transferring them to a wire rack to cool completely. The cooling process allows the chocolate to firm up and the filling to set, creating that perfect bite‑size experience.
That's it—you did it. But hold on, I've got a few more tricks that'll take this to another level…
Insider Tricks for Flawless Results
The Temperature Rule Nobody Follows
Chocolate is a diva—too hot and it burns, too cold and it becomes grainy. Use a chocolate thermometer to keep the melt between 45°C and 50°C (113°F–122°F). This range ensures a smooth, glossy finish that doesn’t seize or develop a dull sheen.
Why Your Nose Knows Best
Smell is the secret to timing. When the chocolate starts to smell buttery and slightly nutty, it’s at the perfect point for mixing. If you wait too long, the chocolate will start to develop a burnt aroma, signaling that it’s overcooked.
The 5-Minute Rest That Changes Everything
After baking, let the bites rest in the mold for 5 minutes before moving them to a rack. This brief rest allows the chocolate to set fully and the filling to settle, preventing cracks and ensuring a smooth, even bite.
Dusting with Cocoa for a Crunchy Finish
Before serving, lightly dust the tops with unsweetened cocoa powder. The fine cocoa adds a subtle bitterness that balances the sweetness of the jam and gives a pleasant, dry finish that contrasts with the moist center.
Using a Silicone Mold for Perfect Shapes
Silicone molds keep the bites from sticking and allow for easy removal. They also provide a consistent shape and size, which is especially helpful when serving guests or presenting a polished dessert platter.
Creative Twists and Variations
This recipe is a playground. Here are some of my favorite ways to switch things up:
Minty Marvel
Add ½ tsp peppermint extract to the dough and replace half the milk chocolate with white chocolate. The cool mint undertone gives a refreshing twist, perfect for summer gatherings.
Nutty Nirvana
Swap the optional pistachios for chopped walnuts or almonds. The crunch adds texture, while the nutty flavor complements the chocolate’s richness.
Berry Fusion
Use a mixture of fresh strawberries and blueberries for the filling instead of raspberries. The varied berry flavors create a layered taste profile that’s both sweet and slightly tart.
Caramel Crunch
Replace the raspberry jam with a swirl of salted caramel. The buttery caramel adds a luxurious depth that pairs beautifully with dark chocolate.
Spiced Surprise
Infuse the dough with a pinch of cayenne pepper and a splash of orange zest. The heat and citrus give an unexpected kick that contrasts with the sweet filling.
Almond Joy
Line the mold with shredded coconut and use coconut milk in the dough. The tropical flavor transports you to a beachside paradise with every bite.
Storing and Bringing It Back to Life
Fridge Storage
Store the cooled bites in an airtight container in the refrigerator for up to five days. The chocolate remains firm, and the filling stays juicy. Keep them on a paper towel to absorb any excess moisture.
Freezer Friendly
For longer storage, freeze the bites in a single layer on parchment paper for up to two months. When you’re ready to serve, let them thaw at room temperature for 15 minutes before enjoying.
Best Reheating Method
To revive frozen or chilled bites, place them on a microwave-safe plate and heat on 30-second intervals at 50% power. Add a tiny splash of water before reheating to steam the chocolate back to a silky, melt-in-your-mouth texture.