I was staring at a half‑poured bottle of beer and a slab of chuck steak on my counter, feeling the heat of the kitchen like a personal interrogation. The last time I tried to make a Mexican braised beef, the result was a soggy, flavorless mess that left me questioning my culinary instincts. That night, I swore I’d find a method that turned the humble cut into a silky, aromatic masterpiece that could make even the most skeptical foodie swoon. The moment I cracked the first lid of the sauce, the kitchen filled with a smoky, earthy perfume that felt like a promise of comfort and boldness.
Picture the beef browning to a deep mahogany crust, the aroma of toasted cumin and smoked paprika dancing in the air, while the simmering broth turns into a glossy, savory glaze that clings to every morsel. The sound of the pot hissing is the soundtrack of a dish that’s been patiently coaxed into tenderness over a slow, low flame. The texture is a contrast between the tender, melt‑in‑your‑mouth meat and the crisp, caramelized edges that snap like a perfectly fried tortilla. The flavor profile is a harmonious blend of smoky, slightly sweet, and a hint of citrusy brightness that lingers on the tongue. The entire experience is a sensory celebration that makes the kitchen feel like a theater of culinary magic.
I’m not just talking about a recipe; I’m sharing a revelation that will change the way you think about braised beef forever. This version stands out because it balances traditional Mexican spices with a modern, deep‑flavor technique that brings out the meat’s natural richness. The sauce’s silky texture is achieved by a slow reduction that concentrates the broth into a velvety coating. The dish is surprisingly forgiving, yet it demands precision at every step, turning a simple meal into a statement of culinary confidence. You’ll discover that the key to this transformation lies in a few secret ingredients and a disciplined approach to searing and simmering.
If you’ve ever tried to recreate this dish from a generic recipe and ended up with a bland, watery result, you’re not alone. Most recipes get this completely wrong by ignoring the importance of proper browning, the right balance of acidity, and the subtle sweetness that caramelization brings. The secret to this version is the layered flavor base that starts with a touch of beer, which adds depth and a slight bitterness that cuts through the richness of the meat. Another twist is the use of fresh cilantro and lime at the finish, which lifts the dish and gives it that unmistakable Mexican vibrancy. The result is a sauce that clings to the beef like velvet, delivering a bite that’s both comforting and exhilarating.
I dare you to taste this and not go back for seconds, because the first bite will leave you craving more. This is hands down the best version you'll ever make at home, and if you’re skeptical, let me walk you through every single step. By the end, you’ll wonder how you ever made it any other way. The anticipation of the first spoonful is just the beginning of a culinary journey that will keep you coming back for more.
What Makes This Version Stand Out
- Flavor Depth: The combination of beer, tomato sauce, and a splash of lime creates a complex, layered taste that evolves with each bite.
- Texture Mastery: Slow braising turns tough chuck into melt‑in‑your‑mouth tenderness while preserving a slight chew that adds satisfaction.
- Time Efficiency: Although it simmers, the method uses a single pot and minimal prep, making it a win for busy evenings.
- Ingredient Quality: Using fresh, high‑quality spices and a good beer elevates the dish beyond a standard stew.
- Crowd‑Pleaser: The bright, smoky flavors and hearty texture make it a hit at family gatherings and dinner parties alike.
- Make‑Ahead Friendly: The dish can be prepared a day ahead, allowing flavors to meld even further.
Inside the Ingredient List
The Flavor Base
The foundation of this dish starts with a generous splash of beer, which introduces a subtle bitterness that balances the richness of the beef. Beer also contributes a depth of flavor that’s hard to replicate with broth alone, giving the sauce a more robust character. If you prefer a non‑alcoholic version, substitute with a dry white wine or a splash of apple cider vinegar for a similar acidity. The key is to choose a beer that’s not too sweet; a light lager or pilsner works beautifully.
Next comes the tomato sauce, which adds sweetness and body to the broth. The sauce’s natural sugars caramelize during the braising process, creating a glossy glaze that clings to the meat. A good quality canned tomato sauce with no added sugar will keep the dish from becoming overly sweet. For a fresher twist, consider using a homemade tomato purée.
The Texture Crew
The chuck steak is the star, chosen for its marbling and ability to stay tender after long, slow cooking. Cutting the meat into uniform cubes ensures even cooking and a consistent bite. If you can’t find chuck, consider using short ribs or brisket; both have similar fat content and will produce a similarly tender result.
The vegetables—onion, garlic, jalapeño, carrots, and bell pepper—provide a sweet, savory base that builds complexity. They also contribute a gentle crunch that contrasts with the softness of the meat. Be sure to dice the vegetables uniformly to promote even sautéing and prevent uneven caramelization.
The Unexpected Star
Fresh cilantro and lime juice are the finishing touch that elevates the dish from comforting to unforgettable. Cilantro brings a bright, herbaceous note that cuts through the richness, while lime juice adds a zesty lift that brightens the entire plate. Adding these ingredients at the very end preserves their delicate flavors and ensures they don’t get lost in the long simmer.
If you’re not a fan of cilantro, a handful of chopped parsley can serve as a suitable substitute. Just keep in mind that the flavor profile will shift slightly toward a milder, sweeter note. The lime, on the other hand, is essential; skipping it will result in a flatter sauce lacking that signature Mexican brightness.
Everything's prepped? Good. Let's get into the real action, where the magic truly happens and the flavors come together in a symphony of savory delight.
The Method — Step by Step
- Trim the chuck steak of excess fat and cut into 1½‑inch cubes. Pat the meat dry with paper towels; this helps achieve a beautiful sear. Season each cube generously with salt and pepper, allowing the seasoning to penetrate the surface. This step is crucial for flavor development and prevents the meat from becoming mushy during braising.
- Heat a heavy‑bottomed skillet over medium‑high heat and add 1 tablespoon of olive oil. Once the oil shimmers, add the beef cubes in a single layer, leaving space between them. Sear the meat on all sides until a deep brown crust forms; this caramelization locks in juices and adds depth. Turn the meat gently to avoid tearing the crust.
- Reduce the heat to medium and add the diced onion, minced garlic, and jalapeño to the skillet. Sauté until the onion turns translucent and the garlic releases its aroma, about 3–4 minutes. Stir in the sliced carrots and bell pepper, cooking for an additional 2 minutes to soften slightly. This stage builds the aromatic foundation of the dish.
- Stir in the tomato paste, cumin, smoked paprika, and oregano, letting the spices toast for 1 minute. The spices should emit a fragrant, nutty scent, signaling that they’re ready to release their flavors. Then pour in the beer and give everything a good stir to deglaze the pan, scraping up any browned bits. This deglazing step ensures no flavor is left behind.
- Return the seared beef to the skillet, then add the beef broth, tomato sauce, and a bay leaf. Stir to combine, making sure the meat is mostly submerged. Bring the mixture to a gentle boil, then reduce the heat to low and cover the skillet. The slow, low simmer allows the flavors to meld and the meat to become tender.
- Simmer the braise uncovered for 1½ hours, stirring occasionally. After the first hour, check the tenderness by inserting a fork; the meat should slide off the bone with minimal resistance. If the sauce is too thin, let it reduce for an additional 15 minutes, stirring frequently. This step ensures the sauce thickens into a glossy, flavorful glaze.
- Remove the bay leaf and taste the sauce. Adjust seasoning with additional salt, pepper, or a pinch of sugar if needed. Add the lime juice, stirring to incorporate its bright acidity. This final touch brightens the dish and balances the richness of the meat and sauce.
- Fold in the chopped cilantro, reserving a small handful for garnish. Let the mixture rest for 5 minutes off the heat; this allows the flavors to settle and the sauce to thicken slightly. The rest period also gives the meat time to reabsorb juices, ensuring every bite is juicy and tender.
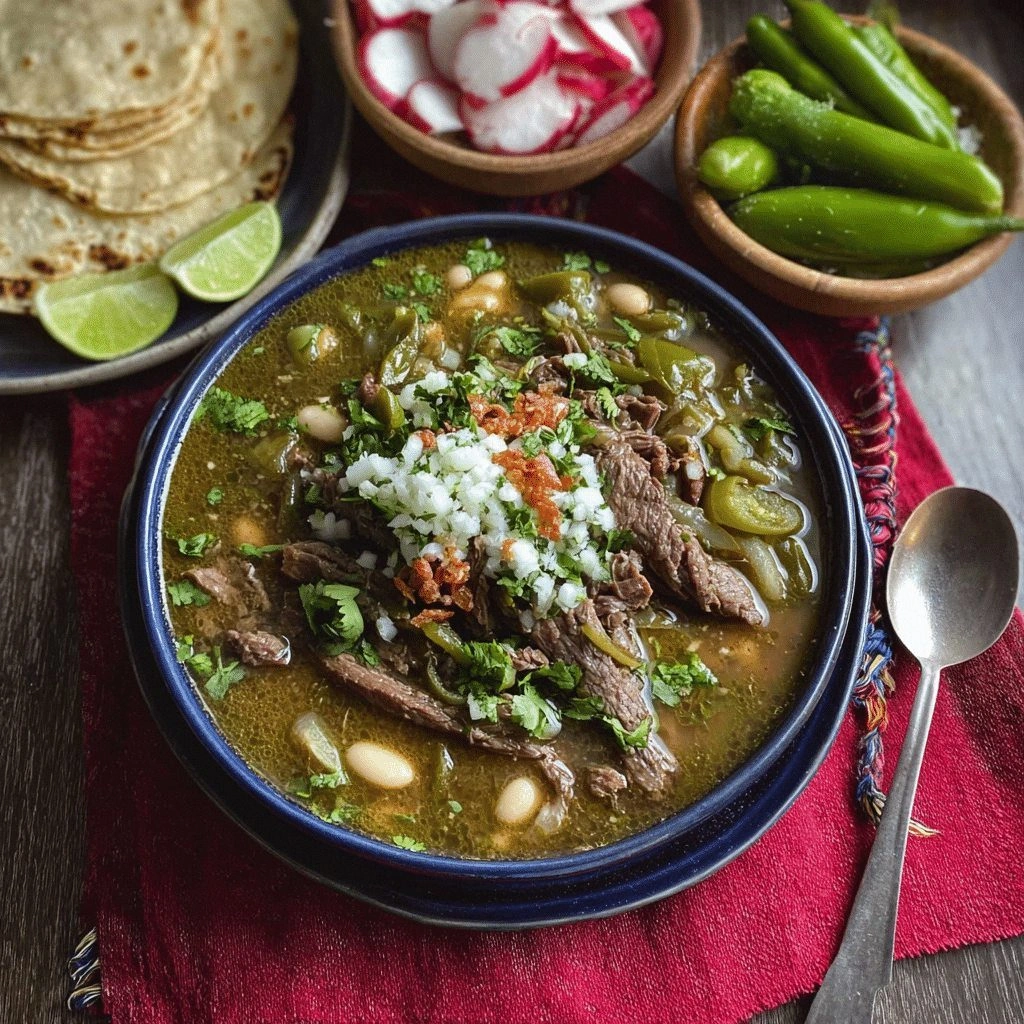
- Serve the braised beef hot, accompanied by warm corn tortillas, fluffy rice, or a side of fresh guacamole. Sprinkle the reserved cilantro over the top for a burst of color and freshness. This dish is best enjoyed immediately, but it holds up well for a short period if you’re in a hurry.
Insider Tricks for Flawless Results
The Temperature Rule Nobody Follows
Maintaining a consistent low heat is the secret to a silky sauce and perfectly tender meat. Many cooks instinctively turn up the heat to speed up the process, but this causes the sauce to reduce too quickly, leading to a sticky, uneven consistency. Use a thermometer to keep the skillet at 250–275°F (120–135°C); this range is ideal for slow braising.
If you notice the liquid evaporating too fast, add a splash of water or broth to keep the mixture from drying out. Conversely, if the sauce is too watery, let it simmer uncovered for a few minutes to evaporate excess liquid. This fine‑tuning ensures the sauce stays glossy and coats the meat beautifully.
Why Your Nose Knows Best
Your olfactory sense is a powerful indicator of doneness. As the sauce simmers, the aroma evolves from a sweet, caramelized scent to a deeper, earthy tone. When the meat is ready, the smell should be rich and inviting, with a hint of citrus from the lime. Trust your nose, and you’ll avoid over‑cooking or under‑seasoning.
The 5‑Minute Rest That Changes Everything
After cooking, let the braised beef rest for at least five minutes before serving. This brief pause allows the juices to redistribute throughout the meat, making each bite more succulent. Skipping this step often results in a slightly dry mouthfeel, especially in the center of the meat.
The Secret to a Thick, Glazed Sauce
If you prefer a thicker sauce, finish the braise with a cornstarch slurry. Dissolve 1 tablespoon of cornstarch in 2 tablespoons of cold water, then stir it into the simmering sauce. Cook for an additional 2–3 minutes until the sauce thickens to your liking. This technique adds body without altering the flavor profile.
Avoiding the Common Pitfall
Many people add too much salt at the beginning, which can draw out moisture and hinder the browning process. Instead, season the meat after searing and adjust the final seasoning after simmering. This approach ensures a balanced flavor and prevents the meat from becoming overly salty.
The Final Touch of Freshness
A handful of fresh cilantro and a squeeze of lime at the finish are essential. They cut through the richness and add a bright, herbal note that lingers on the palate. Don’t be afraid to garnish the plate with extra cilantro for a pop of color and freshness.
Creative Twists and Variations
This recipe is a playground. Here are some of my favorite ways to switch things up:
Smoky Chipotle Variant
Add a teaspoon of chipotle in adobo sauce to the sauce base for a smoky, mildly spicy kick. The chipotle pairs beautifully with the beer, creating a deep, smoky undertone. This version is perfect for those who enjoy a little heat but still want the dish to remain approachable.
Coconut Cream Finish
Stir in a splash of coconut milk at the end to lend a creamy, tropical twist. The coconut’s subtle sweetness balances the acidity of the lime and the heat of the jalapeño. This variation is ideal for a brunch or a festive gathering.
Vegetarian Adaptation
Replace the beef with hearty mushrooms or jackfruit for a plant‑based version. The mushrooms provide a meaty texture, while jackfruit offers a shredded, beef‑like consistency. Adjust the seasoning to keep the flavor profile intact.
Breakfast Boost
Serve the braised beef over a bed of scrambled eggs for a hearty breakfast. The savory sauce complements the eggs, creating a filling and flavorful morning meal. Sprinkle with fresh chives for an extra burst of green.
Gluten‑Free Twist
Use a gluten‑free flour blend to thicken the sauce if you prefer a thicker consistency. The gluten‑free flour will maintain the sauce’s viscosity without altering the taste. This adjustment makes the dish suitable for those with gluten sensitivities.
Spicy Garlic Explosion
Increase the garlic to 6 cloves and add a pinch of cayenne pepper for a bold, spicy flavor. The extra garlic enhances the umami base, while the cayenne adds a subtle heat that lingers. This version is ideal for adventurous palates.
Storing and Bringing It Back to Life
Fridge Storage
Cool the braised beef completely before transferring it to an airtight container. Store it in the refrigerator for up to three days. The sauce will thicken slightly as it cools, but it remains flavorful and tender.
Freezer Friendly
For longer storage, freeze the dish in freezer‑safe containers for up to two months. Thaw overnight in the refrigerator before reheating. The meat remains juicy, and the sauce retains its richness.
Best Reheating Method
Reheat the dish gently over low heat, adding a splash of water or broth if the sauce has thickened too much. Stir frequently to prevent scorching. A small amount of water will help the sauce steam back to its original silky consistency.