Picture this: a frantic Saturday night, a kitchen full of flour dust, a half‑cooked pizza on the counter, and a sudden craving for something sweet that feels like a hug in miniature form. I was scrambling to salvage the evening when a friend texted, “I’ve got the best mini cannoli cups recipe, try it!” I laughed, but the curiosity was real, and the idea of bite‑size, hand‑held pastries that could double as party favors or a quick dessert was irresistible. The moment my oven preheated, the scent of melted butter and vanilla filled the air, and the anticipation of that first bite—crisp on the outside, creamy on the inside—was almost too good to ignore. I had to test it, and I didn’t want to keep this secret to myself. I dare you to taste this and not go back for seconds. The result was a revelation: a perfect marriage of crunchy shell and silky filling that feels like a carnival of textures in your mouth.
If you’ve ever tried a homemade cannoli that ended up soggy or too sweet, you’ll know the frustration of trying to get the balance just right. That’s why this version is a game‑changer. I’ve distilled the technique into a few key moves that lock in crispness, prevent the filling from leaking, and add a subtle hint of citrus that brightens every bite. The result is hands down the best version you’ll ever make at home, and it’s so simple you’ll wonder how you survived before. The secret? A touch of lemon zest in the dough, a quick chill before baking, and a light dusting of powdered sugar that gives the cups a delicate finish.
What makes this recipe stand out is the way it respects the classic cannoli while injecting modern convenience. I’ve pre‑measured the dough into mini cups that bake evenly, so you never have to worry about uneven edges or collapsed shells. The filling is a silky ricotta mixture with dark chocolate chips that melt just enough to keep the texture airy. And the best part? It’s a crowd‑pleaser that looks as good as it tastes—perfect for potlucks, brunches, or a decadent after‑dinner treat.
Let me walk you through every single step—by the end, you’ll wonder how you ever made it any other way. I’ll share the trick that keeps the shells crisp, the hack that saves time, and a few insider tips that will make your cannoli cups look professionally plated. Get ready for a recipe that’s as fun to make as it is to eat.
What Makes This Version Stand Out
- Texture: The shells are thin and crisp, yet sturdy enough to hold the filling without cracking. The dough’s slight oil content keeps the edges from becoming too brittle.
- Flavor: A subtle citrus note from lemon zest lifts the richness of ricotta and chocolate, creating a balanced taste profile that isn’t overly sweet.
- Time Efficiency: Pre‑portioning the dough into mini cups cuts prep time dramatically, making it ideal for last‑minute parties.
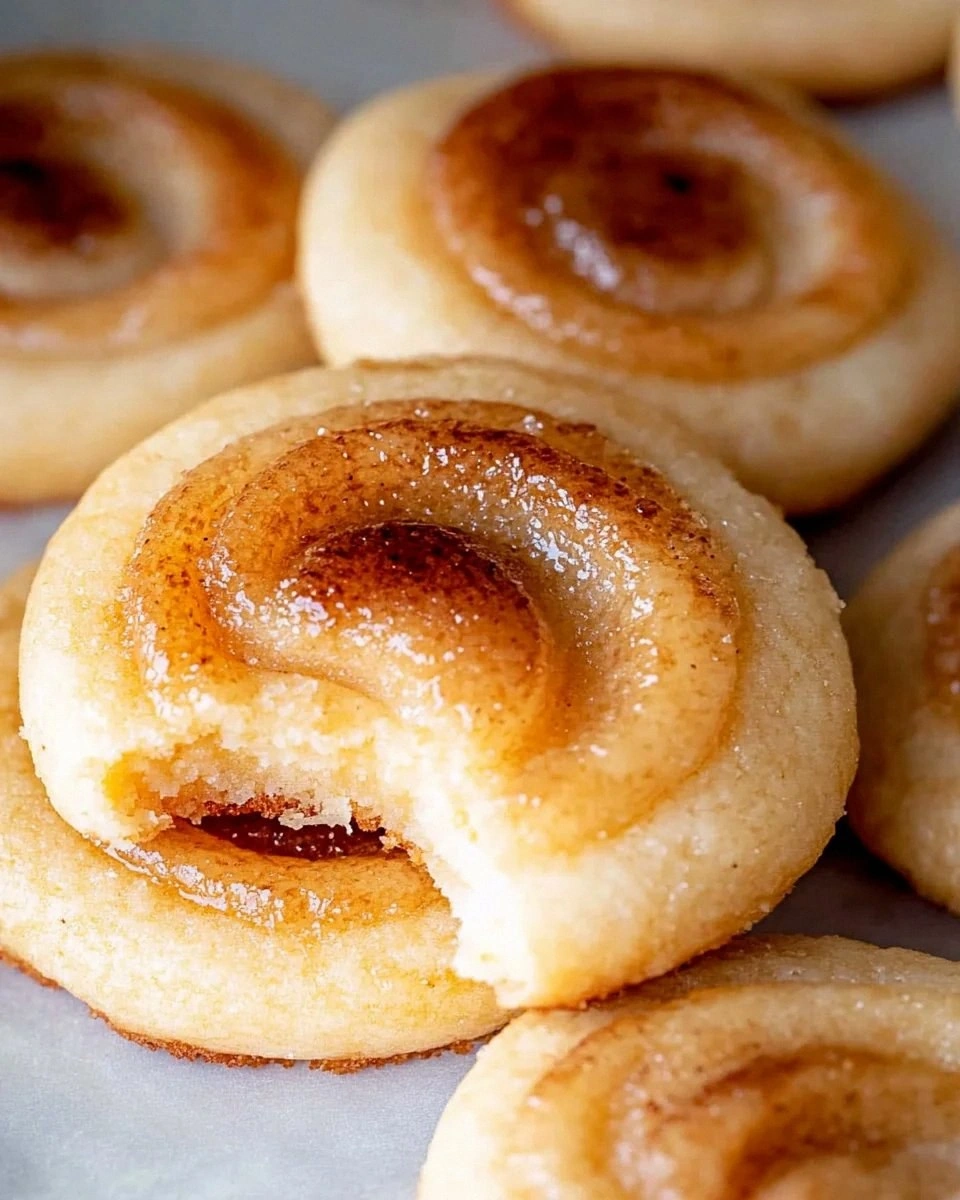
- Visual Appeal: The finished cups are a golden‑brown swirl, dusted with powdered sugar that gives them a polished, dessert‑shop look.
- Make‑Ahead Friendly: You can bake the shells and fill them just before serving, or keep them in the fridge for a few hours and reheat for a fresh crunch.
- Ingredient Quality: Using high‑quality ricotta and dark chocolate chips elevates the flavor, making each bite a luxurious experience.
- Versatility: The recipe can be adapted to vegan or gluten‑free versions with a few simple swaps.
Alright, let’s break down exactly what goes into this masterpiece…
Inside the Ingredient List
The Flavor Base
The foundation of any great dessert is its flavor base, and for these mini cannoli cups, that starts with the dough. Flour, baking powder, salt, and a touch of sugar create a neutral canvas that allows the filling’s richness to shine. The butter adds a buttery aroma that’s instantly comforting. If you skip the butter, the shells will feel dry and flat, losing that signature crunch.
The Texture Crew
Texture is everything in a cannoli, and that’s why we use a combination of ricotta, powdered sugar, and a splash of vanilla. Ricotta gives the filling a silky smoothness, while powdered sugar balances the acidity of lemon zest. Vanilla enhances the overall flavor without overpowering the chocolate chips. Skipping any of these will result in a filling that’s either too thick or too watery.
The Unexpected Star
Dark chocolate chips are the unexpected star that adds depth and a subtle bitterness. They melt into the ricotta just enough to create tiny pockets of flavor, giving each bite a surprise. If you prefer a milder taste, you can swap them for milk chocolate or omit them entirely, but the experience will feel incomplete.
The Final Flourish
The final flourish—powdered sugar for dusting, chopped pistachios for crunch, and a pinch of nutmeg for warmth—brings everything together. Each element adds a layer of complexity, making the cups feel like a well‑crafted dessert rather than a simple snack. If you skip the nuts, you’ll miss the delightful crunch that contrasts the creamy filling.
Everything's prepped? Good. Let's get into the real action…

The Method — Step by Step
- Step 1: Prepare the Dough. In a medium bowl, whisk together 2 cups all‑purpose flour, 1 tsp baking powder, 1/2 tsp salt, and 1/4 cup granulated sugar. Add 1/4 cup cold unsalted butter cut into cubes. Using your fingertips, rub the butter into the dry ingredients until the mixture resembles coarse crumbs. This is where the dough gets its flaky texture.
- Step 2: Bind the Dough. In a separate bowl, beat 1 egg and 1 tsp vanilla extract until frothy. Pour the wet mixture into the dry ingredients and stir until a soft dough forms. The dough should be pliable but not sticky; if it feels dry, add a teaspoon of water.
- Step 3: Chill the Dough. Wrap the dough in plastic wrap and refrigerate for at least 15 minutes. Chilling firms the butter, preventing the shells from becoming too greasy during baking.
- Step 4: Shape the Cups. On a lightly floured surface, roll the dough into a thin sheet about 1/8 inch thick. Cut out circles using a 3-inch cookie cutter. Press each circle into the bottom and up the sides of a mini muffin tin, forming a cup shape. Press firmly to ensure the dough adheres to the tin.
- Step 5: Bake the Shells. Preheat the oven to 375°F (190°C). Brush the dough cups lightly with a beaten egg to help them brown. Bake for 12–15 minutes, or until golden brown and crisp. Let them cool in the tin for 5 minutes before transferring to a wire rack.
- Step 6: Prepare the Filling. In a bowl, combine 1 cup ricotta, 1/4 cup powdered sugar, 1 tsp lemon zest, and 1/2 cup dark chocolate chips. Mix until smooth. The filling should be thick enough to hold its shape but creamy enough to spread easily.
- Step 7: Assemble the Cups. Spoon a generous amount of filling into each shell using a small spoon or piping bag. If you’re filling them ahead of time, cover tightly with plastic wrap and refrigerate. They’ll stay fresh for up to 24 hours.
- Step 8: Finish with Garnish. Dust the filled cups with powdered sugar and sprinkle chopped pistachios for crunch. For a final touch, add a light drizzle of honey or a dusting of ground nutmeg.
- Step 9: Serve Immediately. These mini cannoli cups are best enjoyed fresh, but if you need to reheat, place them in a preheated oven at 350°F (175°C) for 3–4 minutes to restore crispness.
That's it — you did it. But hold on, I've got a few more tricks that'll take this to another level. From adjusting the filling consistency to perfecting the dusting technique, these final touches will elevate your mini cannoli cups from homemade to unforgettable.
Insider Tricks for Flawless Results
The Temperature Rule Nobody Follows
Many people bake at a single temperature, but the secret to a perfect shell is a two‑stage bake. Start at 375°F for 10 minutes, then lower to 350°F for the last 5 minutes. This ensures the exterior crisps up without over‑browning the interior.
Why Your Nose Knows Best
The aroma of freshly baked dough is a reliable indicator of doneness. When the scent hits a warm, buttery note, the shells are ready. If you’re unsure, tap the bottom of a cup; it should feel hollow and not doughy.
The 5‑Minute Rest That Changes Everything
After baking, let the shells rest in the tin for exactly 5 minutes. This short rest allows the steam to escape, preventing sogginess when you fill them. It also makes the shells easier to remove from the tin without tearing.
Fill with Precision
Use a piping bag fitted with a small round tip to fill the cups. This gives you control over the amount and keeps the filling neat. If you’re filling them ahead of time, place a small paper towel over each cup to absorb excess moisture.
Dusting Delight
A fine sift of powdered sugar is the key to a professional finish. Use a small sieve to dust lightly, ensuring the sugar doesn’t clump and cover the chocolate chips. A light drizzle of honey adds a glossy sheen that makes the cups irresistible.
Creative Twists and Variations
This recipe is a playground. Here are some of my favorite ways to switch things up:
Nutty Crunch
Swap pistachios for chopped toasted almonds or walnuts. The nutty flavor pairs beautifully with the ricotta and adds an extra textural element.
Chocolate‑Covered Delight
Dip the finished cups in melted dark chocolate and chill until set. This gives a glossy finish and an intense chocolate experience.
Vegan Version
Use coconut milk ricotta and a flax egg (1 tbsp ground flaxseed + 3 tbsp water) instead of a chicken egg. Replace butter with coconut oil for a plant‑based crust.
Gluten‑Free Twist
Use a gluten‑free all‑purpose flour blend and a pinch of xanthan gum to maintain structure. The dough will behave similarly, producing crisp shells.
Spiced Citrus
Add a teaspoon of orange zest and a pinch of ground ginger to the dough. The citrus and spice create a fresh, aromatic flavor profile.
Savory Surprise
Omit the sugar from the filling and add a tablespoon of grated parmesan. Pair with a drizzle of balsamic glaze for a savory cannoli cup that’s perfect for appetizers.
Storing and Bringing It Back to Life
Fridge Storage
Store filled cups in an airtight container in the refrigerator for up to 24 hours. Keep the container on a plate to catch any drips, and avoid stacking cups to preserve crispness.
Freezer Friendly
Wrap each cup individually in parchment paper, then place them in a freezer bag. They’ll keep for up to 2 weeks. Thaw in the refrigerator before serving.
Best Reheating Method
Preheat the oven to 350°F (175°C). Place the cups on a baking sheet and heat for 3–4 minutes. Add a tiny splash of water to the filling before reheating; it steams back to perfection, keeping the ricotta moist.