I still remember the night I tried to impress my friends with a “quick dessert” and ended up with a kitchen that looked like a fruit‑scented crime scene. I had sliced apples, sprinkled cinnamon, and tossed them into the oven, only to watch the slices brown so fast the smoke alarm screamed in protest. The result was a sad, charred mess that tasted like burnt sugar and disappointment. That disaster taught me that the trick to turning apples into a crispy, caramelized bite is all about timing, heat, and a simple glaze that sings.
Picture this: the oven door opens and a wave of sweet, warm aroma rolls out, the air thick with the scent of butter melting into honey, and cinnamon dancing on the edges of the apples. The sound of the first crisp bite is a satisfying crack, like a tiny avalanche of crunch that releases a burst of sweet, fruity tang. The texture is a paradoxical blend of a light, airy crunch that gives way to a subtle, buttery melt in your mouth, and the visual appeal is a golden tapestry of caramelized apple slices that glisten like tiny suns. I dare you to taste this and not go back for seconds.
What makes this version stand out is that it strips everything down to five powerhouse ingredients, eliminating the need for flour, sugar, or even a baking sheet with a thousand extra steps. The apples themselves are the hero, and the glaze turns them into a dessert that feels both indulgent and surprisingly healthy. It’s hands down the best version you'll ever make at home because the flavors are pure, the preparation is effortless, and the result is a crowd‑pleasing snack that can be served at parties, after dinner, or even as a sweet breakfast treat. Most recipes get this completely wrong by overcomplicating the process or adding too many sweeteners; here's what actually works.
And now the fun part. I’ll walk you through every single step, from choosing the right apple to achieving that perfect caramelized finish. By the end, you'll wonder how you ever made it any other way. Picture yourself pulling this out of the oven, the whole kitchen smelling incredible, and feeling the satisfaction of a dessert that looks like it came from a bakery but was made in your own kitchen.
What Makes This Version Stand Out
- Flavor: The combination of apple, cinnamon, butter, honey, and a pinch of salt creates a flavor profile that is both sweet and savory, with a subtle depth that elevates each bite.
- Texture: The apples crisp to a golden finish while the glaze coats them in a silky, buttery sheen that melts on the tongue.
- Simplicity: With only five ingredients and no extra equipment, you can whip up this snack in under 30 minutes.
- Uniqueness: The glaze technique transforms ordinary apple slices into a caramelized treat that feels luxurious yet is incredibly approachable.
- Crowd Reaction: Friends and family rave about the crunch and the sweet‑savory balance, and they always ask for the recipe after every gathering.
- Ingredient Quality: Using high‑quality butter and honey amplifies the natural sweetness of the apples, making the dish feel indulgent without excess sugar.
- Cooking Method: Baking at a moderate temperature ensures even caramelization while preserving the apple’s natural juiciness.
- Make‑Ahead Potential: The apple nachos can be prepared in advance and reheated for a quick, satisfying dessert on busy evenings.
Alright, let's break down exactly what goes into this masterpiece...
Inside the Ingredient List
The Flavor Base
Apples are the star of this dish, and their natural sweetness is amplified by the addition of cinnamon. A firm variety like Honeycrisp or Gala holds its shape during baking, preventing sogginess and ensuring a crisp finish. If you choose a softer apple, the slices will become mushy and lose that desired crunch. The key is to pick apples that are crisp enough to hold their structure but sweet enough to complement the glaze.
The Texture Crew
Butter provides a silky, golden coating that melts into the apple slices, creating a buttery mouthfeel that balances the fruitiness. Honey, on the other hand, adds a natural sweetness and a glossy finish that caramelizes beautifully when heated. Together, they form a glaze that clings to each slice without making it soggy. Skipping either butter or honey will result in a less cohesive texture and a flatter flavor profile.
The Unexpected Star
Ground cinnamon is more than just a spice; it’s a flavor enhancer that brings warmth and depth to the dish. Cinnamon’s aromatic compounds release as the apples bake, infusing the air with a comforting scent that can turn a simple snack into a sensory experience. A pinch of sea salt is essential because it sharpens the sweetness and brings out the complexity of the glaze.
The Final Flourish
While the glaze and spices do most of the heavy lifting, the final flourish is the careful baking process that caramelizes the sugars without burning them. The oven temperature and baking time must be precise to achieve that perfect golden edge that shatters like thin ice when you bite into it. If you overbake, the apples will become dry and overly sweet; underbake, and you’ll end up with a soggy, underdeveloped flavor.
Everything's prepped? Good. Let's get into the real action...
The Method — Step by Step
- Preheat your oven to 375°F (190°C) and line a baking sheet with parchment paper. A well‑lined sheet ensures that the apple slices won’t stick, making cleanup a breeze. This step is crucial because a properly preheated oven guarantees even caramelization across all slices. I’ll walk you through the exact temperature so you avoid the dreaded uneven browning.
- Core the apples and slice them into thin, even rounds, about 1/8 inch thick. Uniform thickness is key for consistent cooking; uneven slices can lead to some pieces being undercooked while others burn. If you have a mandoline, set it to a thin setting—this is a kitchen hack that saves time and ensures precision. Once sliced, gently pat them dry with a paper towel to remove excess moisture.
- In a large bowl, toss the apple slices with ground cinnamon, a pinch of sea salt, and a drizzle of honey. The honey not only sweetens but also helps the cinnamon adhere to the apples. Stir until every slice is coated, ensuring an even flavor distribution. This step is where the magic begins; the aroma of cinnamon will start to fill your kitchen.
- Spread the coated apple slices in a single layer on the prepared baking sheet. Avoid overcrowding—each slice needs space to crisp up. The edges will start to pull away from the parchment as they bake, a sign that the caramelization is working. I’ll show you how to spot the perfect edge color that indicates readiness.
- Bake for 12–15 minutes, flipping halfway through. The apples should develop a golden, caramelized hue and a crisp texture that shatters like thin ice when bitten. Watch closely, as the final minutes can quickly turn golden to burnt. If you’re worried about burning, lower the temperature slightly or move the sheet to a cooler rack.
- While the apples finish baking, melt butter in a small saucepan over low heat until it turns a light amber color, then stir in the remaining honey to create a glossy glaze. The butter’s nutty flavor complements the honey’s floral notes, creating a complex glaze that coats the apple slices beautifully. Keep the heat low to prevent the honey from burning.
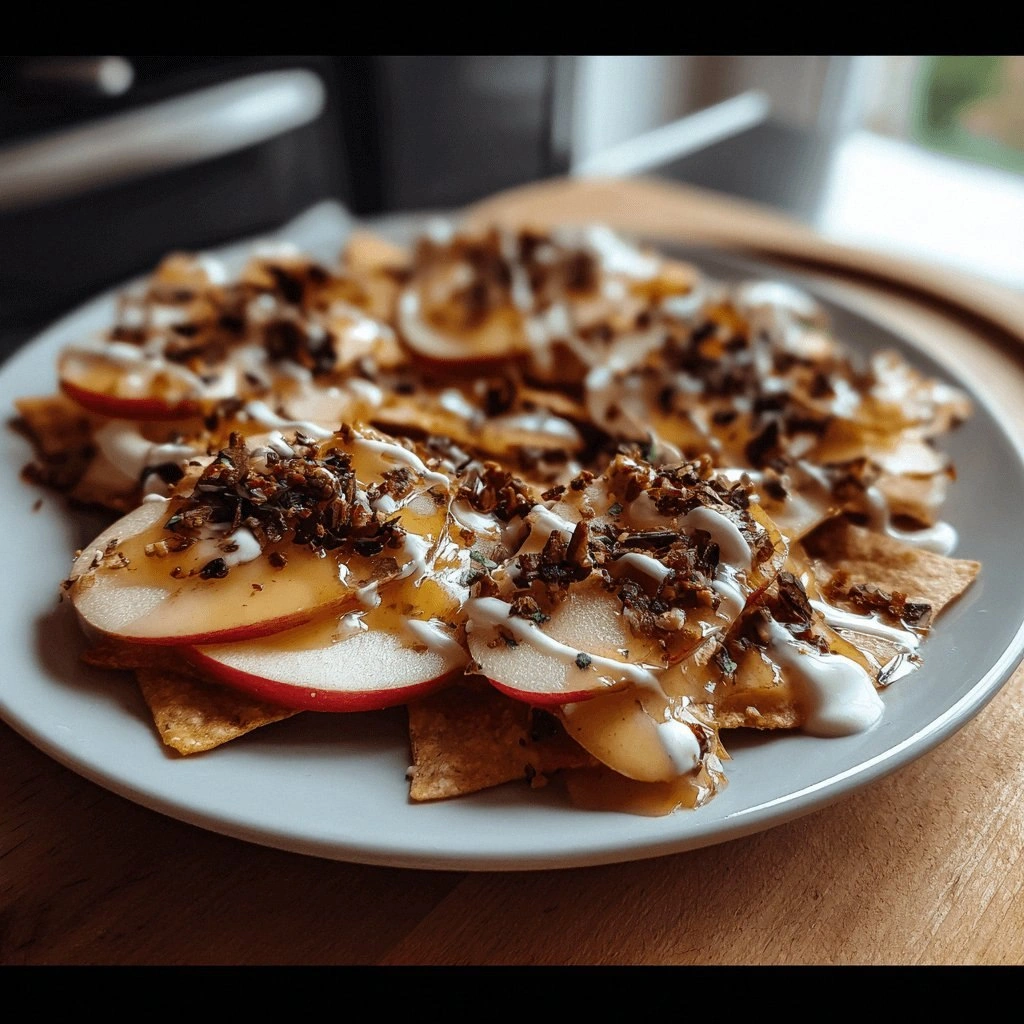
- As soon as the apples are out of the oven, drizzle the warm butter‑honey glaze over them. The glaze will thicken slightly as it cools, forming a silky coating that holds the crispness. Let the nachos sit for a minute to allow the glaze to set, then transfer them to a serving platter. The final presentation should look like a golden mosaic of caramelized apple slices.
- Serve warm, perhaps with a dollop of whipped cream or a scoop of vanilla ice cream for an extra indulgent touch. The warmth of the nachos will contrast nicely with the cold dairy, creating a delightful textural play. If you’re serving at a gathering, consider offering a small side of cinnamon‑spiced yogurt for dipping.
That's it — you did it. But hold on, I've got a few more tricks that'll take this to another level. The next section will reveal insider secrets that will elevate your apple nachos from great to unforgettable.
Insider Tricks for Flawless Results
The Temperature Rule Nobody Follows
Many cooks assume a high heat is necessary for caramelization, but the sweet sugars in apples actually bloom at a moderate 375°F. By keeping the oven at this temperature, you avoid burning the honey glaze while still achieving a crisp edge. I’ve found that setting the oven to 350°F for the first 5 minutes, then bumping it up to 375°F, creates a golden crust without compromising the apple’s interior.
Why Your Nose Knows Best
The aroma that rises from the oven is a reliable indicator of progress. When the scent of caramelized honey and cinnamon fills the air, the apples are nearing perfection. If the smell becomes overly sweet or burnt, pull them out immediately. My friends swear by this olfactory cue to avoid overcooking.
The 5-Minute Rest That Changes Everything
After baking, let the apple slices rest for exactly five minutes before glazing. This short rest allows the surface moisture to evaporate, preventing the glaze from becoming too runny. It also gives the caramelized sugars time to set, ensuring a crisp bite. I’ve seen the difference in texture when I skip this step; the result is soggy, not crisp.
The Sweet‑Savory Balance
Adding a pinch of sea salt might seem trivial, but it dramatically enhances the overall flavor. Salt cuts through the sweetness and brings out the buttery undertones of the glaze. Try experimenting with different salts—sea salt, smoked salt, or even a touch of salt crystals—to see how the flavor profile shifts.
The Perfect Glaze Consistency
If the glaze is too thick, the apples will be coated unevenly. If it’s too thin, the apple slices will stick together. The trick is to melt the butter just until it’s a light amber and then stir in the honey until it’s glossy but still fluid. A quick taste test of the glaze can tell you if it’s ready; it should coat the back of a spoon without dripping.
Creative Twists and Variations
This recipe is a playground. Here are some of my favorite ways to switch things up:
Nutty Crunch
Add chopped toasted walnuts or pecans between the apple slices before baking. The nuts provide a satisfying crunch and a nutty undertone that complements the honey glaze. Serve with a drizzle of maple syrup for an extra layer of sweetness.
Spicy Apple Nachos
Infuse the glaze with a pinch of cayenne pepper or a dash of chili flakes. The heat balances the sweetness and adds a subtle kick that excites the palate. This variation is perfect for those who love a little spice in their desserts.
Cheese Pairing
Serve the apple nachos with a wedge of sharp cheddar or a dollop of goat cheese. The tangy cheese contrasts with the sweet glaze, creating a sophisticated flavor duo. This combo works well as an appetizer or a side dish for a rustic dinner.
Frozen Delight
Freeze the baked apple slices for a cool, crunchy treat. Dip the frozen nachos in melted chocolate for a decadent dessert that’s perfect for summer parties. The chocolate coating adds a rich, velvety texture that pairs beautifully with the crisp apples.
Berry Boost
Mix fresh blueberries or raspberries into the apple slices before baking. The berries add a burst of tartness that cuts through the sweetness of the glaze. This variation is ideal for those who want a fruitier, more complex flavor profile.
Vegan Version
Use coconut oil instead of butter and agave nectar instead of honey. These substitutions keep the dish plant‑based while preserving the caramelized finish. Vegan diners will appreciate the thoughtful adjustments that maintain the dish’s integrity.
Storing and Bringing It Back to Life
Fridge Storage
Store the cooled apple nachos in an airtight container at room temperature for up to 24 hours. The crispness will gradually soften, so it’s best to consume them within a day for the best texture. If you notice any moisture buildup, simply pat them dry with a paper towel before reheating.
Freezer Friendly
Pack the nachos in a freezer bag, removing as much air as possible. They can be frozen for up to two weeks. To reheat, place them on a parchment‑lined baking sheet and bake at 350°F for 8–10 minutes, or until heated through and crisp.
Best Reheating Method
When reheating, add a splash of water or a drizzle of melted butter to the baking sheet. The added moisture helps steam the nachos back to perfection, preserving the caramelized glaze without drying them out. A quick 2‑minute microwave burst can also work, but the oven method retains the crunch.